Get to know the IDE
Code Bela, right in your browser.
Bela comes with a built-in IDE that you can access from your computer’s browser. As well as being a convenient coding environment, the IDE is also packed with tools for learning, exploring, experimenting, and developing interactive projects with sensors and sound.
This article provides a brief overview of the IDE and its features, and shows you how to run a project.
Table of contents
Accessing the Bela IDE
When your Bela system is connected to your computer and booted up, you can access the Bela IDE from a web browser (we recommend Chrome). You can load the IDE by simply navigating to http://bela.local.
The Bela IDE is not online - it lives on your Bela system, and you access it through the local USB network. To find out more about how your browser, Bela and the IDE relate to one another, check out Where the IDE lives and how it works.
The four parts of the Bela IDE
This section provides a short overview of the IDE’s four main parts. As well as a place to write, compile and run code, the Bela IDE also has a lot of great tools for development. You can take an in-depth look at the IDE in the IDE section of this site.
The Bela IDE has four distinct parts: the Editor, the Toolbar, the Console, and the Tabs.
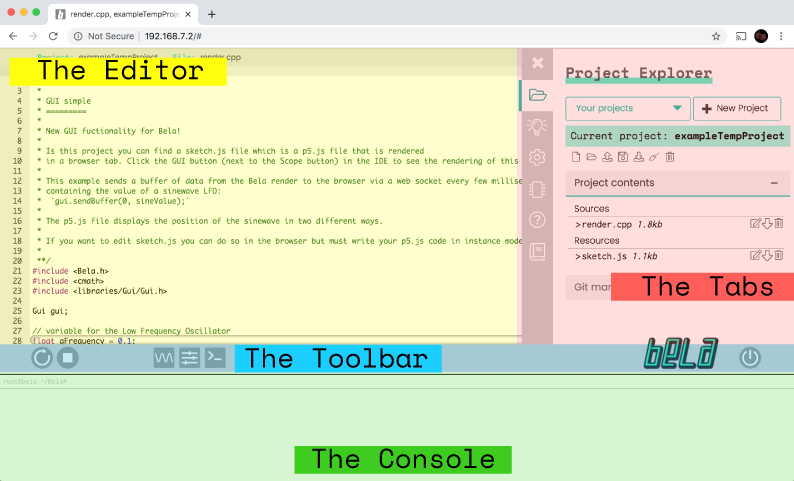
The Editor
The Editor is the IDE’s main window (highlighted above in yellow). This is where you type your code.
If your project contains a Pure Data patch and you open it, you’ll see your patch visualised here when you view it. You can’t edit it here - editing Pure Data patches is done in the Pure Data GUI on your computer. Check out this section the Bela-Pure Data Workflow to learn more.
The Toolbar
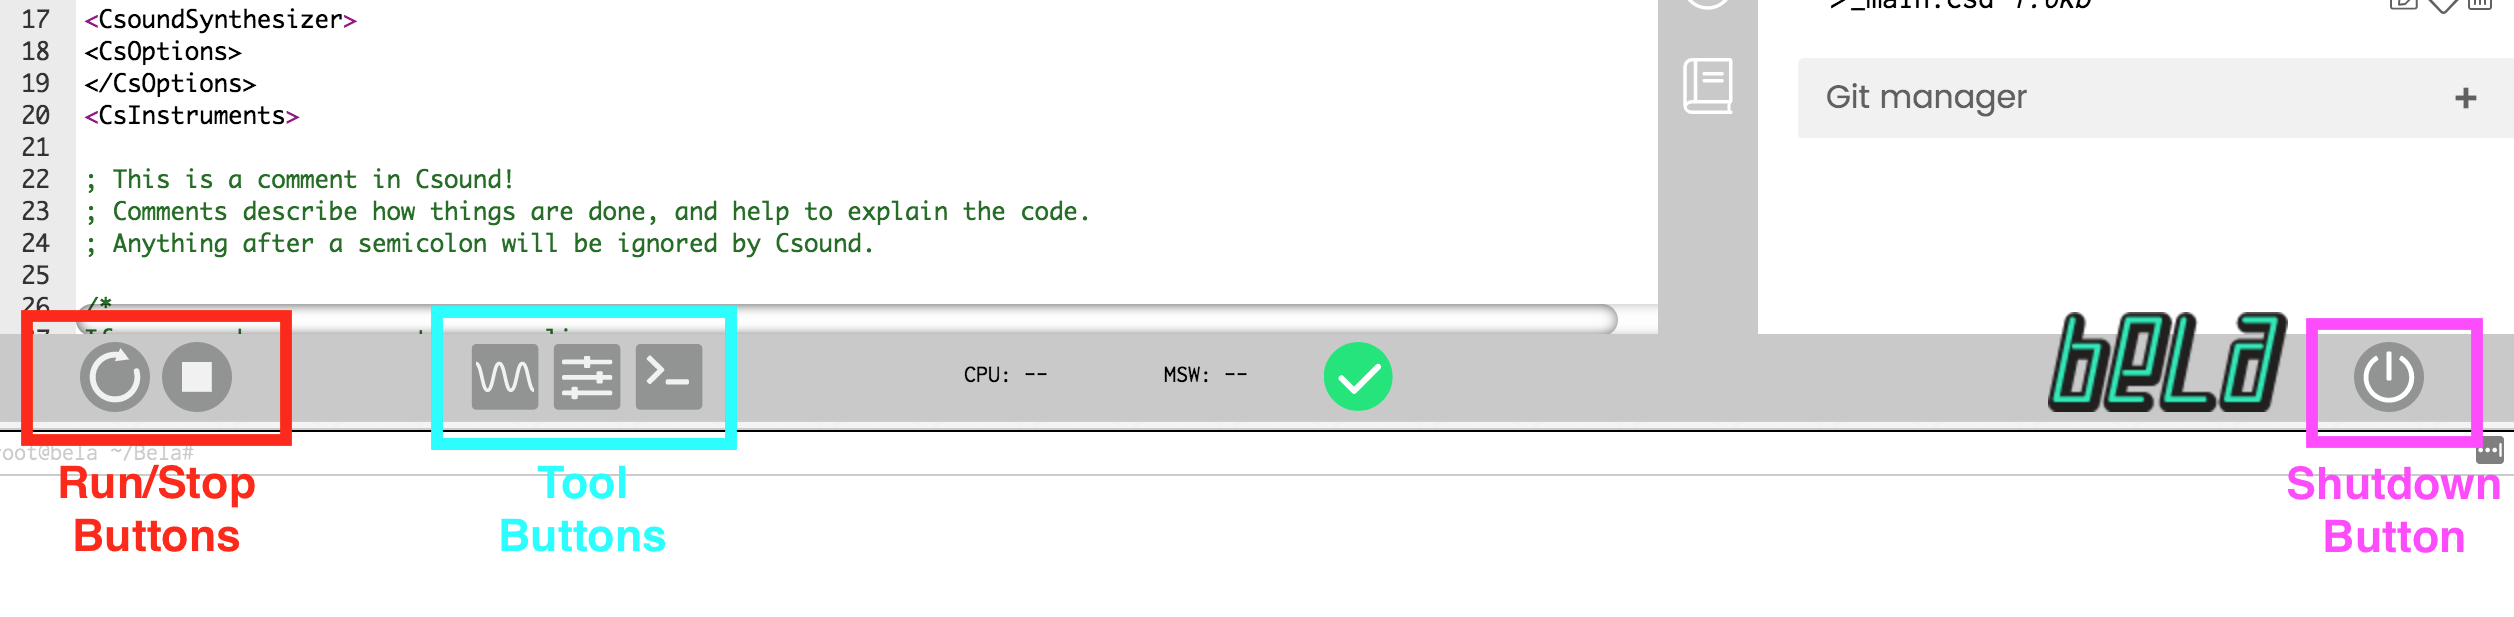
The toolbar has the most important tools, arranged near the bottom of the interface so they’re always available and easy to find (highlighted above in blue). There are three groups of buttons:
- On the far left are the round
RunandStopbuttons.Runcompiles and runs your project. When you clickStopyour project stops executing. - The next three square buttons are important tools triggers. From left to right: The
Scopebutton (which launches the in-browser oscilloscope), theGUIbutton (which launches the GUI visualiser), and theClear consolebutton (which clears the output from the console). - All the way on the far right is the
Shutdownbutton. Click this to shut down your Bela system safely and gracefully.
The Console
The Console is the field along the bottom of the IDE (highlighted above in green). The console provides text output as your project runs. These might be generated by Bela (such as error messages), but you can also generate output yourself by printing to the console.
The Console is also interactive! If you'd like to execute commands on the Bela command line, you can do so by typing directly into the console on the bottom line.
The Tabs
The Tabs are the control centre (highlighted above in pink). The Tabs are a set of menus that contain a huge amount of resources, tools, and ways to interact with your Bela system.
Click on the top X to expand and collapse the tabs. There’s a lot of great tools in the tabs and you can read about each of these menus in the IDE section.
In this Get Started Guide we’ll use two tabs:
-
The Project Explorer , which gives you access to all your projects and files. As well as being able to switch between projects, you can also see all the files in the project that’s currently open, as well as create, upload, download, rename and delete these files.
-
The Examples tab comes pre-loaded with dozens of examples in C++, Pure Data, Supercolllider and Csound, demonstrating everything from the basics to synthesis. When you click on an example it opens in the Editor, and you can edit the code and save it as a project to your board. This is a great way to get started learning Bela techniques.
Build and run your first project
To start off, we’ll build and run Bela’s most basic project:
1. Find the Minimal example
Click on the Examples tab, and under Fundamentals, click on Minimal. This opens the Minimal example in your editor. (It’s a blank project, and has just the structure of Bela code.)
2. Build and run it
Click the Run button in the toolbar. This builds the project and runs it. (If this is the first time you’ve built a Bela project this might take a minute, as the system needs to compile all the libraries and dependencies. This will only happen once.)
You will see the Run button turn green and spin. You won’t hear any sound with this example yet, because it’s just a blank project!
That’s all there is to building and running a project in the Bela IDE.
What’s next
Now that you know where the Project Explorer and Examples tabs are and can build and run projects, we’ll run a project with some audio output - the Hello World of audio programming.