Settings and sensitivity
Trill sensors are designed to be integrated into your interactive digital projects. This means that you might want to customise some aspects of Trill sensors and their behaviour to make them perfect for your physical build, as well as your particular software setup.
This article describes how to customise Trill sensors to obtain exactly the results you want, by manipulating both the software settings and the sensors themsevles.
Table of contents
- Modes of operation
- Scan settings
- Customising the
prescalersetting - Using the EVT (event) pin
- Useful links
Modes of operation
Trill sensors can operate in four modes: CENTROID, DIFF, RAW and BASELINE. By default, Trill Bar, Square, Hex and Ring operate in CENTROID mode, and Trill Craft operates in DIFF mode. Each Trill sensor uses between 26 and 30 capacitive sensing channels. When scanned, Trill sensors report the sensed amount of capacitive activation for each channel.
The baseline capacitance value is automatically reset when a Trill sensor is intitialised. Therefore, it's important not to touch Trill sensors when the program starts, or the baseline values may be computed incorrectly and behave abnormally.
CENTROID mode
CENTROID is the default mode for Trill Bar, Square, Hex and Ring. This mode processes the readings of the individual capacitive sensing channels taking into account the geometry of the circuit board, in order to compute the position and size of several discrete touch points.
The size of a touch is a measure of the total activation measured on the sensing channels that contribute to the touch. The amount of activation for a touch of a given size is dependent on the geometry of the device.
Differential readings are used as the starting point to compute touches when a sensor operates in CENTROID mode.
RAW mode
RAW mode returns the raw capacitance reading from the capacitive sensing channels of the device.
BASELINE mode
The baseline capacitance value for each channel is used as a reference value when the device is in DIFF or CENTROID mode.
A baseline reading is calculated when your program starts and the Trill::setup() method initialises your sensor. The current readings from the capacitive channels are sampled, updating the baseline value stored on the Trill sensor itself. This baseline reading is automatically calculated when your program starts, but can be updated at any time by calling the Trill::updateBaseline() method.
By setting a Trill sensor to BASELINE mode, you can read these stored baseline values. Because this mode only provides the baseline value, this method is mostly used for debugging and prototyping purposes.
If you use the updateBaseline() method, remember that nothing should be touching the Trill sensor when the baseline value is calculated or it may not be correct. Incorrect baseline readings can cause Trill sensors to behave abnormally.
Auto-calibration over time
Overtime there is also an automatic calibration of the baseline which runs as part of the firmware. The baseline gets gradually updated, averaging over multiple readings. The data sheet of the cypress IC says the following about the auto calibrate routine.
Baselines must be updated after sensor scan to ignore low frequency changes in the sensor data caused by environment changes such as temperature from sensor status decision.
This is desirable behaviour in most cases but if you want a work around you can do the following. Run in RAW and store a copy of the calibration data locally, then minus this from the RAW readings to compute the DIFF data manually. However you may encounter some low frequency shift in readings over time.
DIFF mode
DIFF is the most useful mode for Trill Craft. In DIFF mode the baseline reading calculated at startup is subtracted from the raw channel reading, providing a uniform scale across all channels.

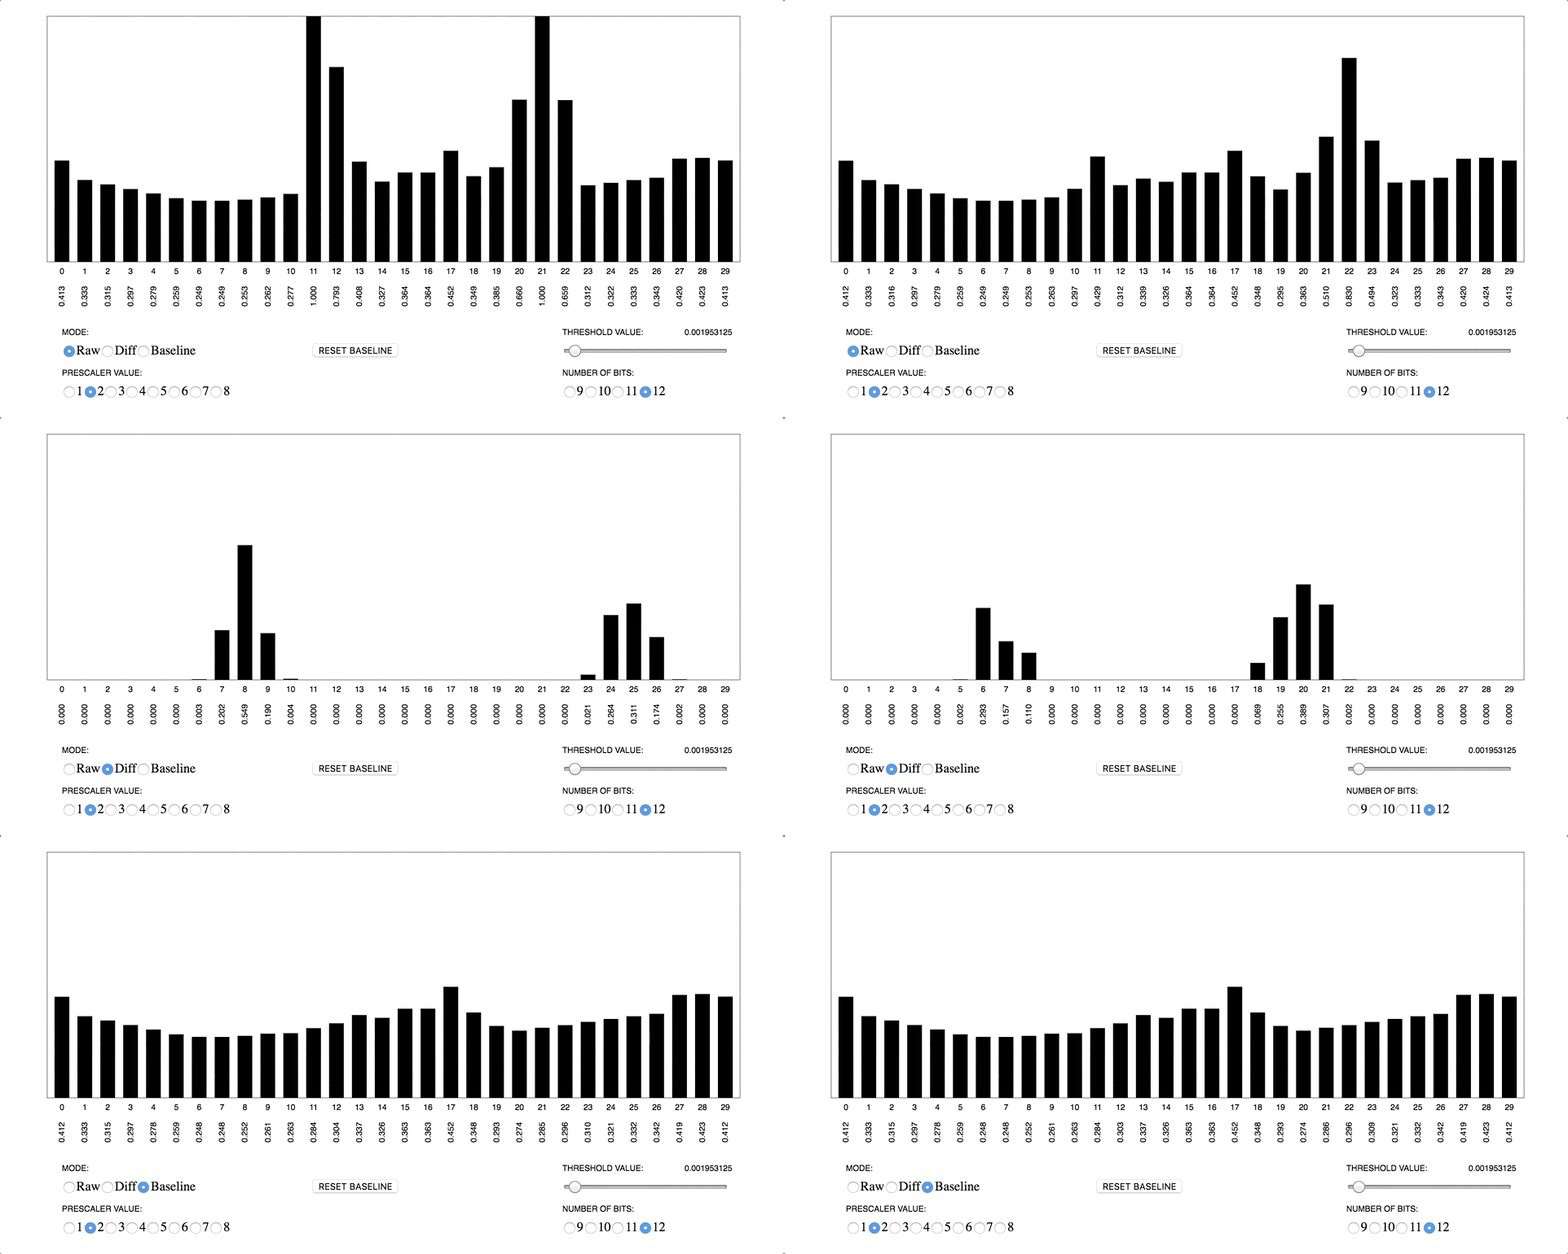
This graphic shows the effects of changing between three different modes: RAW, DIFF and BASELINE.
Changing the mode of operation
When you initialise Trill sensor by calling the setup() or begin() method, the device is set to the default mode for the sensor type. You can change the active mode with a call to setMode(). Here’s an example of setting a Trill Bar sensor in RAW mode:
	if(touchSensor.setup(1, Trill::BAR) != 0) {
		// ... handle initialisation error
	}
	// set the sensor to RAW mode
	touchSensor.setMode(Trill::RAW);
Scan settings
You can configure the scan settings to optimize the scanning properties of Trill sensors. You may want to do this to adjust some metrics, such as signal-to-noise ratio, position accuracy, noise rejection, headroom, scan rate. The concepts mentioned here are explained in-depth at pages 14-17 of the Cypress manual.
Speed and resolution
Speed and resolution are important factors, and can be customised using the setScanSettings(uint8_t speed, uint8_t num_bits) method, like this:
	if(touchSensor.setup(1, Trill::BAR) != 0) {
		fprintf(stderr, "Unable to initialise touch sensor\n");
		return false;
	}
	touchSensor.setScanSettings(0, 16); // 0 = ultra fast speed, 16 = 16 bit resolution
	//...
The first argument of setScanSettings() is speed, which refers to how fast the sensor is scanned. There are 4 possible levels of speed:
- 0 (ultra fast),
- 1 (fast),
- 2 (normal),
- 3 (slow)
The second argument of setScanSettings() is resolution, which refers to the number of bits used to represent a reading value (also known as bit depth). Resolution can range from 9-16 bits. Increasing resolution increases sensitivity, signal-to-noise ratio, and noise immunity, but increases the time needed for each scan.
For most projects you will want to play with these values to find the best combination of high resolution and sufficiently fast sensing for your project’s needs.
The following chart details the scan length (in microseconds) for each combination of speed and resolution settings for each of the capacitive sensing channels on your device (to calculate the overall scan time for your Trill sensor, find the scan time relative to your settings and multiply it by the number of channels on your device - 26 for Trill Bar, 30 for all other Trill sensors):
| Resolution (bits) | Ultra Fast | Fast | Normal | Slow |
|---|---|---|---|---|
| 9 | 57us | 78us | 125us | 205us |
| 10 | 78us | 125us | 205us | 380us |
| 11 | 125us | 205us | 380us | 720us |
| 12 | 205us | 380us | 720us | 1400us |
| 13 | 380us | 720us | 1400us | 2800us |
| 14 | 720us | 1400us | 2800us | 5600us |
| 15 | 1400us | 2800us | 5600us | 11000us |
| 16 | 2800us | 5600us | 11000us | 22000us |
1 microsecond = 0.000001 seconds, or one millionth of a second.
Setting a noise threshold
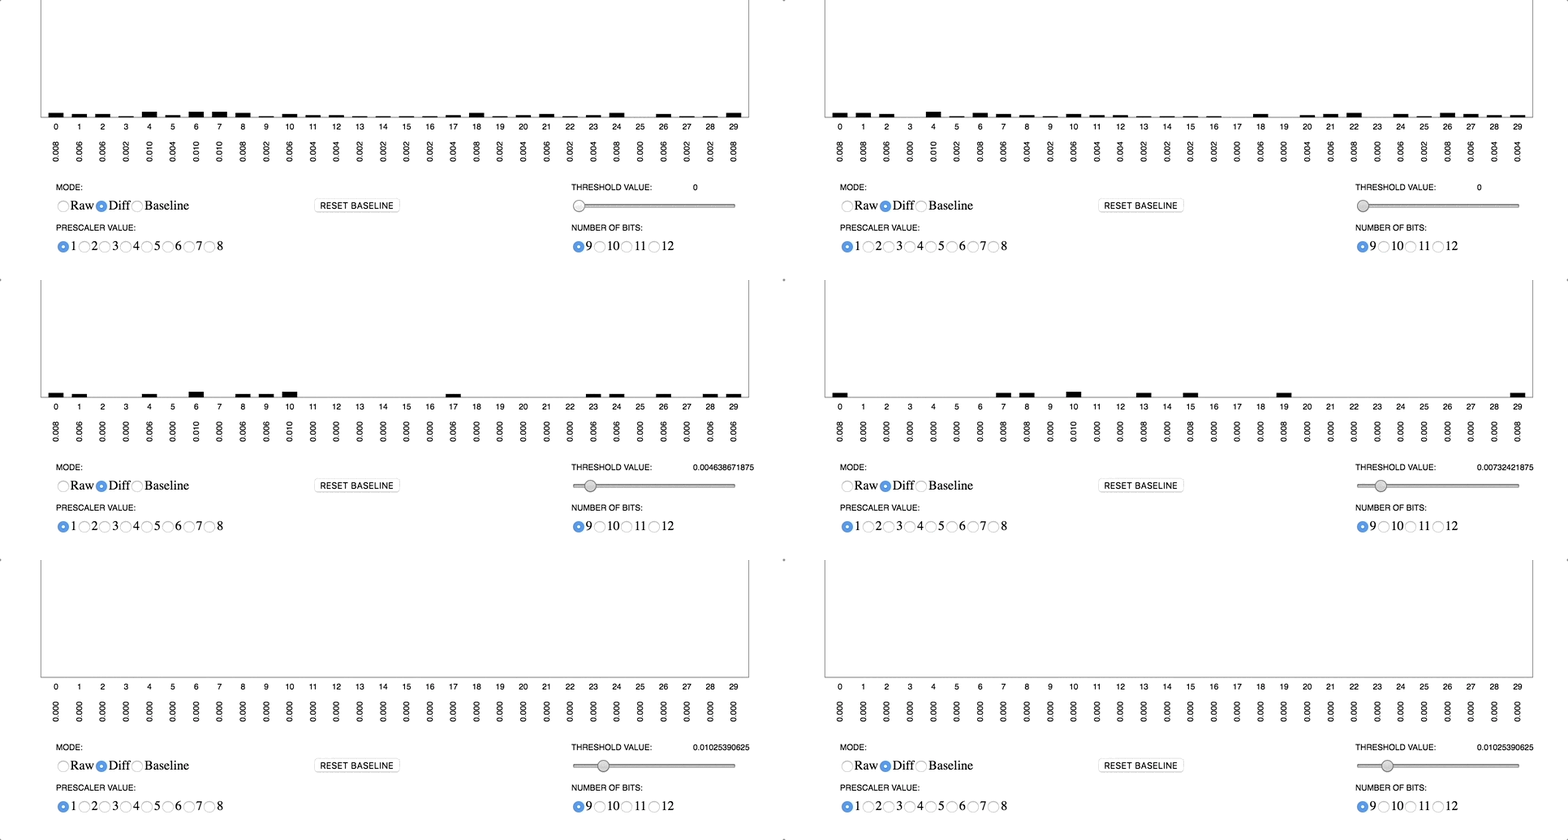
The threshold setting applies to the DIFF and CENTROID modes of operation. It is particularly useful for creating a custom interface with Trill Craft.
Customising this setting allows us to reject noise caused by material variation. Custom-built conductive interfaces can be built out of a huge range of materials that vary in conductive properties, and these interfaces can pick up a lot of stray noise due to material properties, the size of your conductive surface, even electrical devices in the room. If we don’t reject this noise the Trill sensor will pick up and report data all the time, even when it’s not being touched.

In order to reject this noise, we can set a custom threshold setting. This is a number above which the touch data must rise in order for it to be registered as a touch. This allows us to exclude any incidental noise, and makes the sensor much more reliable.
The threshold value can be set as a floating point number between 0.0 and 0.0625 in the Linux and Bela API, or as an integer value between 0 and 255 in the Arduino API. All readings from individual capacitive channels smaller than the specified threshold value will then be rounded down to 0. Set a custom threshold value after you intialise the Trill sensor, like this:
	if(touchSensor.setup(1, Trill::BAR) != 0) {
		fprintf(stderr, "Unable to initialise touch sensor\n");
		return false;
	}
	touchSensor.setNoiseThreshold(0.05);
	//...
Customising the prescaler setting
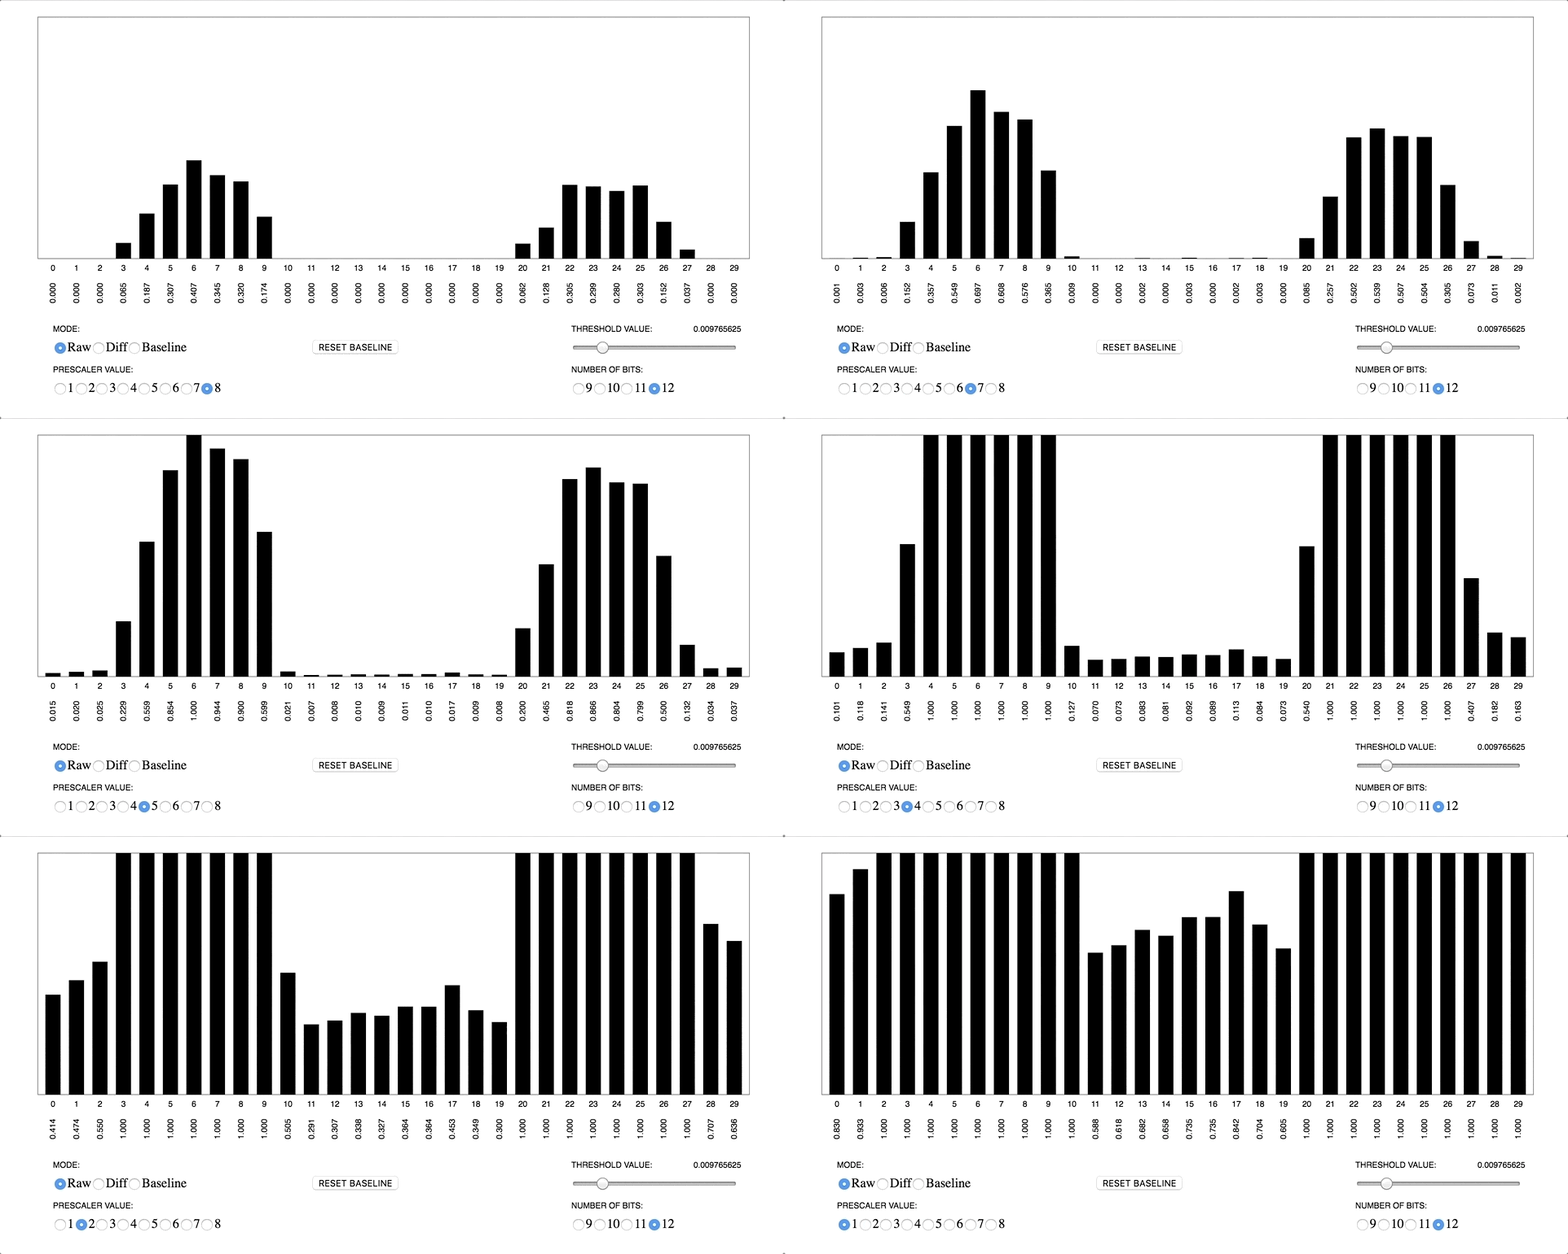
The prescaler setting describes the Trill sensor’s sensitivity. Technically, this value is a divider for the clock on the Cypress chip, and determines the length of time the chip charges the sensor pads before taking a reading.

The value of the prescaler is an integer from 1-8. There are two rules of thumb for determining a prescaler value:
- A higher value prescaler produces a longer charging time, and is better for more resistive materials and larger conductive objects connected.
- A lower value prescaler is better for proximity sensing
Set a custom prescaler value after you set up your Trill sensor, like this:
	if(touchSensor.setup(1, Trill::BAR) != 0) {
		fprintf(stderr, "Unable to initialise touch sensor\n");
		return false;
	}
	touchSensor.setPrescaler(2);
If you're experimenting with custom modes, prescaler and threshold values, we recommend using the Trill general-settings example in the
Examples tab in the Bela IDE to determine your optimal settings.
Using the EVT (event) pin
Each Trill sensor has an event pin, labelled EVT. On Trill Bar, Square, Hex and Ring the EVT pin is connected to a surface solder pad. On Trill Craft the EVT pin is one of the 6 pins on the short end of the sensor.
The EVT pin is automatically pulsed every time a touch is registered on the sensor. This could, for example, be connected to an LED to see whether touches are being detected and to rule out problems with hardware. Most usefully, the EVT pin can be used to detect whether any activity is present on the sensing surface without the need for a full I2C transaction.
For example, if you have several Trill sensors connected to the I2C bus and you want to reduce the amount of I2C transactions performed, you could use the EVT pin to trigger your board to scan the bus, so it doesn’t scan unncecessarily. The EVT pulses when a touch is detected, but in order to detect any touch a scan of the Trill sensor channels is required - and by default this only happens after each I2C transaction.
However, you can change this default behaviour and set your Trill sensors to scan automatically at a specified interval using the setAutoScanInterval() method. Call the Trill::setAutoScanInterval() when you set up your Trill sensor and pass it a non-zero value (we recommend 1, which is the fastest rate).
Connect the EVT pin to a digital input on your board and monitor it as your project runs. If it’s pulsed, a touch is detected, and you can then scan your I2C bus to get the touch data.
Useful links
Trill sensors use the capacitive sensing interface of the Cypress CY8C20XX6A/S microcontroller. In-depth information on how Cypress’s capacitive sensing works is in the Cypress manual.
The C++ Trill library is fully documented in the Bela code docs.
