Bela Gem Get Started Guide
Get up and running with Bela Gem.
Bela Gem is our next‑generation embedded audio and sensor platform built around PocketBeagle 2 (PB2). This guide walks you from an unopened box to running your first project.
To learn how to port your old Bela projects to the new family of boards, see the migration guide.
Table of contents
- What You’ll Need
- Flash the microSD Card
- Assemble Your Hardware
- Power Up & First Boot
- Open the Bela IDE
- Take a Quick Tour of the IDE
- Run Your First Example
- Updating the System (Optional but Recommended)
- Next Steps
What You’ll Need
Before you begin:
- PocketBeagle 2 (PB2) — the single‑board computer that powers Bela Gem
- Bela Gem Stereo or Bela Gem Multi board
- microSD card (≥16GB, Class 10 recommended)
- USB‑C cable to connect the PB2 to your computer
- A computer with a web browser
- Optional: headphones, speakers, audio cables, sensors
If you bought a pre‑flashed SD card from Bela, you can skip ahead to Assemble Your Hardware
Flash the microSD Card
The Bela Gem system runs from the microSD card. If your board did not come with a pre-flashed SD card, you will need to flash the official Bela Gem image before first boot.
Recommended Tool: Beagleboard Imager
Beagleboard Imaging Utility works on macOS, Windows, and Linux and handles compressed images automatically. It can be installed following the instructions here.
- Insert your microSD card into your computer (use an adapter if needed)
- Open the Beagleboard Imaging Utility
- On the first page, select “PocketBeagle 2” from the board list and press “Next”
- On the following page, select “Bela Gem PocketBeagle 2” from the image list and press “Next”
- On the following page, select the SD card destination from the destination list. If you cannot recognise your SD card in the list, try removing it and plugging it back in, observing the changes in the list as you do so. Make sure you select the correct destination, noting that devices other than SD cards may be listed here, e.g.: USB drives. All data on the selected destination drive will be erased. Once you have selected the destination, review its details and press “Next”.
- On the following page, leave all settings as default and click on “Next”
- On the following page, you are presented with a summary of your selections. Confirm by pressing “Write”. You may be prompted to enter your password when the flashing starts.
- Wait for the imager to finish writing the card.
Flashing will erase all data on the microSD card.
Advanced Users
You can alternatively flash the image using any other flashing tool you are familiar with (e.g.: dd, bmap or Balena Etcher). Download the zipped image from this page. For more information, see Managing your SD card.
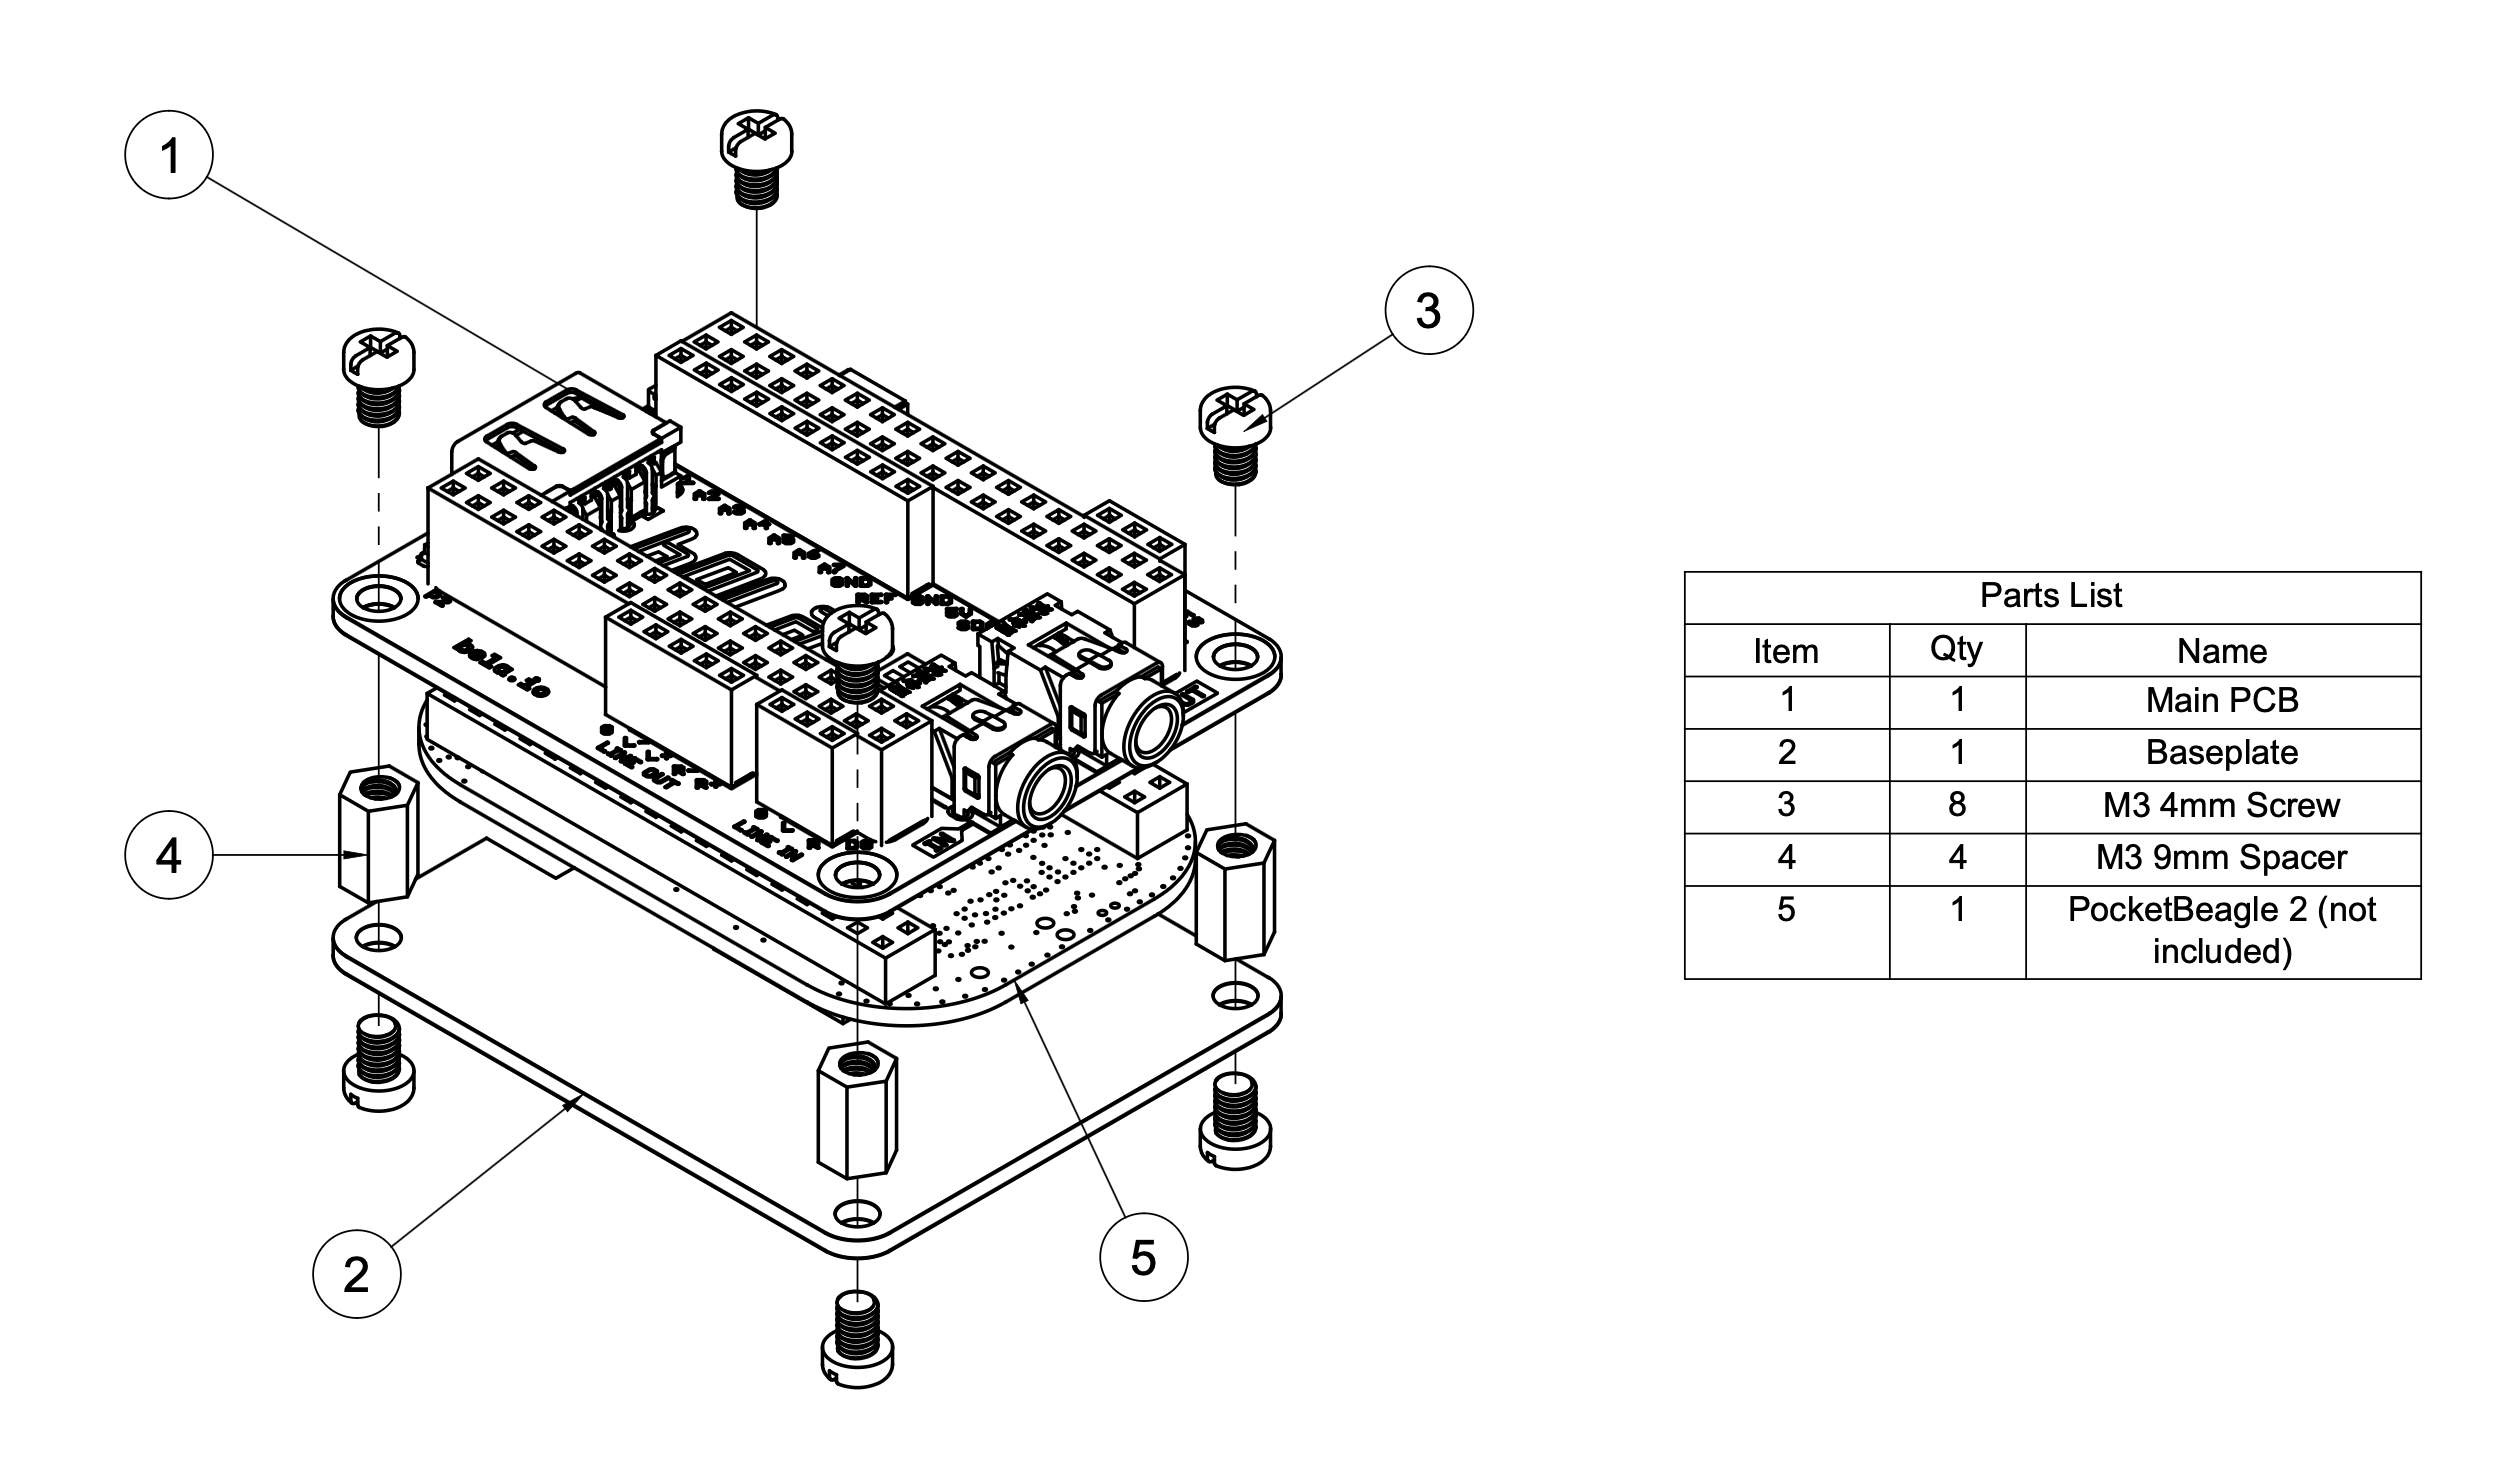
Assemble Your Hardware
- Insert the flashed microSD card into the PB2’s microSD slot.
- Carefully mount PocketBeagle 2 onto the Bela Gem headers, ensuring the pins and sockets are aligned. The USB port on the Bela Gem should be above the USB-C port on the PB2. Apply an even, firm pressure until the pins of the Bela Gem are fully inserted into the sockets on the PB2.
- Attach the baseplate and spacers, securing with the supplied screws.
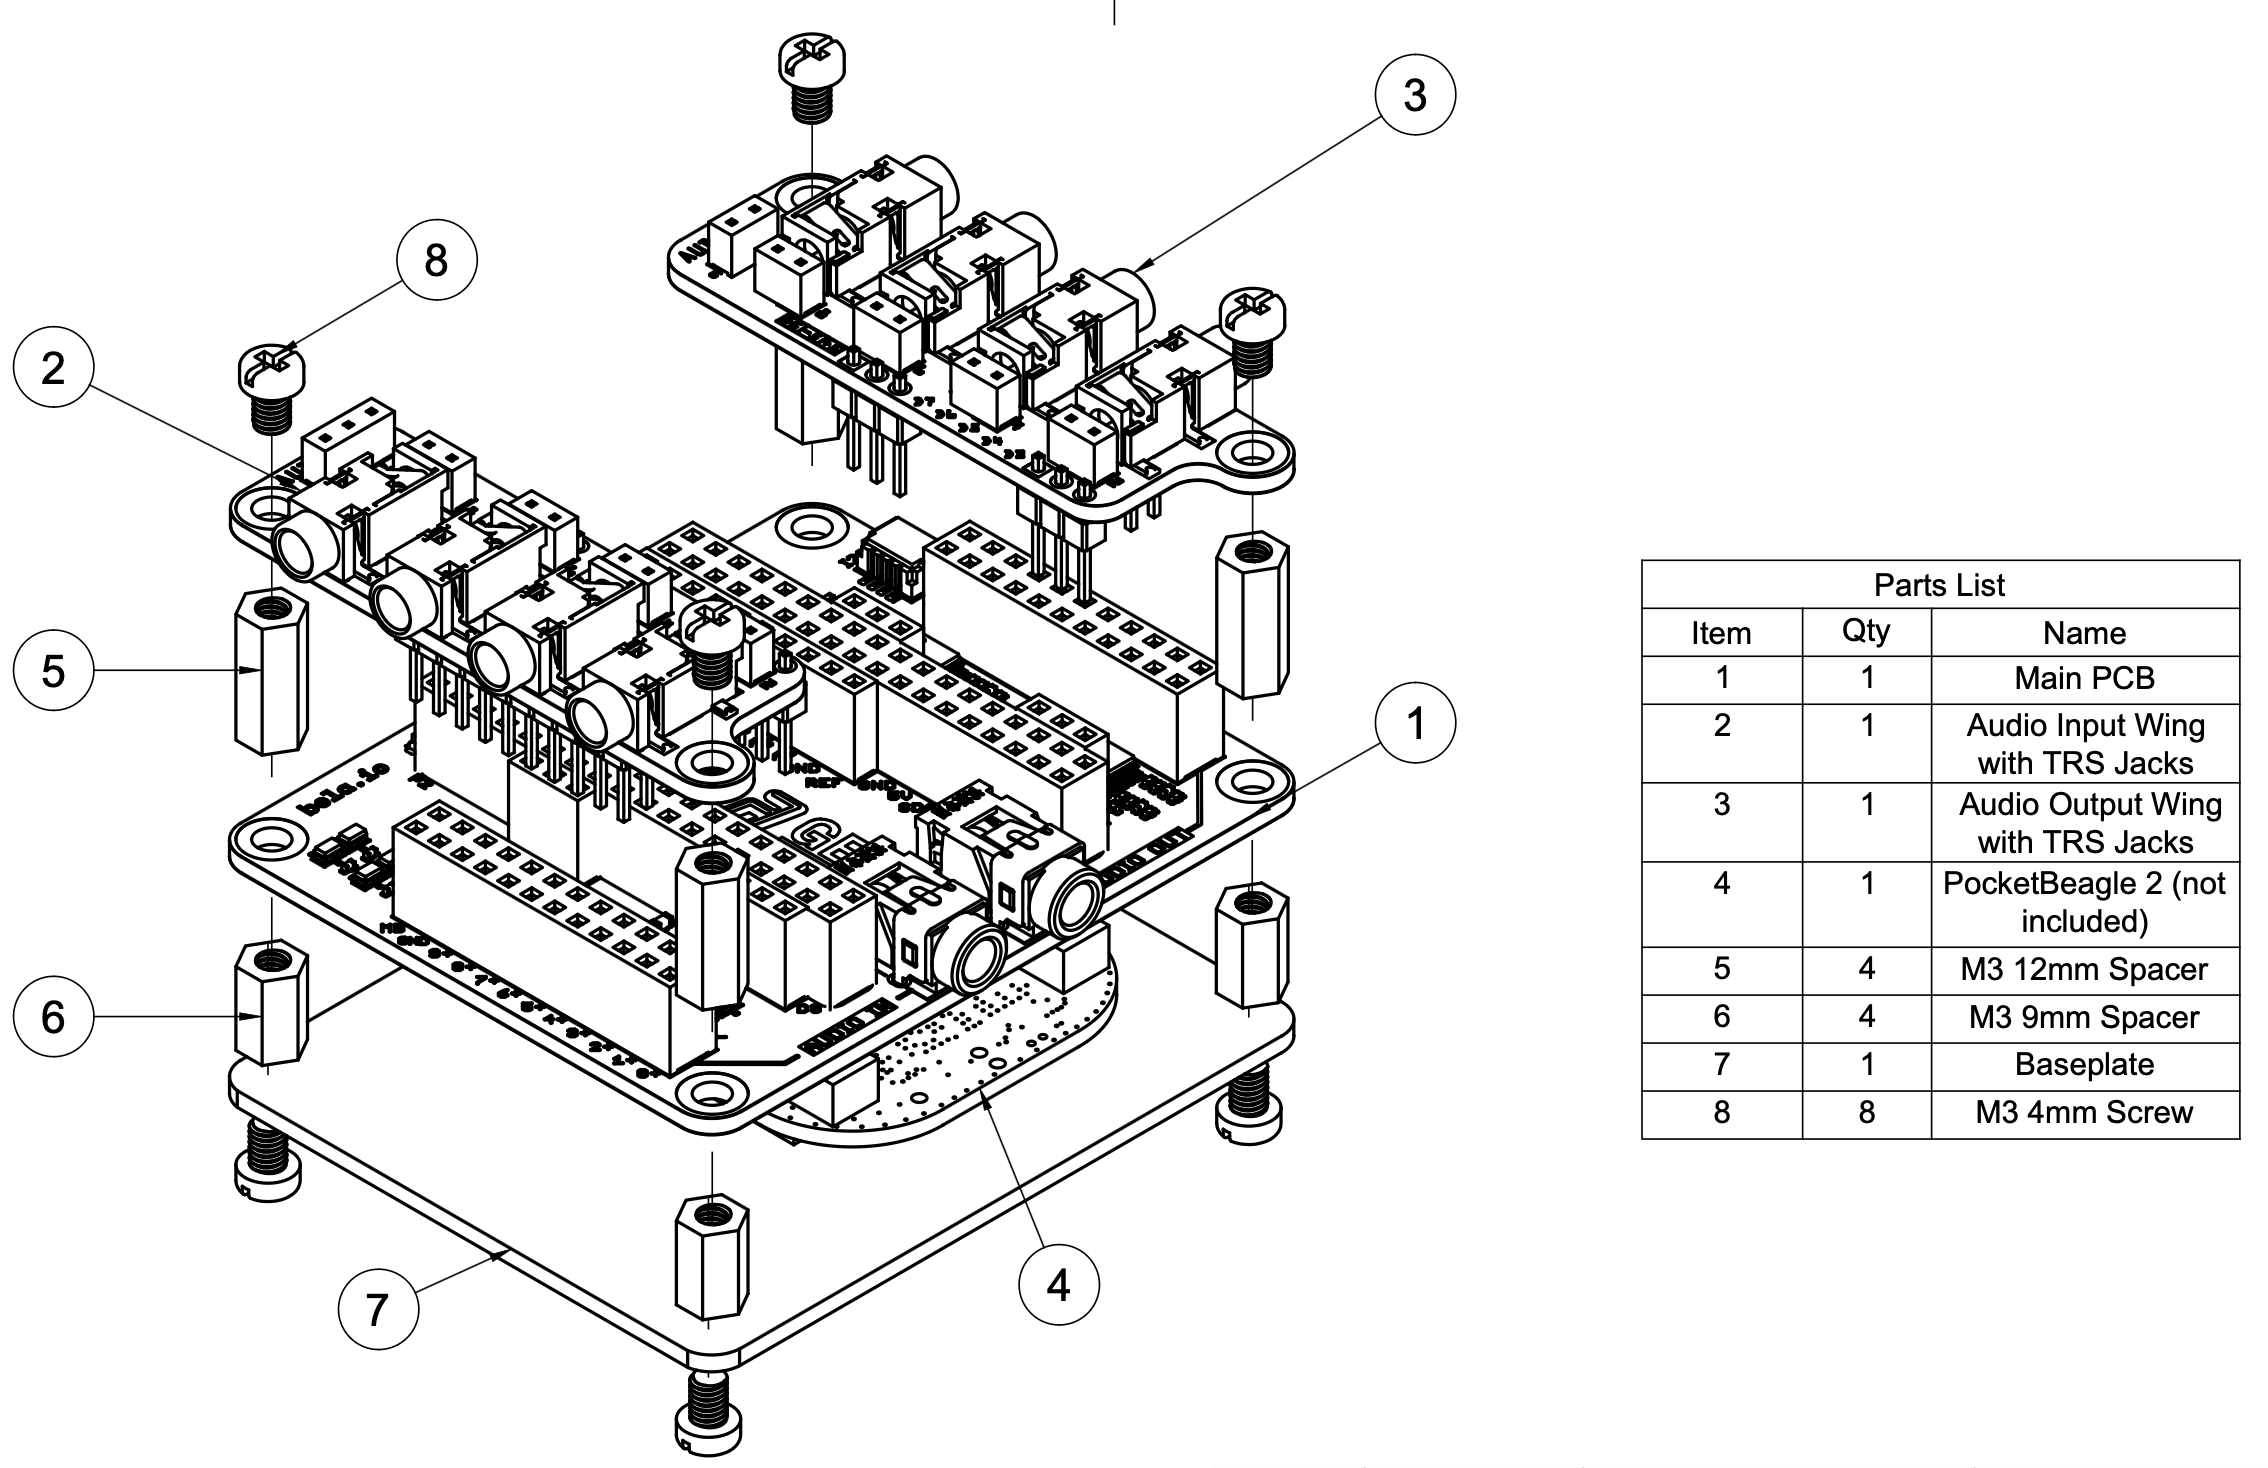
Bela Gem Multi
- Attach the wing PCBs which provide 3.5mm TRS jacks for each audio input and output channel.
Power Up & First Boot
- Connect the USB‑C cable from the PocketBeagle 2 to your computer.
- When powered over USB‑C, PocketBeagle 2 will boot automatically from the microSD card. After 5-10 seconds, you should see the power light on the Bela Gem change from solid blue to blinking in a heartbeat pattern.
- The board takes about 90 seconds for the first boot, at which point you can proceed to the next step.
Open the Bela IDE
Bela Gem hosts the Bela IDE directly on the board, no internet connection needed. You can use your browser to connect directly with the board.
- Open your web browser
- Go to: http://bela.local (important: use http, not https)
You should see the Bela IDE interface — this is where you write, build, and run projects on the board.
If bela.local doesn’t Load
Try one of the following:
- Wait another 30-60 seconds and refresh
- Make sure the blue power LED on the P2 side is blinking, not solid (blinking means the PB2 is running)
- Try http://192.168.7.2 in your browser
- If using Windows 10 try http://192.168.6.2
- Check that your USB-C cable supports data, not just power
Take a Quick Tour of the IDE
Inside the IDE you’ll find:
- Editor — write code and documentation
- Run / Stop buttons — compile and run on the board
- Console — system messages and program output
- Side tab — examples, project files, settings, pin diagram and board tools
- Signal monitor and oscilloscope - monitor the status of I/O pins and signals on your board
For a full walkthrough, see: Get to know the IDE
Run Your First Example
The best place to start is the project which is automatically opened when you boot the board, basic.
Click Run to start the project. The Run button will turn yellow and spin while the code compiles. The first time you boot the board, or after an update, it may take several minutes to compile the Bela core. Thereafter, compiling projects will be much quicker.
When finished, the button will turn green and spin quickly, and you will see the LED next to the button on the Bela Gem begin to blink quickly. If you have headphones or speakers connected, you should hear audio output from Bela Gem.
Check out the readme.md file for more information.
Updating the System (Optional but Recommended)
Once you’re up and running, check for system and IDE updates:
- Open the Settings tab in the side menu of the IDE
- Look for Other System Functions options
- Click Check for Updates
- Follow the on‑screen instructions
- If you encounter issues, solve or report them here.
This keeps your board aligned with the latest examples, documentation, and performance improvements.
With an internet connection on your computer you can update the board automatically, no need to download anything, just follow the steps in the IDE.
Next Steps
Now that Bela Gem is running, you can:
- Try our Hello World tutorials for audio and sensors.
- Port your old Bela projects to Gem: migration guide.
- Explore different languages:
- C++ (low‑level, maximum performance)
- Pure Data (visual patching)
- SuperCollider (live coding)
- Csound (elder music programming)
- Max RNBO
- Learn how to: