Audio Expander
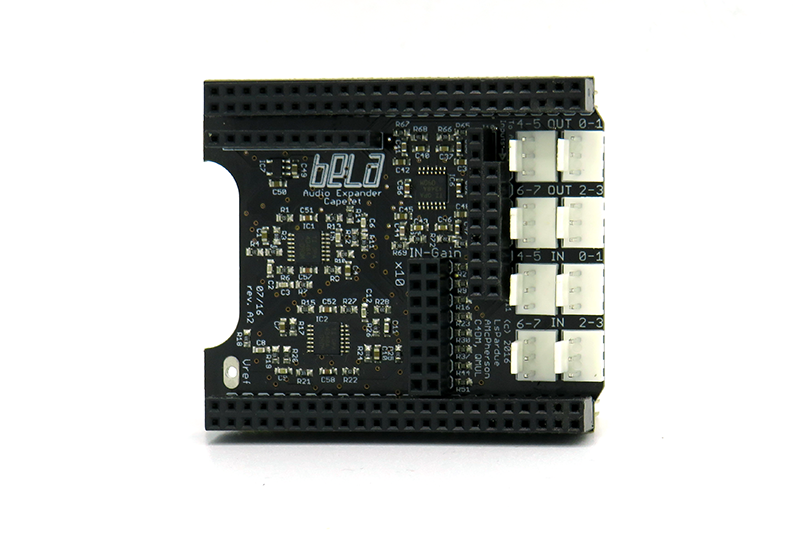
The Audio Expander is a an add-on for Bela that converts the 8 16-bit analog inputs and outputs to extra audio channels.
Please note that the Audio Expander is only compatible with Bela, and is not compatible with Bela Mini.
Table of contents
About the Audio Expander
The Audio Expander is an add-on accessory for Bela that converts the 8 16-bit analog inputs and outputs into extra audio channels. It provides lowpass filtering to reduce noise and aliasing, and DC blocking and level-shifting to allow audio signals to be sent and received from the analog I/Os.
Tech Specs
Audio input channels:
- 2nd-order lowpass filters, f3 = 17.6kHz
- Gain: 1.6 (default, no jumper set) or 16 (jumper set)
- DC offset at Bela analog in: 1.8V
- Max input range: +/- 1.12V (jumper not set) or +/- 112mV (jumper set)
Audio output channels:
- 2nd-order lowpass filters, f3 = 17.8kHz
- Gain: 1.0
- Max output range: +/- 2.3V (assuming analogWriteOnce() range 0 to 0.92)
- The filters are implemented with OPA4348 opamps
Comparing the Audio Expander audio to Bela audio
The Audio Expander uses Bela’s DC-coupled ADC and DAC. These parts are of a different type to the sigma-delta codec used for the main Bela audio I/O. See this blog post for details of the different types of converter and their performance for audio.
There are also some nonlinear effects on the DAC related to limited slew rate and differing settling time for different DAC codes, which add a bit of nonlinear distortion to the DAC outputs. These issues do not affect the ADC. We are currently working on software compensation for these effects, which will be added to the dev-capelet branch when ready.
Hardware
Installation
The Audio Expander has two sides: One rounded, and one with a notch.
Place the Audio Expander on top of your Bela unit, aligning the notched side with the notch in the Bela cape. Align the Audio Expander pins above the Bela headers. In addition to the double rows of pins on each side, there are also pins that fit into the analog inputs and outputs on top of the Bela. Make sure they’re lined up correctly.
Gently push down and ease the pins into place. Often it’s helpful to push gently on alternating ends of the Audio Expander to ensure that all pins slide into place. Ensure that all pins are fully in place, including the analog inputs and outputs, and make sure all pins are pushed all the way down to ensure a good connection.
Audio inputs and outputs
Audio outputs are accessible by the 3-pin molex-style connectors on top of the Audio Expander labelled OUT. These outputs are low-pass filtered, level-shifted versions of the signals on each of the 8 analog output pins.
The additional audio inputs are accessible by 3-pin connectors labelled IN. These inputs will be low-pass filtered and level-shifted for use with the Bela analog inputs.
Unlike the Bela cape, the outputs on the Audio Expander are line outputs, and are not designed to directly drive headphones. An external amplifier should be used for driving speakers and headphones.
Required cables
The audio inputs and outputs are accessible via 3-pin molex-style connectors, the same type as Bela’s audio connectors. We recommend using Bela audio adapter cables with the Audio Exapnder. These are sold separately, but can be added to your order.
Compatibility
Because the Audio Expander uses both analog inputs and outputs, it is only compatible with Bela, and is not compatible with Bela Mini.
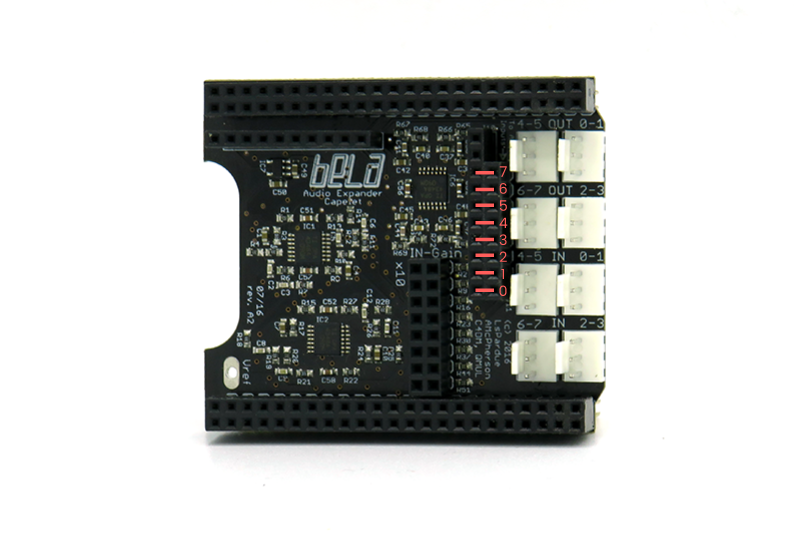
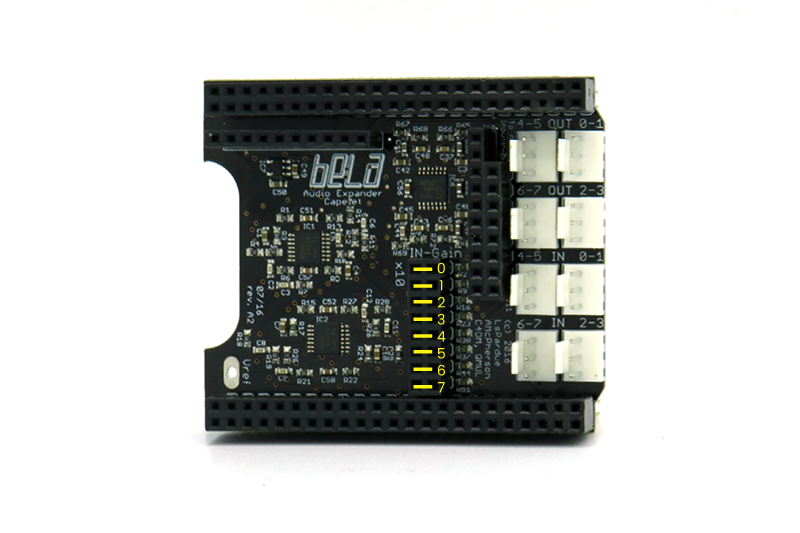
Using jumper wires to change the expander’s function
Jumper wires can be installed to change the Audio Expander’s function.
To select audio inputs:
Install wire jumpers between connectors J10 and J11 for the channels you want to use (see diagram below). The jumpers connect the audio expander input circuits to the Bela analog inputs:
Any channels without this jumper installed can still be used as a regular analog input on J10 as shown here:
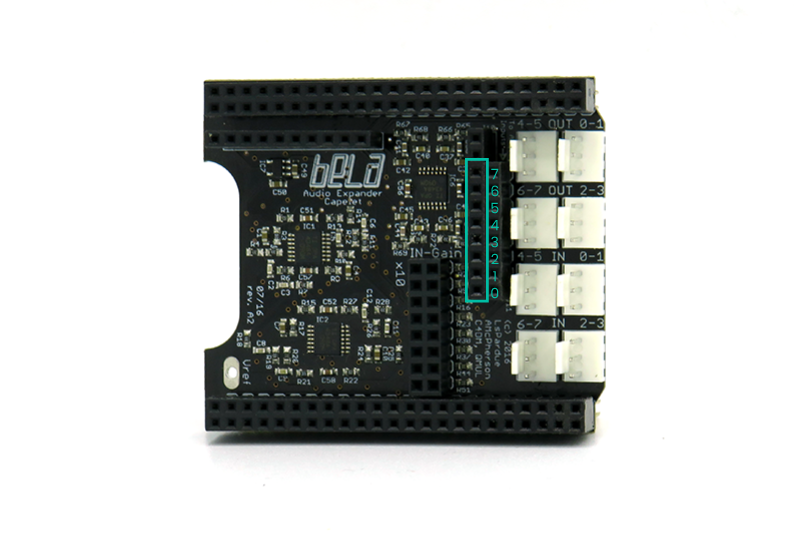
Make sure the software settings match your wiring.
Setting audio gain:
The Audio Expander inputs have gain that can be enabled on each channel separately. Enabling it increases gain on the selected channels by a factor of 10, or 20dB.
To enable gain on a channel, install a wire jumper on J12 at the location that corresponds to the desired channel (see diagram below):
Software
Selecting analog input and output channels
When you select analog input channels for use with the Audio Expander, these inputs are rescaled for use. The analog inputs usually operate between 0 and 1, but when being used with the Audio Expander they are rescaled to -1 to 1. Additonally, a highpass filter is added to remove the DC offset from the audio expander circuit.
Wnem you select analog output channels for use with the Audio Expander, they’re also scaled from the usual 0 to 1 to -1 to 1. This output will also be rescaled internally to a single-ended signal suitable for analog output.
Using the Audio Expander with the IDE
When you start the Bela IDE with the Audio Expander installed, the Settings tab has an extra drop down menu with Audio Expander options. Here you can choose the analog input and analog output channels to use with the Audio Expander.
Using the Audio Expander with the command line
If you’re using the command line to build your projects, there are two options provided for the Audio Expander:
-Y or --audio-expander-inputs selects the analog input channels to use. Provide a list of channels (0-7) separated by commas. For example, to use analog inputs 0, 1, 2 and 3:
$ --audio-expander-inputs 0,1,2,3
-Z or --audio-expander-outputs selects the analog output channels to use. Provide a lit of channels (0-7) separated by commas. For example, to use analog outputs 4, 5, 6 and 7:
$ --audio-expander-outputs 4,5,6,7
Under the hood: Built-in scaling and level shifting
Analog signal values are between 0 and 1, while audio signal ranges between -1 and 1. When you use the Audio Expander, Bela does this rescaling in the background.
Additionally, level shifting also takes place. To rescale an audio signal to this 0-1 range we’d normally add 1 to the signal and multiply by 0.5. However, the very top if the analog range is prone to clipping, depending on the voltage provided by the USB port powering the board. Therefore, the audio is scaled down so the audio output never goes above 0.92 and avoids clipping.
Similarly, the analog input is rescaled in the background so that the input range from 0 to 1 is scaled between -1 and 1, with an offset of about 0.4 from the audio expander filters. The signal is then filtered with a first-order high-pass to eliminate the DC offset.
Working with raw signals
What the above options do may not be the perfect fit for your specific application. If you do not specify any of the –audio-expander- options, you can still access the audio expander the same way you usually access the analog inputs and outputs on Bela. When using C++, the analogRead() and analogWriteOnce() functions will work as usual (no rescaling or filtering in the background) and you can implement these functionalities yourself.
Similarly, when using libpd or Heavy, the analog inputs and outputs will show up on channels 3 through 10, scaled between 0 and 1, and will need to be manually rescaled and filtered.
Programming notes
The analog-as-audio channels are accessed from software the same way as the analog channels.
C++
Use the analogRead() and analogWriteOnce() functions.
Pure Data
Access the additional audio inputs [adc~] and [dac~] 3 to 10
SuperCollider
When setting a channel count greater than 2, the analog-as-audio channels are accessed as audio channels instead of via the analogIn and analogOut uGens.