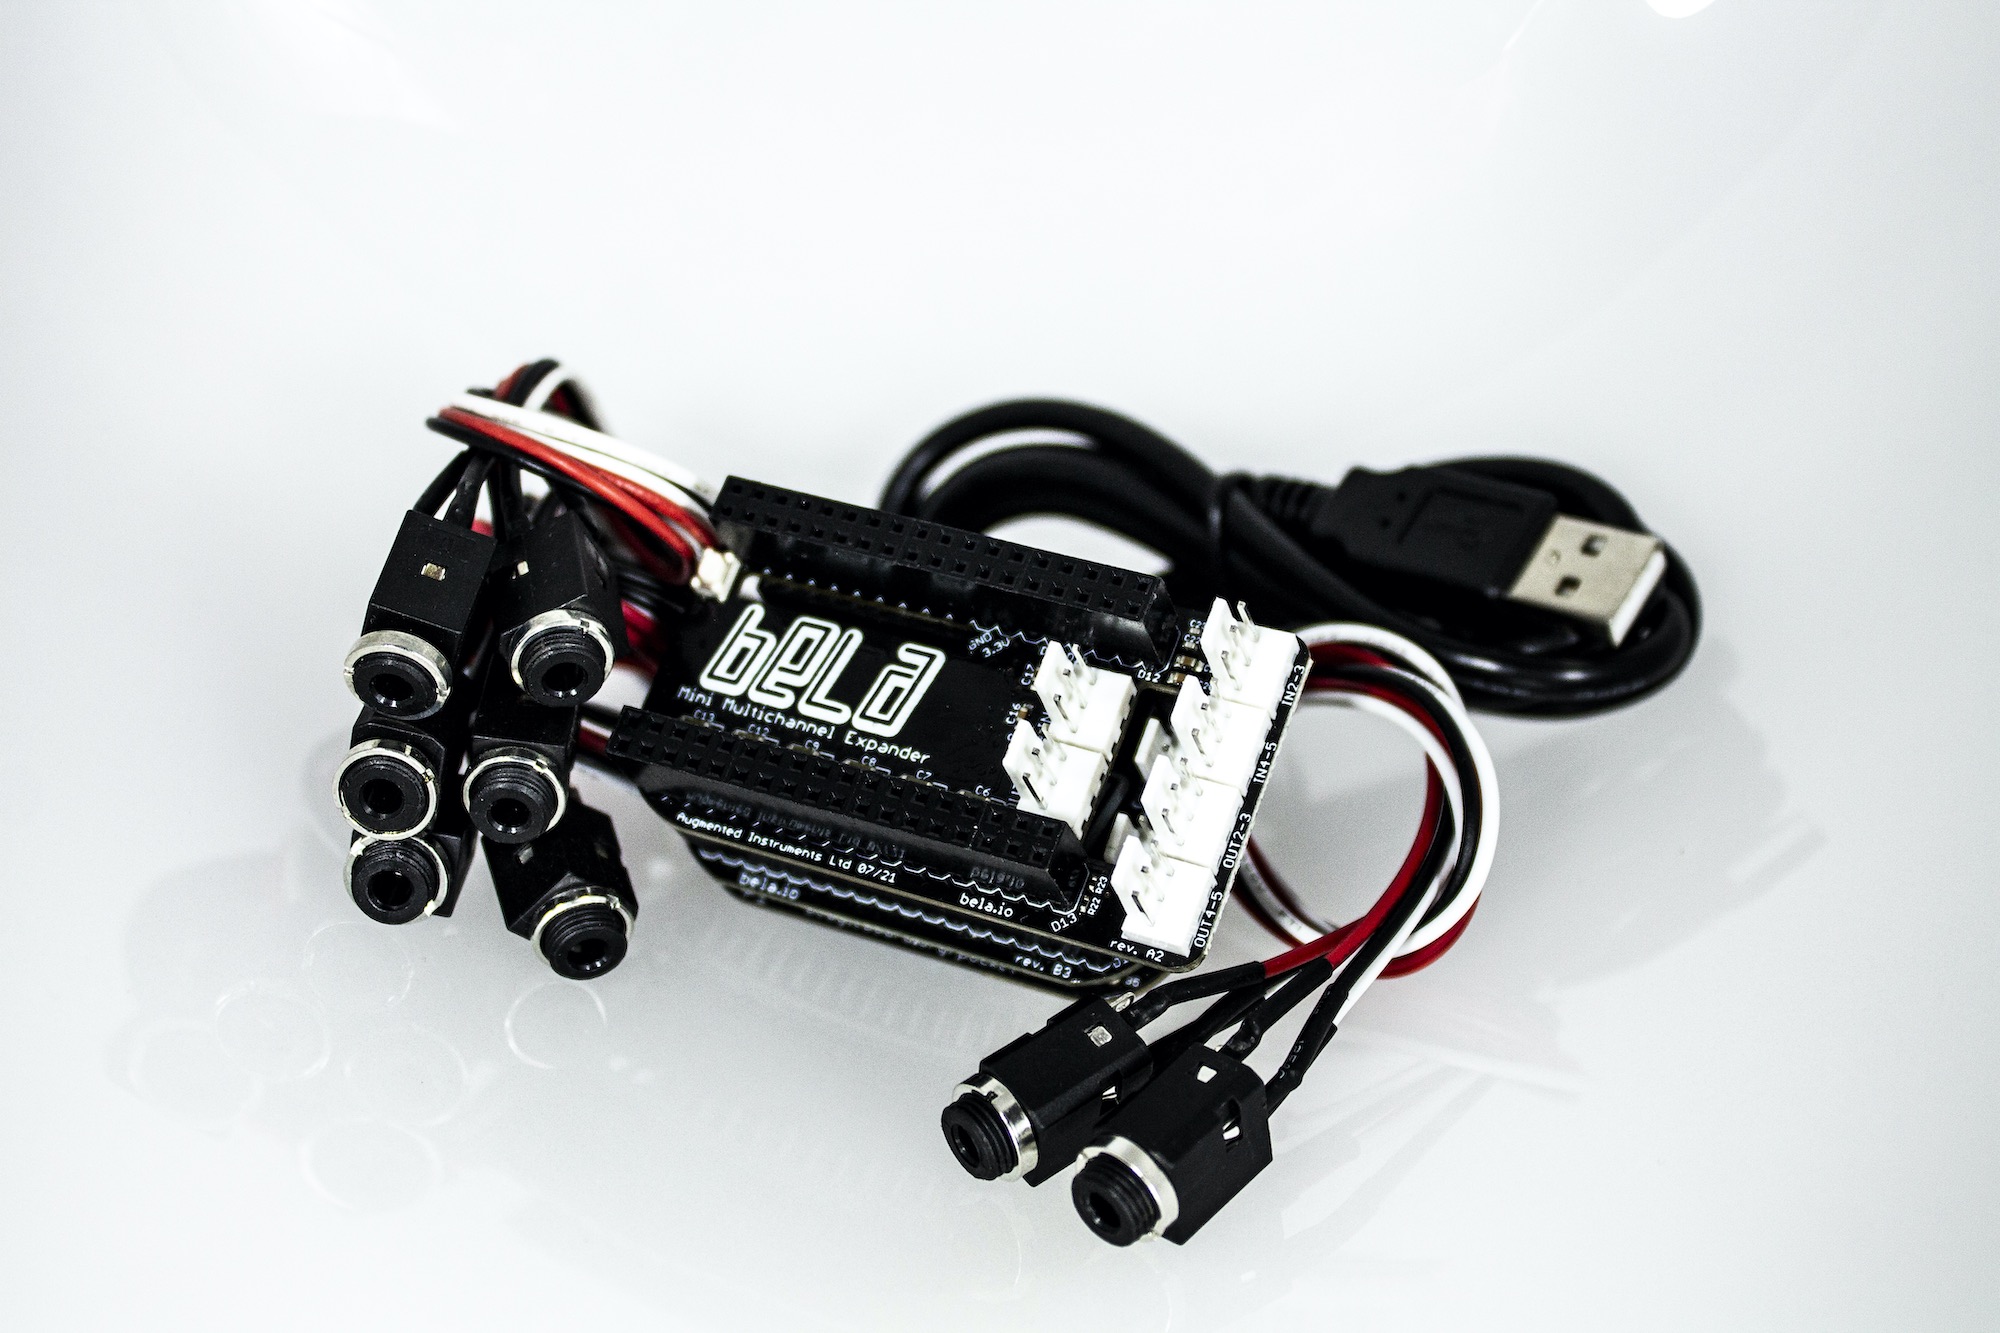
Bela Mini Multichannel Expander
The Bela Mini Multichannel Expander is an add-on board for Bela Mini that increases audio input and output channels from 2 to 8, while still giving you access to all of Bela Mini’s connectivity and interactive features.
This article describes the Bela Mini Multichannel Expander, how to use it, and gives some examples of programming it with C++ and Pure Data.
Table of contents
The Bela Mini Multichannel Expander
The Bela Mini Multichannel Expander is an add-on board for Bela Mini. When combined with Bela Mini it expands the audio input and output channels from 2 to 8. With this huge increase in audio, you don’t lose any of what Bela Mini has to offer, like ultra-fast processing, 8 16-bit analog inputs, 16 digital I/O, plug-and-play MIDI over USB, and the Bela IDE.
Take a look at what’s possible:
8 channels of audio ready in seconds, and it’s still tiny
The Bela Mini Multichannel Expander fits on top of a Bela Mini system and takes seconds to install. Just line up the pins, push down carefully, and you’re ready to go.
Fully assembled, a Bela Mini system with the Multichannel Expander is still astonishingly tiny - just 35 x 64 x 34mm. It fits in the palm of your hand, and pretty much anywhere else.
When the Bela Mini Multichannel Expander is in place, ports give you full access to the analog and audio connectors on your Bela Mini, as well as 6 additional audio connectors on the expander.
The Bela Mini Multichannel Expander is also easily removable, in case you want to use your Bela Mini system for another project that doesn’t require multichannel audio. But it’s so small that you can also just leave it in place, and have multichannel audio whenever you want it.
Full quality audio + full functionality
The 6 additional audio inputs and outputs afforded by the Bela Mini Multichannel Expander are full audio quality. On the expander there are 3 TLV320AIC106 codecs, which are the same as the codecs on both Bela and Bela Mini in terms of sound quality.
This makes the Bela Mini Multichannel Expander different from the Bela Audio Expander (available only for Bela). The Bela Audio Expander repurposes Bela’s analog inputs and outputs for audio, meaning that the noise performance does not match the onboard audio I/O (you can read all about it on the Bela Blog). Additionally, because the Bela Audio Expander uses the analog ins and outs they’re not available for connectivity while it’s being used.
In contrast, with the Bela Mini Multichannel Expander you get 8 channels of full-quality audio input and output, as well as all the connectivity and interactivity you had before - 8 analog inputs, 16 digital I/O, MIDI over USB, ultra-fast processing, and the Bela IDE.
It’s still your Bela Mini, just better than ever before.
Available solo or as a starter kit
The Bela Mini Multichannel Expander is available in two ways: As an add-on, and as a starter kit.
If you already have a Bela Mini, buy the standalone add-on that you can attach to your Bela Mini system. It comes with 6 stereo audio adapter cables for the 6 extra audio I/O.

If you need a Bela Mini we also offer a Bela Mini Multichannel Starter Kit, which comes with a fully assembled Bela Mini, USB cable, SD card flashed with the latest Bela software, the Bela Mini Multichannel Expander, and a total of 8 audio adapter cables, all for one discounted price.
Programming your multichannel Bela Mini
The extra channels of audio that the expander brings can be added to any of your Bela projects, in all the different languages which run on the board. Here we’ll have a look at how to access them in C++ and Pure Data.
First, make sure your Bela software board is up to date. Updating your Bela software only takes a couple of minutes, and we’ve made a handy guide if you haven’t done it before.
Next, plug the board into the your computer via the USB cable, open up your browser (we recommend Chrome), and navigate to http://bela.local/ to bring up our browser-based IDE. This video takes you through the process:
In the Examples tab we have a dropdown for multichannel examples. This is where you’ll find example projects that demonstrate working with multichannel audio in C++ and Pure Data.
C++
First of all let’s have a quick reminder of how we work with audio in a C++ project.
In a normal Bela project the first two audio inputs are read like this:
audioRead(context, n, 0);
audioRead(context, n, 1);
This remains exactly the same when you’re using the Bela Mini Multichannel Expander, but now you can also access the next 6 audio inputs like this:
audioRead(context, n, 2);
audioRead(context, n, 3);
audioRead(context, n, 4);
audioRead(context, n, 5);
audioRead(context, n, 6);
audioRead(context, n, 7);
The same holds for the audio outputs which are addressed with audioWrite(context, n, channel, output). For example, if we’d like to create a passthrough from all 8 audio input channels to all 8 audio output channels we’d use a for loop to iterate through each one in the render() function:
for(unsigned int n = 0; n < context->audioFrames; n++) {
	for(unsigned int ch = 0; ch < gAudioChannelNum; ch++){
		audioWrite(context, n, ch, audioRead(context, n, ch));
	}
}
In this case gAudioChannelNum will return 8, as Bela Mini will automatically detect the Multichannel Expander.
Example: Multichannel sinetone generator
As a first example we can test our outputs by running the multi-sinetone example, which will synthesise a tone with a different pitch on each of the 8 audio outputs.
To test this make sure the project is running and plug a pair of headphones into an audio adapter cable. Try connecting the cable to the different outputs of the expander and listen to the different results. You will hear increasing pitches as the channel number increases.
Example: Multichannel audio recording
For the simplest example of multichannel audio recording, have a look at the multi-record-audio example. This project records 20 seconds of audio from both what’s coming in the 8 inputs and what is being sent to the 8 outputs and it creates an 8 channel .wav file. Recording begins when the project starts running and stops after 20 seconds have elapsed.
The most powerful aspect of the Bela Mini Multichannel Expander is that it gives you all the interactivity of Bela Mini with 8 audio channels. A good example is the multi-record-audio-button project, which records from the 8 audio inputs when a button is pushed, and stops recording when the button is pushed a second time. This project creates 8 individual mono .wav files, one for each channel that was recorded.
Pure Data
The Bela Mini Multichannel Expander is also fully programmable with Pure Data.
Important notes on channel numbering
Accessing the extra audio channels is straightforward. We use the ~adc object for inputs and the ~dac object for outputs. Channel numbering starts at 1, so audio is on channels 1, 2, 3, 4, 5, 6, 7 and 8.
As we put the audio channels first this means that the analog input channel numbers, digital channel numbers, and the scope channels numbers are all shifted by 6 in comparison to the default numbering.
Usually the analog inputs are on ~adc starting at channel 3, but when using the expander the analog inputs are after your audio input channels. This means that analog inputs 0-7 on your Bela Mini are accessible on ~adc channels 9-16. Similarly the digital inputs are accessible on ~adc channels 17-33 and the scope on ~adc channels 34-38. This can seem a bit complicated if you’re coming from the usual pin numbering but we thought this was the best way to deal with the extra channel numbering without the need for abstractions.
Please check our interactive pin diagram from the exact numbering of each pin: https://learn.bela.io/pin-diagram/.
Example: Multichannel sample playback in Pure Data
The example multi-sample-playback shows how to playback a sample from each of the audio outputs on Bela Mini. We have a metronome and counter which wraps around creating a basic sequencer. The sequencer moves forward once every second, incrementing and triggering the playback of a .wav sample at each one of the audio outputs as it goes.
These samples could equally be triggered by a button or sensor input - a good exercise is to trigger each sample playback using a physical button instead of a sequencer. Have a look at the Digital Input example in our Pure Data course for a guide.