Compiling Bela projects in Eclipse
This page explains how to compile Bela projects with Eclipse.
Table of contents
- Prerequisites
- Prepare Bela
- Install Cross Compiler
- Get Bela Code
- Create Bela Sysroot
- Setup Eclipse
- Eclipse Notes
Contributions to this page are welcome
All the following commands need to be run from your Linux or OS X machine from a terminal.
Bela needs to be connected, turned on and accessible over the network on 192.168.7.2.
Note: If your Bela is using a different IP address you need to change any commands that connect to Bela, you will also need to change the SyncBelaSysroot.sh script and any IP address settings in Eclipse.
Prerequisites
You need Eclipse IDE for C/C++ installed on the Host.
This setup is all tested on Eclipse Oxygen 3a.
You can install this from here : http://www.eclipse.org/downloads/packages/eclipse-ide-cc-developers/oxygen3a
You also need to have done a build from the Bela Web Interface, this is required to generate some of the files we will copy from the Bela. ***
Prepare Bela
First you need to create a couple of directories on the Bela, these are where our executables will be copied to and executed from.
ssh root@192.168.7.2 mkdir -p BelaRemote/Debug
ssh root@192.168.7.2 mkdir -p BelaRemote/Release
Install Cross Compiler
Next we need to install the cross compiler on the host:
For Linux:
mkdir /usr/local/linaro
sudo chmod 777 /usr/local/linaro/
cd /usr/local/linaro
wget https://releases.linaro.org/components/toolchain/binaries/6.3-2017.02/arm-linux-gnueabihf/gcc-linaro-6.3.1-2017.02-x86_64_arm-linux-gnueabihf.tar.xz
tar xf gcc-linaro-6.3.1-2017.02-x86_64_arm-linux-gnueabihf.tar.xz
mv gcc-linaro-6.3.1-2017.02-x86_64_arm-linux-gnueabihf arm-bela-linux-gnueabihf
rm -r gcc-linaro-6.3.1-2017.02-x86_64_arm-linux-gnueabihf.tar.xz
For OS X:
mkdir /usr/local/linaro
sudo chmod 755 /usr/local/linaro/
cd /usr/local/linaro
wget http://files.bela.io/gcc/arm-bela-linux-gnueabihf.zip
unzip arm-bela-linux-gnueabihf.zip
rm arm-bela-linux-gnueabihf.zip
Get Bela Code
mkdir <your working directory>
cd <your working directory>
git clone https://github.com/BelaPlatform/Bela.git
cd Bela
git checkout master
Create Bela Sysroot
Next we need to create a minimum sysroot on the host that will contain the includes and libraries we need to build, this will be stored in /usr/local/linaro/BelaSysroot.
There is a script to sync these files from the Bela:
wget https://raw.githubusercontent.com/AndrewCapon/OSXBelaCrossCompiler/master/SyncBelaSysroot.sh
chmod +x SyncBelaSysroot.sh
./SyncBelaSysroot.sh
Setup Eclipse
Eclipse doesn’t let us save remote debug settings in the project, only in the workspace, unfortunately workspaces containing projects are not designed to be easily shareable as they only support absolute paths for files. So unfortunately we need to do some Eclipse setup.
After these setup steps are completed you will be able to do the following from within Eclipse:
- Copy files between Bela and your Host
- Use a SSH shell to the Bela
- Build Debug and Release builds
- Run Debug and Release Builds on Bela
- Debug Debug and Release Builds on Bela
Please follow the following steps to setup Eclipse:
Import the Bela project
Select menu File->Import
In the Import dialog expand General and choose Existing Projects into Workspace
Click the Browse button to the right of Select root directory and then browse to the Bela folder in your working folder.
Bela should appear in Projects box.
Click Finish
The project will be imported and indexed, you can see the progress in the bottom right corner of the eclipse window.
Build Debug and Release Versions
Right click the Bela project in the Project Explorer to get menu then choose Build Configurations->Build All
Set up Remote System Explorer
Select menu Window->Perspective->Open Perspective->Other
Double click Remote System Explorer
Right click Local in Remote Systems to get menu then choose New->Connection
Choose SSH Only then click Next>
Set Host name to 192.168.7.2
Set Connection Name to: Bela
Click Finish
Right click Bela in the Remote System view on the left to open menu then choose Properties
Set Default User ID to root. For some reason you have to press the little back arrow to the left of the username to be able to change it.
Click Apply and Close
You should now be able to expand My Home or Root to see your files on the Bela, you can use this view to copy files between the host machine and Bela.
You should also be able to right click on Ssh Shells to bring up the menu and choose Launch Shell to open up a shell in Eclipse.
Set up Debug
Go back to the C++ Perspective using the little button top right or Window->Perspective->Open Perspective->other and then double click C/C++
Right click the Bela project in the Project Explorer to get menu then choose Debug As->Debug Configurations
Double click C/C++ Remote Application
Set the following fields on the Main tab:

C/C++ Application Debug/Bela
Build Configuration Debug
Remote Absolute File Path for C/C++ Application /root/BelaRemote/Debug/Bela
Commands to execute before application make --makefile=/root/Bela/Makefile stop
Now click the New… button to the right of Connection
Set Connection type to SSH and click OK
Set the following fields:

Connection Name Bela
Host 192.168.7.2
User root
Click on password based authentication to select it.
Click Finish
Set the following fields on the Debugger tab:
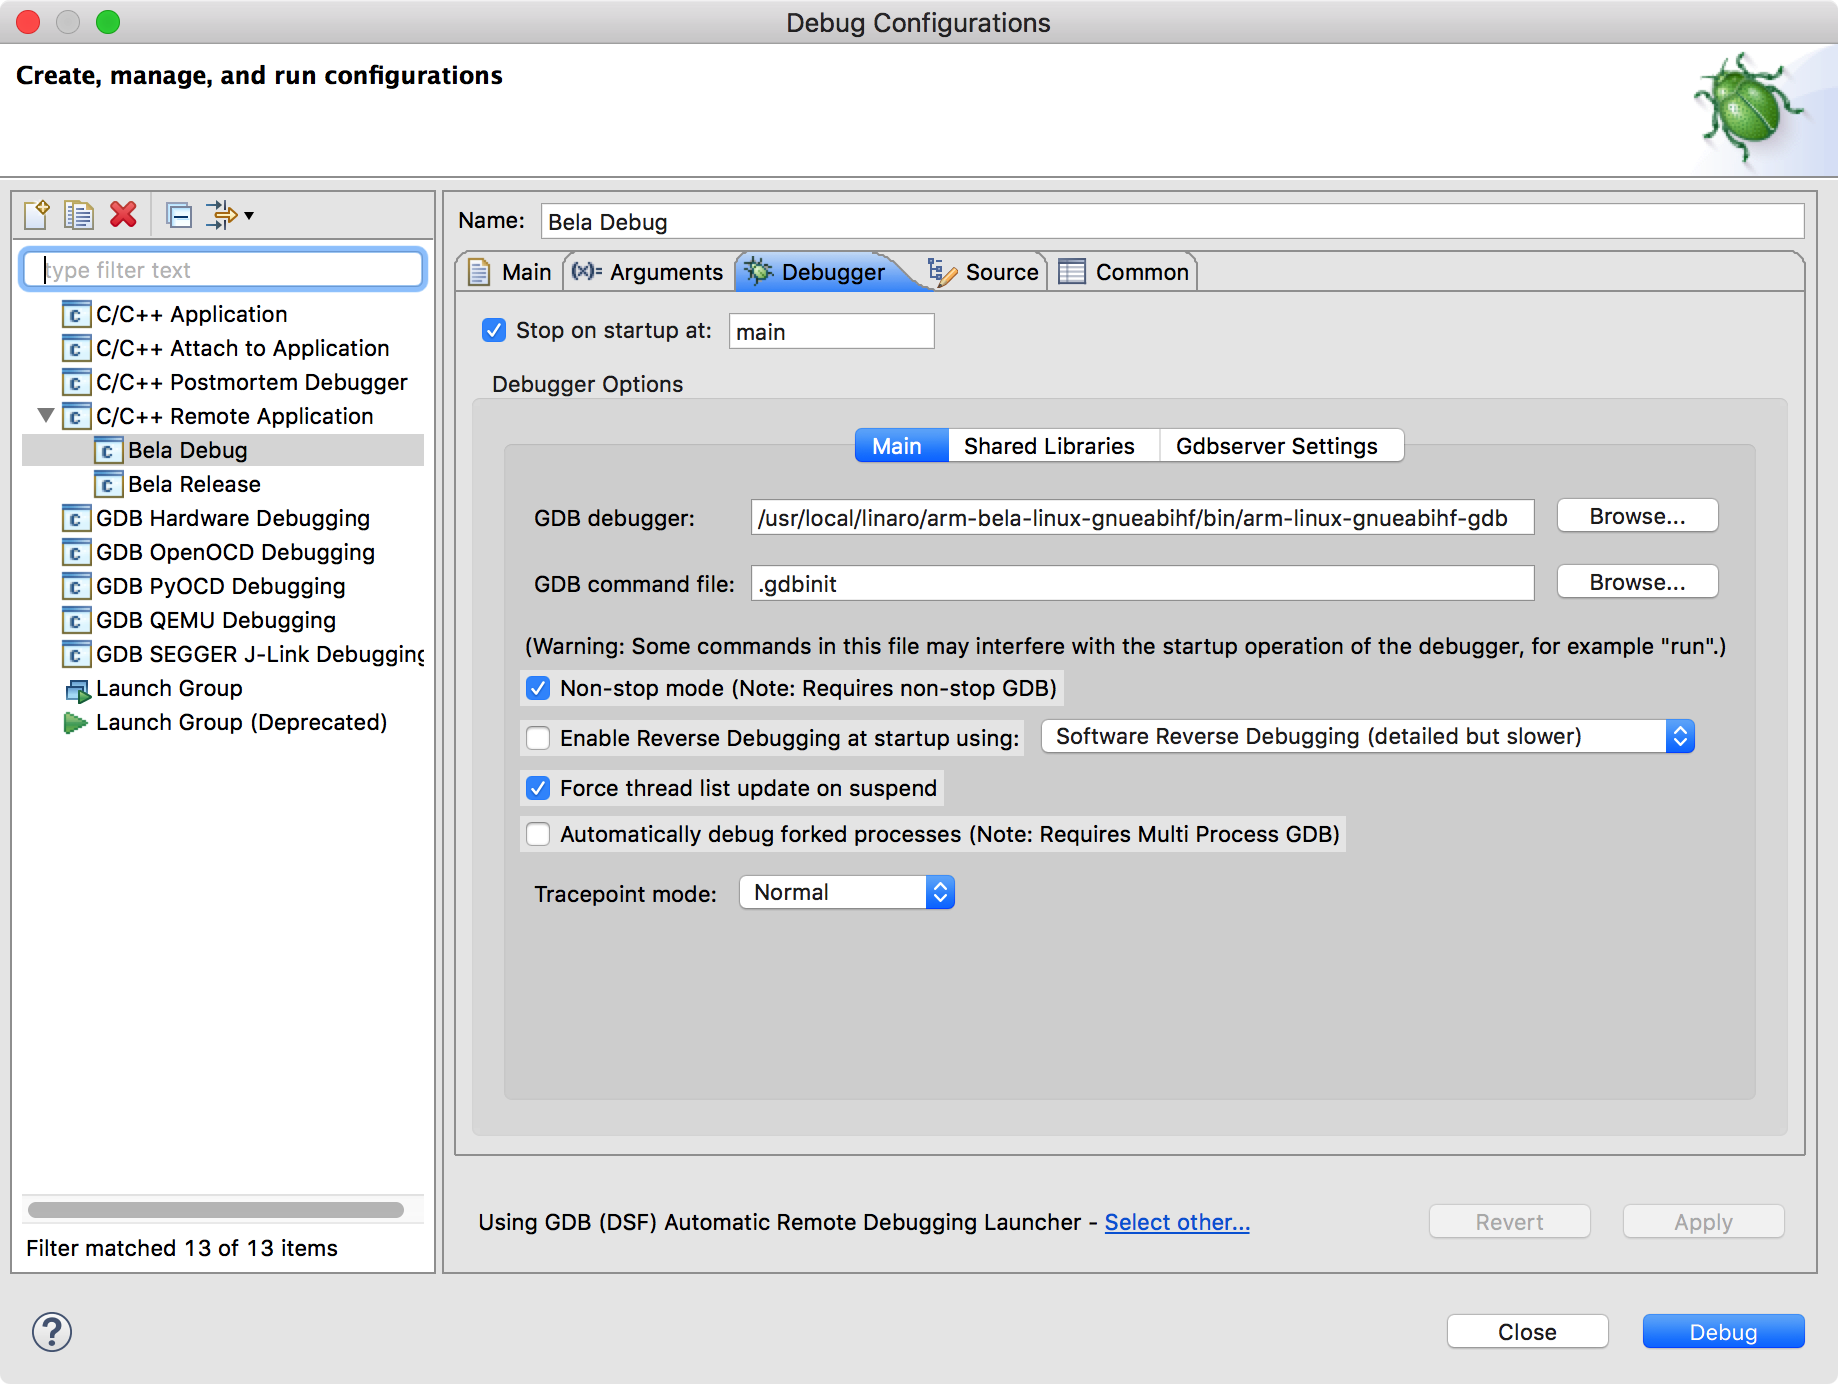
Gdb Debugger /usr/local/linaro/arm-bela-linux-gnueabihf/bin/arm-linux-gnueabihf-gdb
Enable Non-Stop mode
Enable Force thread list update on suspend
Set the following fields on the Common tab:
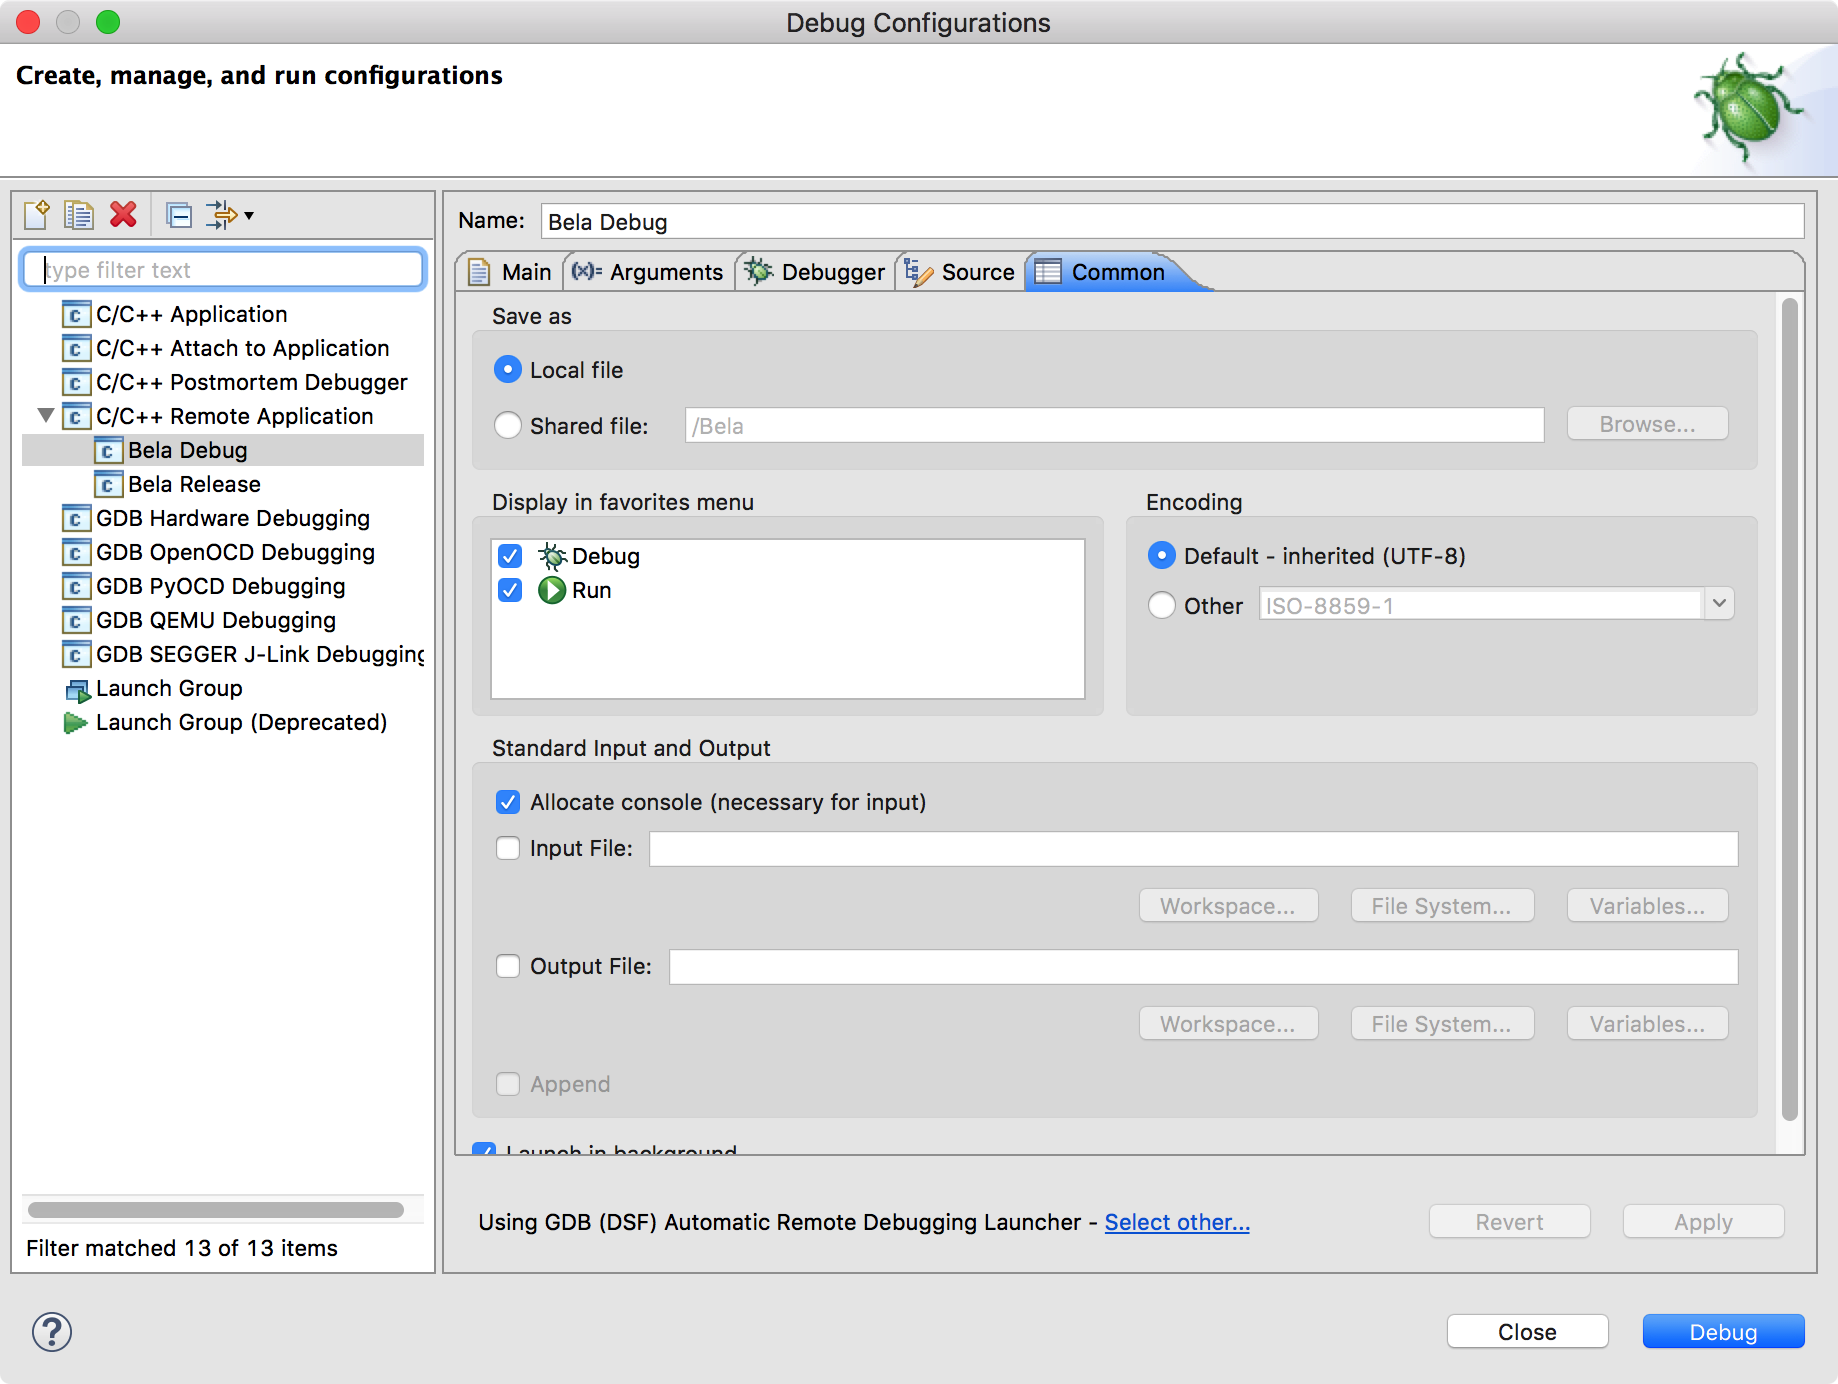
In “Display in favourites menu” click the tick box next to both debug and release then click on “apply” then on “Close”.
Set up release
Right click the Bela project in the Project Explorer to get menu then choose “Run As->Run Configurations”
Right click on “Bela Debug” to get the menu and then choose Duplicate:
Set the following fields on the Main tab:

Name Bela Release
C/C++ Application Release/Bela
Build Configuration Release
Remote Absolute File Path for C/C++ Application /root/BelaRemote/Release/Bela
Click on Apply then on Close.
Setup Eclipse preferences
In menu Eclipse->Preferences choose Run/Debug->Launching make sure Terminate and Relaunch while launching at the bottom is ticked.
Setup oscilloscope
You can display the oscilloscope in a window with Eclipse.
Use the menu Window->Show View->Other and then General->Internal Web Browser
You can then enter http://192.168.7.2/scope/ in the web address and the scope will be displayed.

Eclipse Notes
You will now be able to run and debug both Release and Debug builds using the Run and Debug toolbar icons at the top, if you pull them down you will see the “Bela Debug” and “Bela Release” options.
At the moment there is no easy way of stopping a run launch on the Bela. You can use the SSH shell we set up to run make --makefile=/root/Bela/Makefile stop which will stop the launch.
You can also use the inbuilt web browser to connect to the Bela and the stop button in the web interface will work.
You can also Debug the Release version, this will allow you to halt the launch from the debug menu. There will be some overhead on the Bela with this approach as the gdbserver will be loaded using RAM and a small amount of CPU. Unless you are really near the edge of RAM/CPU usage this is the recommended approach.
You could also add ssh root@192.168.7.2 make --makefile=/root/Bela/Makefile stop to the Pre-Build or Post-Build steps for the Release version so that when you build it any launch will be killed.
Running or debugging will also kill the running process.
Selecting different Bela examples within the Eclipse project
The Eclipse project contains several examples within the examples directory. User-generated projects can be stored anywhere, as long as each project is in a stand-alone folder. Follow these steps to choose which project to compile:
- Only one of the folders containing a project should be enabled at a time. This one will be in solid black text; the remainder will be grey.
- Right-click on the folder which is currently enabled (solid black). Choose Resource Configurations -> Exclude from Build…
- Click Select All to disable the code in this folder. Click OK.
- Now right-click on the folder which you want to enable. Choose Resource Configurations -> Exclude from Build…
- Click Deselect All to enable the code in this folder. Click OK.
Creating a new executable within the Bela project
Duplicate one of the existing project folders using the following steps:
- Right-click the project folder you want to duplicate and select Copy.
- Right-click on the
projectsfolder and select Paste. It will ask you to type in a new name. - Follow the steps above (Resource Configurations) to enable compiling this new project rather than any of the others.