Using an OLED Screen
Adding a screen for visualisation
This is a guide for Bela to OLED screens for displaying text and images. We are going to be working with OLED screens which connect to Bela via I2C. We can then send the screen data to visualise via OSC. All will be explained.
Table of contents
- OLED screens
- The I2C communication protocol
- Wiring up your screen
- Check the I2C address
- Open the OLED example
- Multiple screens
- Running the program in the background
- Using different fonts
OLED screens
There are a huge variety of different OLED (Organic Light Emitting Diode) screens available on the market at this moment in time. They differ in resolution, colour, size and in the ICs which drive the screen. In this tutorial we are going to focus on monochrome OLED screens which work via I2C.
The I2C communication protocol
I2C is a digital communication protocol that provides a convenient method of passing messages to, and getting data from, a network of sensors or devices.
I2C allows you to connect multiple devices (sometimes referred to as drones) to an I2C controller (known as the master). The master device can send messages to the drone devices, and the drone devices can send data back to the master device when asked.
One of the major advantages of I2C is that it only requires two wires for communication (data and clock), plus power and ground. The master and all the devices connect to these same two wires constitute a bus (see our getting started guide).
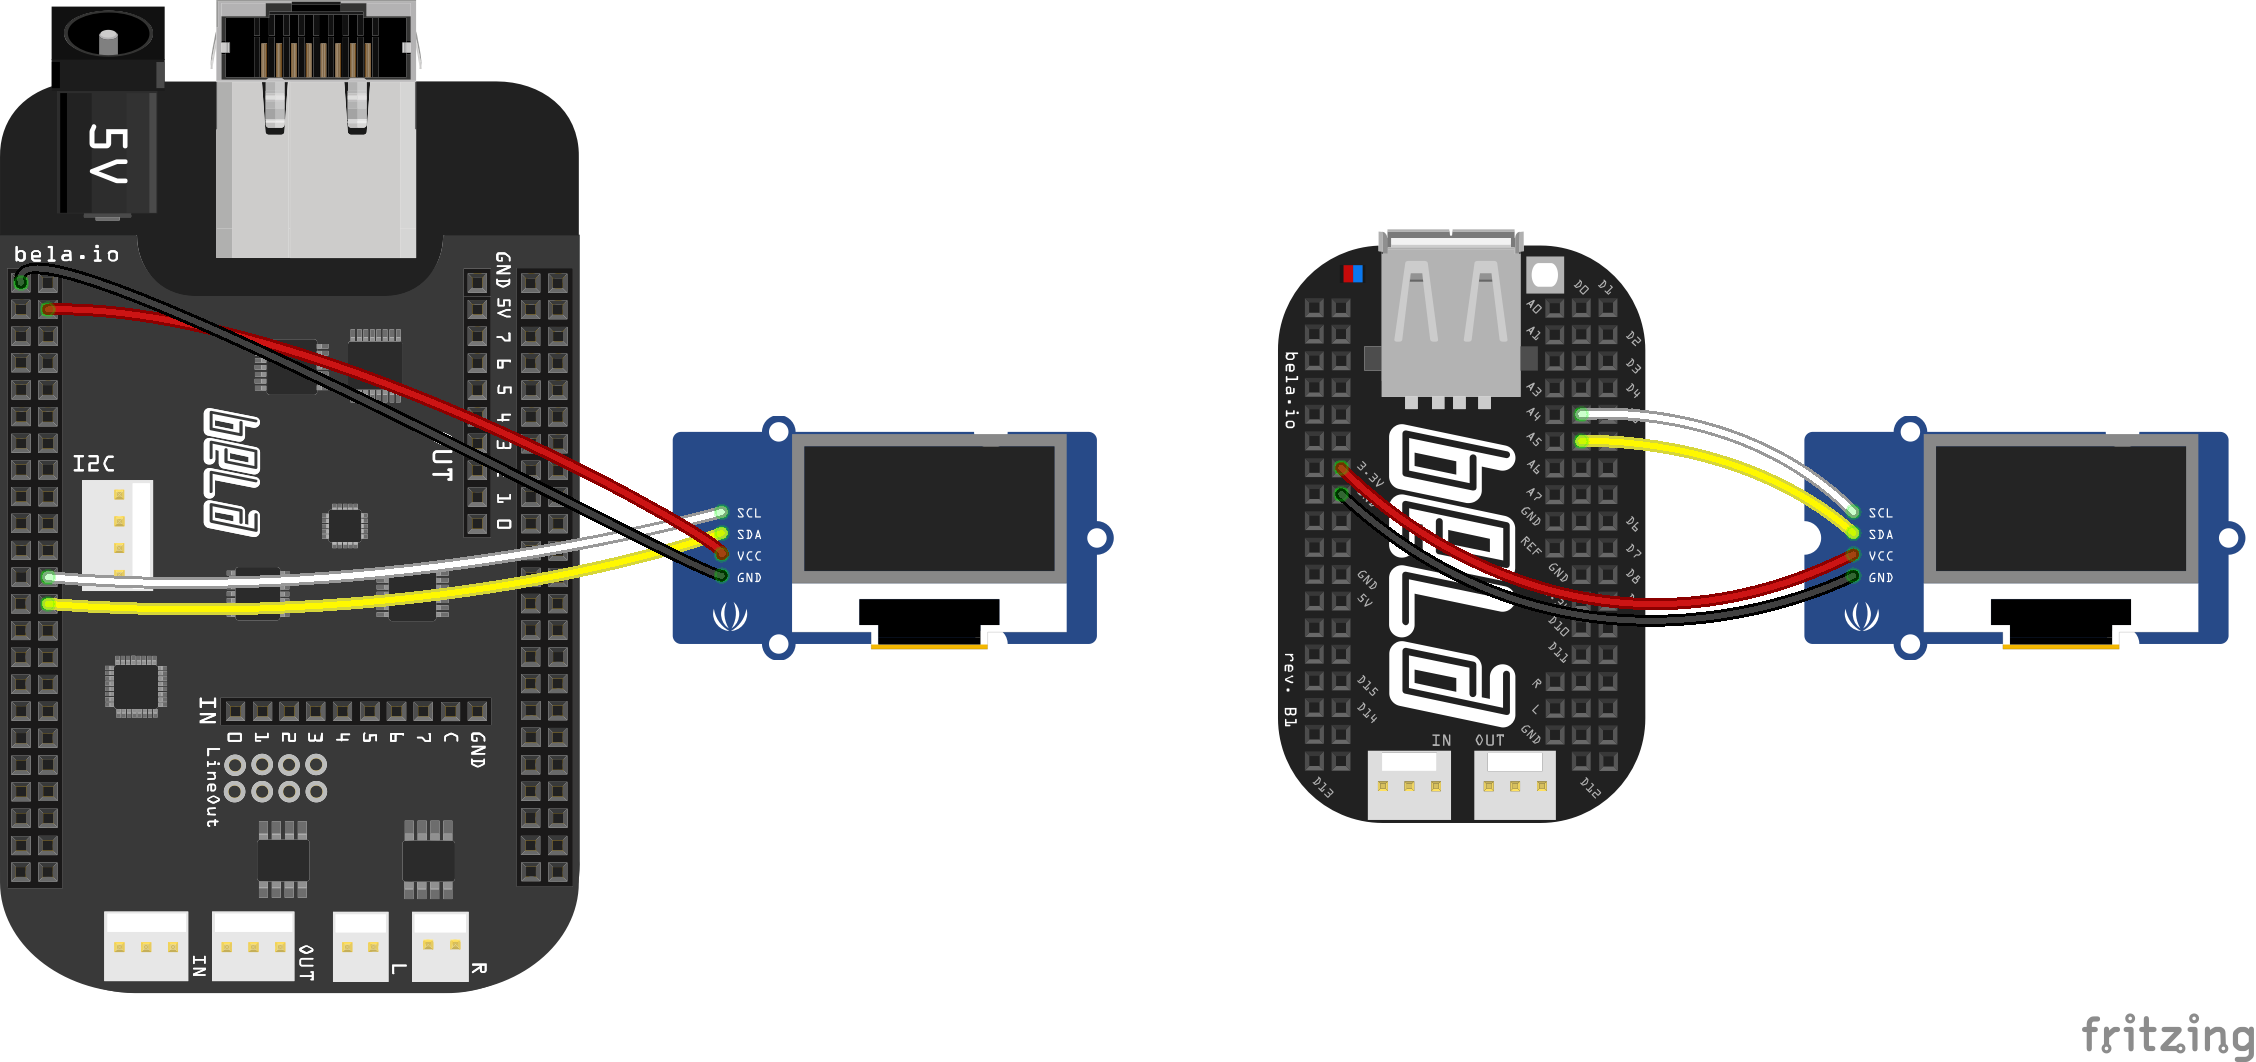
Wiring up your screen
The pins on your screen should be labelled and may differ from the order of the pins in this diagram so make sure you connect them the right order. The Data line (SDA) and Clock line (SCL) should be connected to the SDA and SCL pins of I2C2 on your Bela board. Check the interactive pin diagram to see the exact location of these pins.
Check the I2C address
Check the address of your screen by running the following command in the console at the bottom of the IDE window: i2cdetect -y -r 1. Note that we have found that the incorrect I2C address is often printed on the board!
root@bela ~/Bela# i2cdetect -y -r 1
     0  1  2  3  4  5  6  7  8  9  a  b  c  d  e  f
00: -- -- -- -- -- -- -- -- -- -- -- -- -- -- -- --
10: -- -- -- -- -- -- -- -- -- -- -- -- -- -- -- --
20: -- -- -- -- -- -- -- -- -- -- -- -- -- -- -- --
30: -- -- -- -- -- -- -- -- -- -- -- -- 3c -- -- --
40: -- -- -- -- -- -- -- -- -- -- -- -- -- -- -- --
50: -- -- -- -- -- -- -- -- -- -- -- -- -- -- -- --
60: -- -- -- -- -- -- -- -- -- -- -- -- -- -- -- --
70: -- -- -- -- -- -- -- -- -- -- -- -- -- -- -- --
Above is an example of the output which is printed to the console in the IDE after i2cdetect -y -r 1 is run and it tells us that an I2C device has been identified with the address 0x3c (note that this address is in HEX format). Keep a note of the address of your screen as we’ll need it in a later step.
If you have a Bela image v0.3.8f or earlier, in order for this code to run you have to update the code on your board. Follow the instructions here.
Open the OLED example
We have created an example which should have everything you need to start interacting with your screen which for now can found here: https://github.com/giuliomoro/O2O.
Download the full repository from the link above buy clicking on the Code v button and then Download ZIP. You can then add simply drag and drop the .zip file onto the IDE to create a new project with all the files added.
This example uses a port of the u8g2 Arduino library for monochrome displays. You can find the full library here and if you are wanting some more complex behaviour which is not covered in our example it can be a good idea to check out the many examples for Arduino which come as part of this library. The main part of the programme is written in C++ which interacts with the library and deals with writing the data to the screen and displaying text and objects.
Setting up for your screen
Open main.cpp.
First you need to know which screen you have, which driver IC it uses (for example sh1106 or ssd1306) and the resolution in pixels (for example 128 by 64). Pick the correct function from the list on this page: https://github.com/olikraus/u8g2/wiki/u8g2setupc.
By clicking on the name of your screen you should find a setup function with a format similar to this:
u8g2_Setup_<CONTROLLER>_i2c_<WIDTH>x<HEIGHT>_<NAME>_f
where CONTROLLER is e.g.: sh1106 or ssd1306, WIDTH and HEIGHT are e.g. 128 and 64, name is typically noname or noname_1 or something manufacturer specific.
Here is an example of a complete setup function: u8g2_Setup_sh1106_i2c_128x64_noname_f. We want to copy this and add it to the constructor gDisplays as follows:
std::vector<Display> gDisplays = {
	// use `-1` as the last value to indicate that the display is not behind a mux, or a number between 0 and 7 for its muxed channel number
	{U8G2LinuxI2C(U8G2_R0, gI2cBus, 0x3c, u8g2_Setup_sh1106_i2c_128x64_noname_f), -1},
	// add more displays / addresses here
};
You also need to make sure that the I2C address is correct for the screen you have. In the above example the screen has the I2C address Ox3c which we identified by using i2cdetect -y -r 1 in the previous step.
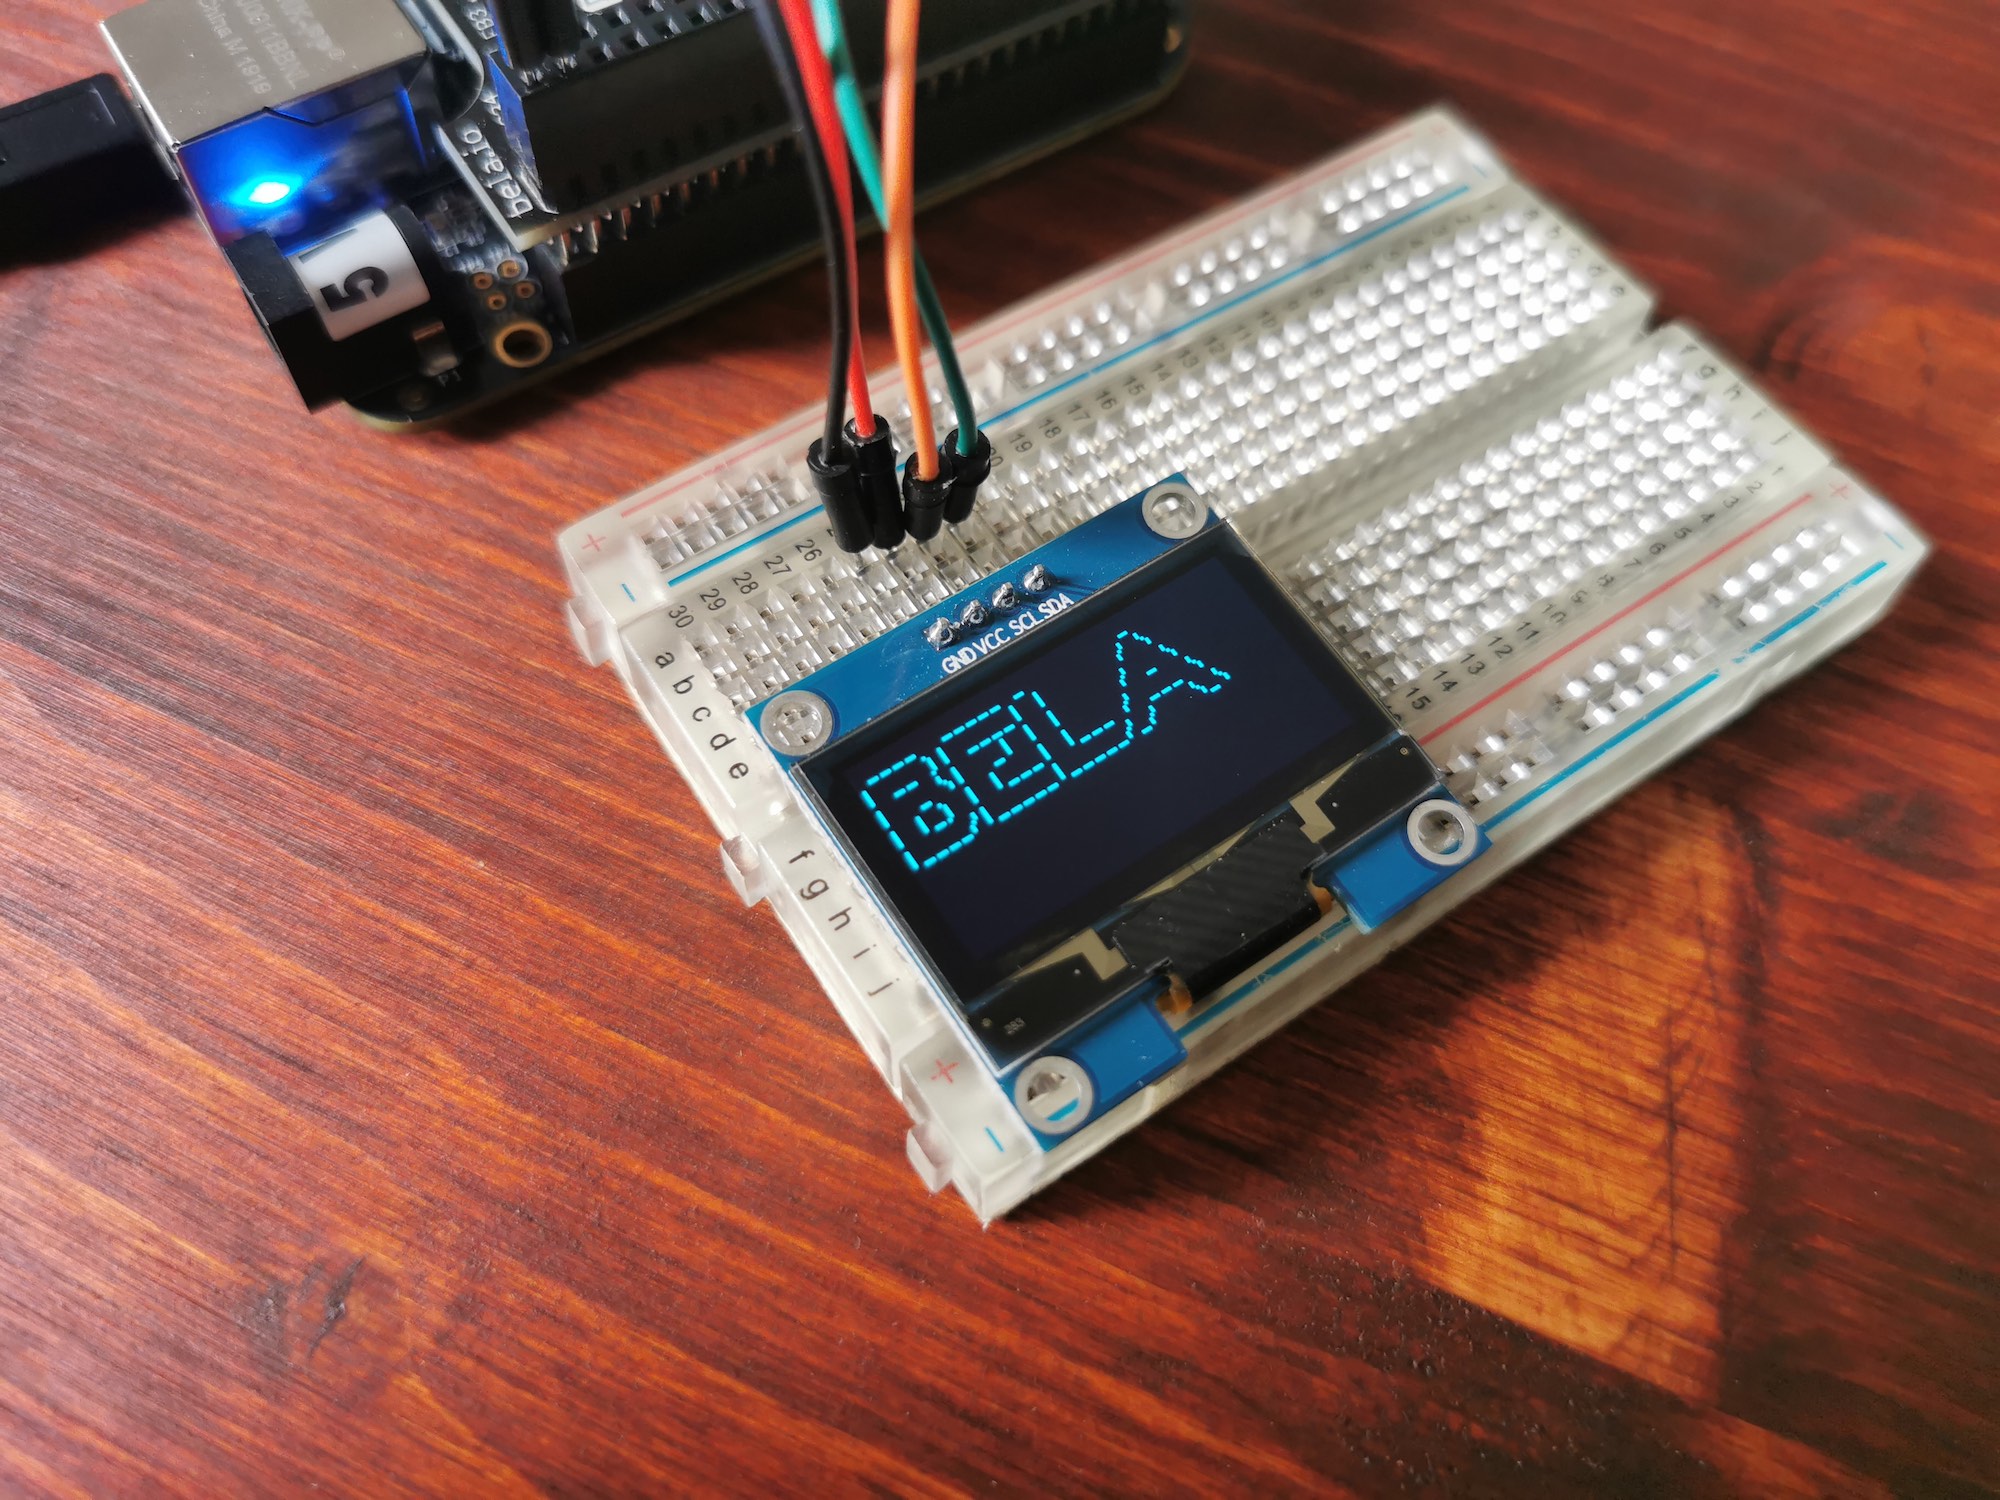
Once you have the correct constructor and I2C address you should be ready to run the project. If all has gone correctly then you’ll see an ASCII version of the Bela logo appear on the OLED as below.
Interacting with the screen
Now that we can communicate with the screen we can look at controlling what is displayed. main.cpp is in fact an OSC receiver which is waiting to receive OSC messages of a predefined format which it will then use to control what is shown on the screen. OSC (Open Sound Control) is a communication protocol for sending information between computers, synthesisers and other multimedia devices. The messages have a title followed by a value or string.
As part of the project files we have two different ways of sending OSC messages to main.cpp. There is a Pure Data patch called local.pd and a SuperCollider file called local.scd. These files are to be run on your laptop or computer and will send OSC messages to the Bela board to control what is shown on the screen. In this tutorial we are going to focus on local.pd as our way of sending massages to the board although you can use any programme which sends out OSC messages.
In the IDE navigate to the project files for this example and download local.pd. Open this file in Pure Data on your own machine.
Setting up the OSC network
The C++ project which should be running on your Bela board is expecting to receive a few different types of OSC message. Once you have opened the Pure Data patch local.pd you first want to make sure that you’re connected to the board remotely so you can send the OSC messages.
You want to send messages to the IP of the board (192.168.7.2 or 192.168.6.2, or you can use bela.local) on port 7562. This should happen automatically when you open local.pd via a [loadbang] but if you need to reconnect for any reason then it’s just a case of clicking the [connect bela.local 7562] message box.
The Bela programme needs to be running on the board before you can connect with netsend and send OSC messages over the network from Pure Data. If you are using another programme to send OSC packets to the board make sure you don't send too often as this may choke the board and result in sluggish reaction times.
OSC messages
Let’s focus on what’s happening in parseMessage(). This function receives our OSC packet and then checks for certain content. If it receives a matching message to the one it is waiting for then it draws something to the screen using the u8g2 library. Let’s look at some of the OSC messages it’s waiting for. We recommend trying this out with local.pd running on your laptop so you can send the required messages with some data. Click the button above each of the sections of the patch to send the OSC packet.
One thing to note before we look at the different animations is that each of the messages is prepended with an address index which is only used if you are dealing with multiple screens. We’ll look at dealing with more than one screen in a later step but for now just note that all OSC messages have a /0 before the messages below to indicate that we are sending to the first screen (0 indexed).
/osc-test
This is to test whether the OSC link with Bela is functioning. When this message is received you will see “OSC TEST SUCCESS!” printed on the screen. In the PD patch click the bang on the left hand side. If you don’t see anything change on the screen then try clicking the [connect bela.local 7562( message again to reestablish the connection. Note that you will have to do this every time the Bela programme restarts on the board.
/number
This prints a number to the screen which is received as a float. Every time you click the bang above this message a random number will be generated and displayed on the screen.
/display-text
This draws text on the screen using UTF8.
/parameters
This simulates the visualisation of 3 parameters which are generated as ramps in the PD patch. They are sent over as floats and then used to change the width of three filled boxes. We also write to the screen for the parameter labelling directly from the cpp file although this could be also sent from the PD patch if we wanted to dynamically change the parameter names.
/lfos
This is similar to the /parameters but with a different animation and a different means of taking a snapshot of an audio signal (see the PD Patch). In this case the value from the oscillator is used to scale the size on an ellipse.
/waveform
This is most flexible message receiver. It will draw any number of floats (up to maximum number of pixels of your screen) that are sent after /waveform. In the PD patch we have two examples of this. The first sends 5 floats which are displayed as 5 bars. Note that the range of the screen is scaled to 0.0 to 1.0.
The second example stores the values of an oscillator into an array of 128 values (the number of pixels on our OLED screen, update the array size in the PD patch if you have a different sized screen). These 128 floats (between 0.0 and 1.0) are sent ten times a second. This gives us a basic waveform viewer.
Multiple screens
With our example it is also possible to work with multiple I2C OLED screens at once so long as they have different addresses. There are two approaches to this. The first expects the screen to be on the same I2C bus with a different address where as the second uses a TCA9548A multiplexer which can useful if you run out of I2C address space and need many screens running at once.
In this tutorial we are focusing on screens on the same I2C bus but with different I2C addresses. As with all I2C devices they can be easily chained together but simply jumping each connection from the first screen across to the second screen.
Add the address of the second screen to gDisplays as follows but with your I2C addresses and constructor:
std::vector<Display> gDisplays = {
	// use `-1` as the last value to indicate that the display is not behind a mux, or a number between 0 and 7 for its muxed channel number
	{U8G2LinuxI2C(U8G2_R0, gI2cBus, 0x3c, u8g2_Setup_sh1106_i2c_128x64_noname_f), -1},
	{U8G2LinuxI2C(U8G2_R0, gI2cBus, 0x3d, u8g2_Setup_sh1106_i2c_128x64_noname_f), -1},
	// add more displays / addresses here
};
The index of the screens in our case will be 0 and 1 and so to send messages to the screen it is just necessary to make sure that your messages begin with the screen index.
Running the program in the background
This example serves as a means of prototyping the behaviour of your screen and developing the code which will be responsible for showing different images and text on the screen depending on what is received via OSC. To create custom behaviours of the screen we recommend editing the message handlers in parseMessage(). See here for a full list of available functions for drawing to the screen: u8g2reference.
Once you’re happy with the behaviour of the screen you can set this programme to run in the background and listen out for OSC messages which can be sent from another programme running on Bela – your main Bela project written in either C++, Pure Data or SuperCollider. The important thing is that your project sends OSC messages in the same format to the port number on which the OLED program (running in the background) is listening.
When you have a reliable way of sending OSC messages to it from the host you can follow the instructions here to run it in the background.
Once the program is running in the background you should be able to send OSC messages to it like before and see the results on the screen.
Once you verify it is working, you can open a different Bela project and try to send OSC to it from the Bela project instead of the host.
If the program is not responding as expected while running in the background, you can troubleshoot it by visualising its output using the journalctl commands provided at the page linked above.
The linked page also contains instructions to start the program automatically upon boot.
When running at startup, the osc2oled service will probably start after the Bela program has started, so if you send OSC to it too early when your program starts, some content may not be visualised on the screen.
Using different fonts
In order to make the library a decent size for embedding amongst the examples on Bela we had to cut down the size of the font library significantly. The basic fonts should be more than adequate for feedback on the screens but if you would like to use a particular font or increase the number of fonts available then you will need to do so using the terminal to copy the 30mB font library across.
First download this file: https://github.com/olikraus/u8g2/blob/master/csrc/u8g2_fonts.c. Then open a terminal window on your laptop.
The first thing to do is to navigate to the folder of the downloaded file using the cd command. For example cd Downloads. You then need to copy the file u8g2_fonts.c to the following location on the board: Bela/projects/O2O/u8g2/csrc/.
To do so use the following command:
scp O2O/u8g2/csrc/u8g2_fonts.c root@bela.local:Bela/projects/O2O/u8g2/csrc/
Have a look at the contents of u8g2_fonts.c to see the available fonts.