Connecting Bela to Wifi
Bela systems are full Linux computers so can be connected to wifi in a couple of different ways. Using a USB wifi dongle you can connect your board to the internet or a local wireless network. It is also possible to share your computer’s internet connection with your Bela board via USB.
This article details how to get your board connected to the internet or local network.
Table of contents
Using a Wifi dongle
Bela Gem
Compatible Wifi dongles
Most Linux-compatible dongles should work, provided that their drivers are included in the 6.12 Linux kernel running on Bela. If the drivers are not included, you will have to compile the drivers for this kernel to get the dongle to work.
We tested Bela Gem with the latest image (updated through the IDE) with these WiFi dongles:
0bda:c811 Realtek Semiconductor Corp. 802.11ac NIC
rtw_8821cu 1-1:1.0: Firmware version 24.11.0, H2C version 12
, obtained from https://www.amazon.com/dp/B09BB3FMSN0bda:b812 Realtek Semiconductor Corp. RTL88x2bu [AC1200 Techkey] rtw_8822bu 1-1:1.0: Firmware version 27.2.0, H2C version 13, obtained from https://www.amazon.com/dp/B09BB3QPXN aka WD-4609AC
Setting up your network connection with WiFi
Grab a terminal and ssh onto the board, then:
- Make sure the
iwdservice is enabled and running:systemctl enable --now iwd.service - Run
iwctl device listto show available wireless devices. We’ll assume below that your device shows up as
wlan0 - Scan for available networks:
iwctl station wlan0 scan - the above command does not print available networks, we need to do:
iwctl station wlan0 get-networks - Now you can connect to the desired network:
iwctl --passphrase "PASSPHRASE" station wlan0 connect "YourNetworkName"replacing
PASSPHRASEwith the passphrase for your network andYourNetworkNamewith the name of the network - Verify it is correctly connected:
iwctl station wlan0 show - You should be connected to the network now. Start testing things:
- see that you have an IP address:
ip a show dev wlan0should show an
inetIP address assigned to your device, e.g.:inet 192.168.1.10/24 - figure out the router IP:
ip route show 0.0.0.0/0 dev wlan0This responds via something like
default via 192.168.1.1 - ping your router:
ping 192.168.1.1(or whatever IP was returned above)
- if the router is connected to the internet, you should be able to ping Google’s servers:
ping 8.8.8.8 - finally, if the DNS is properly configured you should be able to resolve addresses, e.g.:
ping google.com - finally, display some diagnostics:
networkctl status wlan0
- see that you have an IP address:
If your device is called wlan0, it will rely for configuration on the file /etc/systemd/network/wlan0.network.
If it has a different name, you will need to create a file in that in /etc/systemd/network/ with the desired name and parameters in order for it to be enabled automatically on boot.
If you want to change some parameters for wlan0, edit the file in place or create another file to override it.
See man systemd.network for the syntax, file naming pattern and available settings.
WiFi credentials are automatically stored by iwd at /var/lib/iwd/, so it will be able to reconnect to a wifi network after the first time.
Credentials for multiple connections can coexist on disk at the same time, although most dongles will only allow to connect to one at a time.
To forget a network you previously connected to, delete the corresponding file in this folder.
Using Bela Gem as a wi-fi hotspot
Here are instructions on how to set up your Bela as a wireless access point which means you will be able to connect to your board and bring up the IDE – very useful for reprogramming boards which are mounted in projects. This assumes that you have a Linux-compatible wifi dongle plugged in and that the device and the driver supports access point mode.
- Allow
iwdto assign IP addresses: edit the file/etc/iwd/main.confand uncomment the lineEnableNetworkConfiguration=true. Restart theiwddaemon withsystemctl restart iwd, or simply reboot the board. - Create the folder for the access point configuration:
mkdir -p /var/lib/iwd/ap/ - Create the file
/var/lib/iwd/ap/<ssid>.ap, wherewill be used as the SSID of the access point when it is started. Below we assume `/var/lib/iwd/ap/bela-hotspot.ap`. - Edit the file
/var/lib/iwd/ap/bela-hotspot.apand fill it in with the following content, adjusting the passphrase to your needs:[Security] Passphrase=password123 [IPv4] Address=192.168.101.1 Gateway=192.168.101.1 Netmask=255.255.255.0 - Set the device into access point mode by running:
iwctl device wlan0 set-property Mode ap - Start the desired access point profile (must match the file name above)
iwctl ap wlan0 start-profile bela-hotspot - Verify (e.g.: from your computer or your phone) that you can correctly connect to this access point. You should also be able to see the IDE at the address specify in the configuration file above (e.g.: 192.168.101.1).
- To enable the desired access point when the board boots up, you can create an override with an
ExecStartPostentry to thesystemdconfiguration file foriwd. Runsystemctl edit iwd.service. - In the editor that pops up, insert two uncommented lines in the designated space:
[Service]
ExecStartPost=/usr/bin/bash -c "sleep 5; /usr/bin/iwctl device wlan0 set-property Mode ap && iwctl ap wlan0 start-profile bela-hotspot"
then save and exit the editor. This will save this override file in
/etc/systemd/system/iwd.service.d/override.conf, so you can later delete it or modify if you want to remove or change the access point feature on boot. - Reboot the system and verify that the access point successfully appears on boot.
Notes:
- the
sleep 5may be unnecessary - the name of the hotspot configuration file needs to match the argument to
iwctl ap wlan0 start-profile - perhaps a more elegant solution is to create a dedicated systemd service for bringing up the access point. See here for instructions on setting up your own systemd service.
Legacy Bela boards
Compatible Wifi dongles
Most Linux-compatible dongles should work, provided that their drivers are included in the 4.4.113 Linux kernel running on Bela. If the drivers are not included, you will have to compile the drivers for this kernel to get the dongle to work.
We tested Bela with these Wifi dongles:
- Ralink RT5370
- Ralink MT7601U 148f:7601
Setting up your network connection with Wifi
1. ssh into your Bela system
From a terminal on your computer, connect to your Bela board by running:
$ ssh root@bela.local
You’ll know you’ve connected to your Bela board when you see this prompt:
root@bela:~#
2. Make sure your dongle is visible on your board
Run this command to list your devices:
root@bela:~# lsusb
If your dongle does not show up, double check it is plugged in properly or try rebooting your board.
3. Get the name of your wifi device
Run this command:
root@bela:~# ip a
One of the devices that is listed will be called wlanX, where X is a number - this is the name of your network device.
If no wlan device shows up, you need to install drivers for it.
4. Edit your interface list
In this example we use wlan0 as the name of your interface. Replace this with the device name you found in the previous step.
Here you’ll edit the /etc/network/interfaces file. Open it in the command line text editor with this command:
root@bela:~# nano /etc/network/interfaces
Instructions on how to configure the file are included as comments at the bottom of the file. Make sure you set the settings using the interface name of your device that you found in the previous step.
When you’re ready to exit, click CTRL + X to edit, and Y to save any changes you made.
If you make any changes to /etc/network/interfaces, make sure you reboot your board for those to take effect.
5. Set your network name and password
Run the following command, replacing YourNetworkName with the name of your Wifi network and YourNetworkPassword with the Wifi network’s password:
root@bela:~# wpa_passphrase YourNetworkName YourNetworkPassword >>/etc/wpa_supplicant/wpa_supplicant.conf
Then, reset your device for these changes to take effect (don’t forget to replace wlan0 with your device name):
root@bela:~# ifdown wlan0; ifup wlan0;
6. Verify your settings
Make sure your settings are correct by running the following:
root@bela:~# ip a
If your network is configured correctly you’ll see your device name listed with an IP address.
Using Bela as a wi-fi hotspot
Here are instructions on how to set up your Bela as a wireless access point which means you will be able to connect to your board and bring up the IDE – very useful for reprogramming boards which are mounted in projects. This assumes you have an image v0.3.3 or above and that you have a Linux-compatible wifi dongle plugged into Bela (see above for discussion of suitable dongles).
- Edit the file
/etc/default/hostapd(e.g.: usingnano /etc/default/hostapd), find the line that starts withDAEMON_CONF, uncomment it and change it so it looks like this:DAEMON_CONF="/etc/hostapd/hostapd.conf"Save and close the file.
- The above edit told
hostapdto look for a configuration file, so now we need to create it:nano /etc/hostapd/hostapd.conf - Put the following into this file:
interface=wlan0
hw_mode=g
channel=1
wmm_enabled=1
ssid=MyBelaAccessPoint
auth_algs=1
wpa=2
wpa_passphrase=bela1234
wpa_key_mgmt=WPA-PSK
rsn_pairwise=CCMP
ieee80211d=1
country_code=DK
ieee80211n=1
Note: you may want to change the
ssid=(network name) andwpa_passphrase=(password) lines. Ensure your passphrase is at least 8 characters long. Save and close the file. - Next we need to change the network configuration so that Bela advertises its network instead of trying to connect to one. To do that, edit
/etc/network/interfacesand replace thewlan0configuration section, by default:allow-hotplug wlan0 iface wlan0 inet dhcp wpa-conf /etc/wpa_supplicant/wpa_supplicant.confwith the following:
allow-hotplug wlan0
iface wlan0 inet static
 hostapd /etc/hostapd/hostapd.conf
 address 192.168.30.1
 netmask 255.255.255.0
Again, you may want to change the
addressto suit your taste. This is the IP address of your board on this network.
If you make any changes to /etc/network/interfaces, make sure you reboot your board for those to take effect.
- We then want to ensure the board acts as a DHCP server, assigning suitable IP addresses to the devices that connect to it. To do this, first edit
/etc/default/isc-dhcp-serverand change this line fromINTERFACESv4="usb0 usb1"to
INTERFACESv4="usb0 usb1 wlan0"then edit
/etc/dhcp/dhcpd.confand add in these extra lines:subnet 192.168.30.0 netmask 255.255.255.0 { range 192.168.30.2 192.168.30.254; }Ensure that the range here (the range of IP addresses that are assigned to connected devices) is compatible with the address and netmask values set in
/etc/network/interfacesabove.
Testing the hotspot
Now you can test that the network can be successfully started:
ifdown wlan0; ifup wlan0 --verbose
The output of the above command should give something like:
ifup: configuring interface wlan0=wlan0 (inet)
/bin/run-parts --exit-on-error --verbose /etc/network/if-pre-up.d
run-parts: executing /etc/network/if-pre-up.d/hostapd
hostapd: /usr/sbin/hostapd -B -P /run/hostapd.wlan0.pid /etc/hostapd/hostapd.conf
Configuration file: /etc/hostapd/hostapd.conf
wlan0: interface state UNINITIALIZED->COUNTRY_UPDATE
run-parts: executing /etc/network/if-pre-up.d/wireless-tools
run-parts: executing /etc/network/if-pre-up.d/wpasupplicant
/bin/ip addr add 192.168.30.1/255.255.255.0 broadcast 192.168.30.255 	  dev wlan0 label wlan0
/bin/ip link set dev wlan0   up

/bin/run-parts --exit-on-error --verbose /etc/network/if-up.d
run-parts: executing /etc/network/if-up.d/avahi-daemon
run-parts: executing /etc/network/if-up.d/openssh-server
run-parts: executing /etc/network/if-up.d/upstart
run-parts: executing /etc/network/if-up.d/wpasupplicant
If you had any errors in your files, they would hopefully show up here.
Now you should be able to connect to the MyBelaAccessPoint network (or whatever you called it) with the password bela1234 (or whatever you set it to above). Once connected, your device should be assigned an address in the range 192.168.30.2 to 192.168.30.254 (or whatever range specified above), and you should be able to access the board on 192.168.30.1 (or whatever you set it to above).
A few tests:
- open the address
192.168.30.1in the browser: does the Bela IDE show up? - open a terminal, run
ssh root@192.168.30.1thenecho $SSH_CLIENT. To me it shows192.168.30.2 62879 22. In your case it will be slightly different, but the important part to check is that the IP address displayed there is of the range you specified indhcpd.conf. If it is something else (e.g.: a completely different subnetwork, such as192.168.6.xor192.168.7.x, then something went wrong). - power off the board and reboot it. Verify that the wireless networks still comes up, and you can still connect to it.
- power the board from an external power source (i.e.: do not connect it to your computer over USB). Verify that the wireless network still comes up, and you can still connect to it. In this configuration, depending on your system, you may also be able to access the Bela board at
bela.local/(try that in a browser and/or via ssh:ssh root@bela.local).
Sharing internet over USB with Bela (Mac OS X)
This is a way of connecting your Bela system to the internet via the USB connection with your laptop. Note that no dongle is required for this approach but your host computer must be connected to the internet.
1. Enable Internet Sharing
Go to System Preferences > Sharing, and enable Internet sharing:
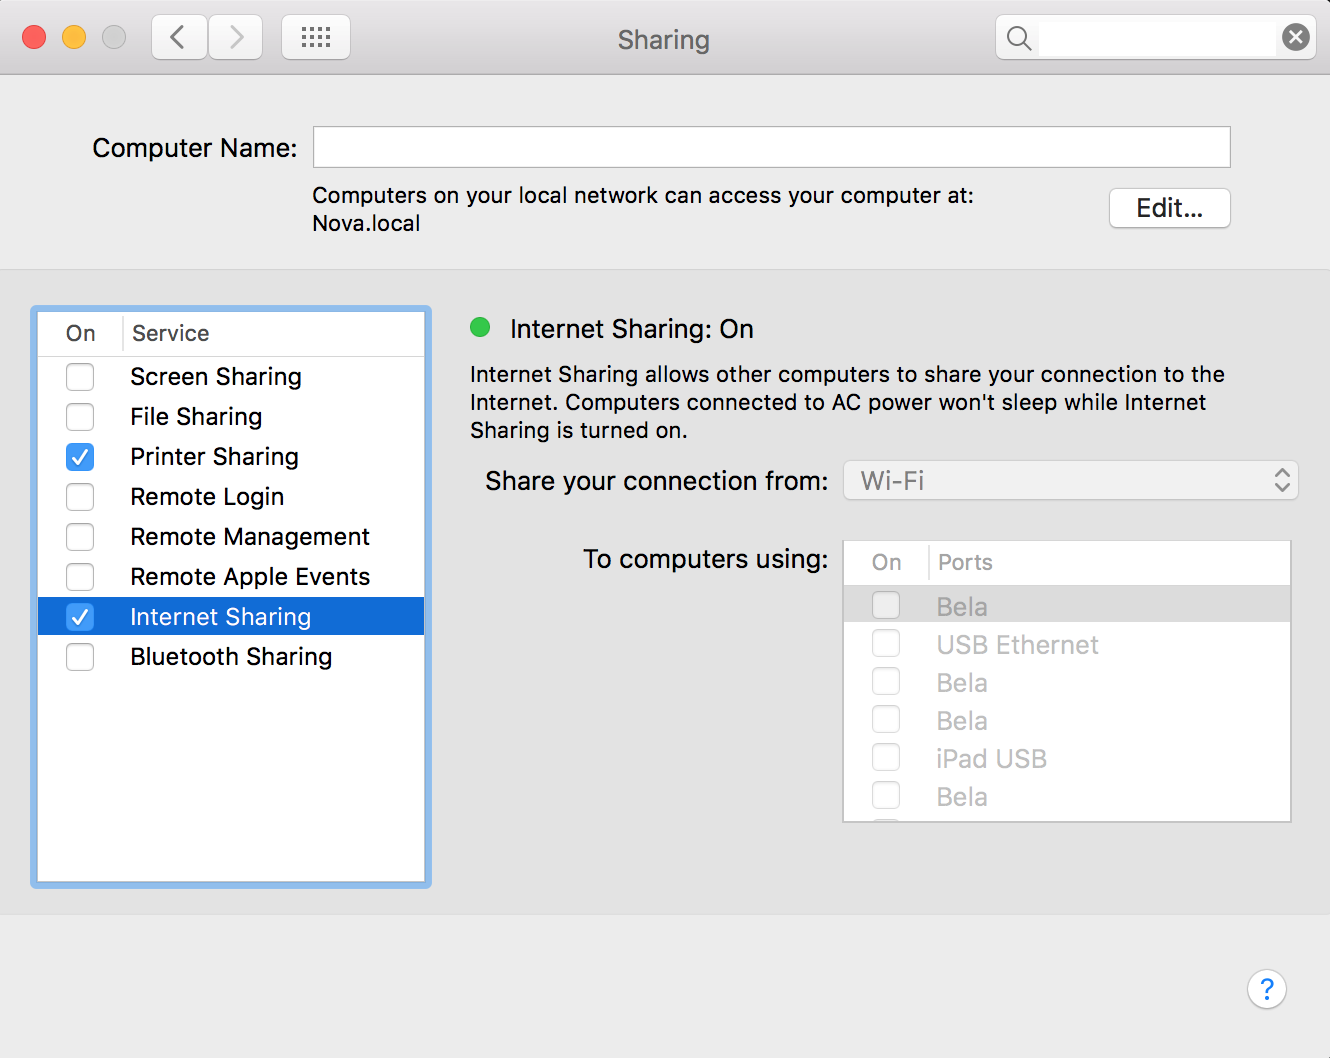
Enabling Internet Sharing will interrupt the IPv4 connection between your laptop and your Bela system. This means you won't be able to reach the Bela IDE or the Bela command line using its IP address. However, bela.local is still advertising its IPv6 address, so you can access the IDE and the command line using bela.local.
2. Edit the interfaces config file
Run the following command:
root@bela:~# pico /etc/network/interfaces
This will open the file in the Pico editor.
Comment out the usb0 static config IP from /etc/network/interfaces by adding a # at the beginning of the line.
Then add these lines:
iface usb0 inet dhcp
iface usb1 inet dhcp
The interface file should then look like this:
auto usb0
iface usb0 inet dhcp

#iface usb0 inet static
#    address 192.168.6.2
#    netmask 255.255.255.0
#    network 192.168.6.0

# USB ECM gadget (macOS / Linux compatible)
auto usb1
iface usb1 inet dhcp

#iface usb1 inet static
#    address 192.168.7.2
#    netmask 255.255.255.0
#    network 192.168.7.0
Save and exit Pico when you’re done with Ctrl + X.
3. Restart the network service
To restart the networking service, run:
root@bela:~# systemctl restart networking.service