Working with Salt
Getting the most out of the Salt module
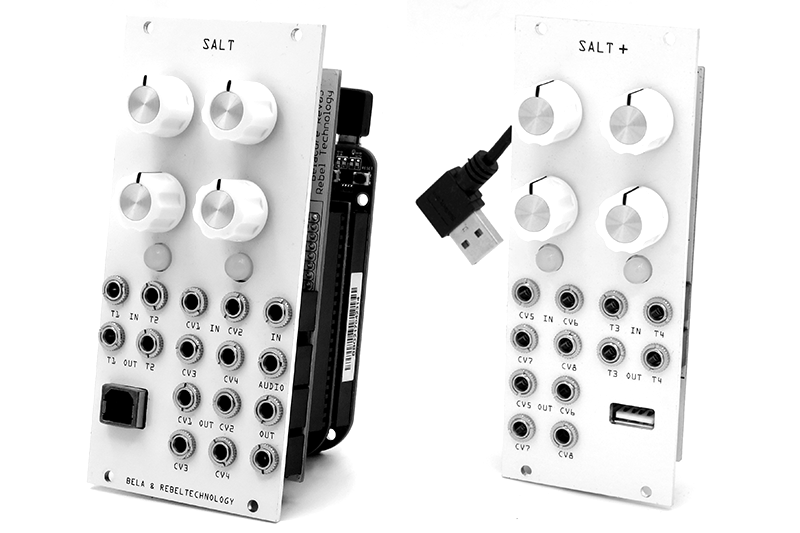
Salt is our fully programmable Eurorack module. To learn more about Salt’s features, visit bela.io/salt; to buy Salt, visit shop.bela.io/salt.
Salt is completely compatible with the regular Bela environment, however there are a few things that you may want to keep in mind when working with the module.
Table of contents
Power
(tl; dr: red stripe down)
Salt comes with a standard Eurorack 10-pin connector, labelled “PWR”. The pinout is as follows:
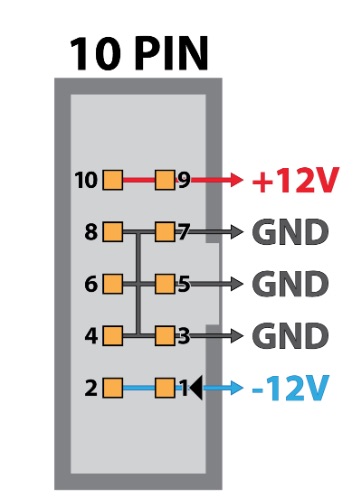
The -12V side of the connector is the one at the bottom one when the module is placed vertically so that the front panel’s writing are straight. It is also clearly marked by a “-12V” label on the PCB. Check the polarity of your cable before you plug it in to avoid damage to the module and the power supply.
Salt+ is powered through a 20-pin straight-through ribbon cable that has to be plugged into Salt. The same cable also carries the signals across the two boards.
Factory-loaded patches
Salt comes with a number of pre-loaded patches, so the moment it arrives to you, you can just plug it in your Eurorack power supply (red stripe down!), wait a few seconds and you will hear some inharmonic oscillators (DuoWave). Hold press the left-most button for one second or so and you will start the next patch, a wavetable-based drum machine (LilMonsta). Keep going and you will find a power Chorus effect (MadChorus), a vocal tract simulator (PinkTrombone!), a TapbodeDelay simulator.
Restarting
In the scenario where both the Eurorack and the USB are connected and you tell Salt to stop (e.g.: using the Shutdown button in the IDE), in order to power it back on you will have to remove power from both the USB and the Eurorack power supply (e.g.: switch it off) and then re-apply either. If you only remove one of the two sources, and then reconnect the other one, the unit will not restart. This is because the BeagleBone that is inside it needs to be completely powered down before it can be restarted.
Programming
Salt can be programmed just like any other Bela board. Just connect it to your computer and follow the instructions here to get started.
Salt I/O
Salt uses the analog, digital and audio I/O of Bela, as follows:
| Name | Physical channel | Pure Data channel |
|---|---|---|
| Audio I/O L | audio channel 0 | dac~/adc~ 1 |
| Audio I/O R | audio channel 1 | dac~/adc~ 2 |
| CV I/O 1-8 | analog channel 0-7 | dac~/adc~ 3-10 |
| SWITCH1 in | digital channel 6 | digital 17 |
| T1 in | digital channel 15 | digital 26 |
| T2/SWITCH2 in | digital channel 14 | digital 25 |
| T3/SWITCH3 in | digital channel 1 | digital 12 |
| T4/SWITCH4 in | digital channel 3 | digital 14 |
| T1 out | digital channel 0 | digital 11 |
| T2 out | digital channel 5 | digital 16 |
| T3 out | digital channel 12 | digital 23 |
| T4 out | digital channel 13 | digital 24 |
| LED 1 out | digital channel 2 | digital 13 |
| LED 2 out | digital channel 4 | digital 15 |
| LED 3 out | digital channel 8 | digital 19 |
| LED 4 out | digital channel 9 | digital 20 |
| PWM out (for LEDs) | digital channel 7 | digital 18 |
Where the “Physical channel” is the number you would use in C++, Supercollider, Csound, FAUST, basically all languages except Pd. Pure Data users can also use these abstractions to deal with the LEDs and Trigger inputs/outputs more conveniently.
Voltage ranges and corresponding digital ranges
| Name | Coupling | Voltage range | Digital range | Notes |
|---|---|---|---|---|
| Audio Out | DC | -5.3V:5.3V | -1:1 | |
| Audio In | AC | 11.3v pk-to-pk | -1:1 | voltage range adjustable with the PGA gain |
| CV Out | DC | -5V:5V | 0:1 | |
| CV In | DC | 10v pk-to-pk | 0:1 | range offset is adjustable with the corresponding pot |
| Trigger Out | DC | 0:5V | 0:1 | |
| Trigger In | DC | 0:5V | 0:1 | T in 2/3/4 are OR-wired with the corresponding switch |
CV inputs
The potentiometers act as an offset for the corresponding CV input. This allows to accommodate input ranges from -10V:0V to 0V:10V. When no signal is present at the CV input, the pot covers the whole digital range.
Trigger inputs and buttons
Trigger inputs T2, T3, T4 are hardwired to the corresponding buttons: pressing the button corresponds to pressing the button.
SWITCH1 and T1 are wired on two different Bela input pins, but they can be OR'ed together in software. The Pd abstractions [bela_trigIn] and [bela_trigIn~], for instance, virtually connect together SWITCH1 and T1, making the behaviour of these the same as that of the other buttons. However, be aware that hold-pressing SWITCH1 for more than 2 seconds may trigger the system action associated with it (typically: stop the current program).
LED and PWM
The LEDs on Salt are bi-color LED, similar to the ones described here. The state of the PWM pin AND the LED pin both concur to the color. Normally you would have a PWM signal running freely on the PWM pin. This can be a soft-PWM rectangle wave with a frequency of samplingRate/32, whose duty cycle you can adjust to balance the brightness of the two colors, see this Pd patch for instance). Alternatively, you could use the PWM peripheral on that pin.
Then in order to drive each LED you have the following option:
- set the LED pin as an INPUT: LED off
- set the LED pin as an OUTPUT, value 0: LED ON, red
- set the LED pin as an OUTPUT, value 1: LED ON, yellow
To dim/fade the LEDs, you would have to alternate states of INPUT and OUTPUT (with the desired value): the longer the pin spends in INPUT mode, the lower the brightness. The full explanation behind how bicolor LEDs work can be found here.
The Pd abstractions bela_enableLeds.pd and bela_led.pd to control the LEDs. You need one instance of the bela_enableLeds abstraction in your patch, and then you can use individual [bela_led x] patches (where x is the LED number from 1 to 4). The messages you send to the [bela_led x] abstraction set the state of the LED as follows:
[0( == off
[1( == red
[2( == yellow
Loading your own patches
Once you are done developing one or more patches, you may want to be able to run that (or those) patches without having to use your computer. If it is just a single patch you want to run, just select it from the “Run project on boot” menu in the  tab of the IDE. If you have multiple projects that you would like to cycle through, then you have to go through a two-step process:
- in the Project tab, rename those projects that you want to cycle through so that their name starts with
loop_ - in the Preferences tab, from the “Run project on boot” dropdown menu, select
•loop_*•.
Once this is done, you can restart the board and you will be able to cycle through these patches (in alphabetical order) by hold-pressing the left-most switch for 1 second.
In fact, the procedure above is the one used to pre-load the factory patches: those are the patches available in the examples tab under Salt (or here), copied to the projects/ folder for your convenience (as explained below). You can safely edit/remove them from the projects tab: they will be left untouched in the examples.
Updating Salt
If you want to update your Salt, follow the instructions here to update your board, just like a regular Bela.
Advanced: build a Salt image
If you want to build a Salt image from scratch, or if you update your image and want to make it salty again, you will have to:
- grab an image release (v0.3.3 or above) from https://github.com/BelaPlatform/bela-image-builder/releases
- flash it on an SD card (see here)
- update the code on your board as explained in the previous section
- boot the board with that image and the new code and run
/root/Bela/scripts/make_salt.sh. This will change a configuration file in/root/.bela/belaconfigso that the board is recognized as “Salt”. - optionally:
- in order to copy the Salt examples to the
projects/folder and make them runnable in a loop at startup, run on the board:/root/Bela/scripts/make_salt.sh --examplesthen reboot and make sure it works. You should be able to cycle through them by hold-pressing switch 1 for one second at a time.
- in order to copy the Salt examples to the