Managing your SD card
The SD card is a vital part of the Bela system. It’s often necessary to copy (or “flash”) the Bela software from your computer to an SD card for use in your Bela system, or to back up your projects or the entire contents of your SD card.
This article is about managing the data on your SD card - flashing it (using free GUI software or the command line) - as well as backing up both your projects as well as your whole Bela software image.
If you bought a Bela Starter Kit, your Bela unit's internal memory will be pre-flashed with the Bela software. Bela Mini Starter Kits include a micro SD card flashed with the Bela software.
Table of contents
- Requirements of the SD card
- Flash an SD card using Balena Etcher
- Flash an SD card using the command line
- Booting Bela from the SD card
- Flashing the eMMC
- Backing up your SD card
- Resizing filesystems on an existing SD card
- Accessing the other card
- Having trouble?
Requirements of the SD card
All Bela systems use micro SD cards. The Bela Mini Starter Kit comes with an SD card pre-flashed with the latest software. You can also purchase a pre-flashed SD card from our shop, or add one to any order.
If you want to use an SD card of your own, make sure it has at least 8GB of space. We recommend using a 16GB card to ensure lots of space for assets like audio clips.
We recommend using a high-quality SD card. Your SD card is the core of your system, and if it fails you risk losing everything that's not backed up - make sure your SD card is reliable!
Flash an SD card using Balena Etcher
If you have a Bela Gem Stereo or Multi, follow instructions here.
1. Download Balena Etcher
Download and install Balena Etcher.
Balena Etcher is free, open-source software used for copying image files (.iso and .img) to storage media.
2. Download the latest Bela software image.
You need to download the Bela software image to flash to an SD card. Note that this is different from the ZIP file used for updating your Bela system.
If you are using Bela, BelaMini or CTAG, download the latest image release from our Github page.
If you are using Bela Gem Stereo or Multi, dowFor Bela Gem, follow the instructions here.
3. Insert your SD card into your computer
Insert your SD card into your laptop using the SD card slot (you may need an SD card adapter), or use a dongle.
4. Flash the card using Balena Etcher
Open Balena Etcher. You’ll see the following:
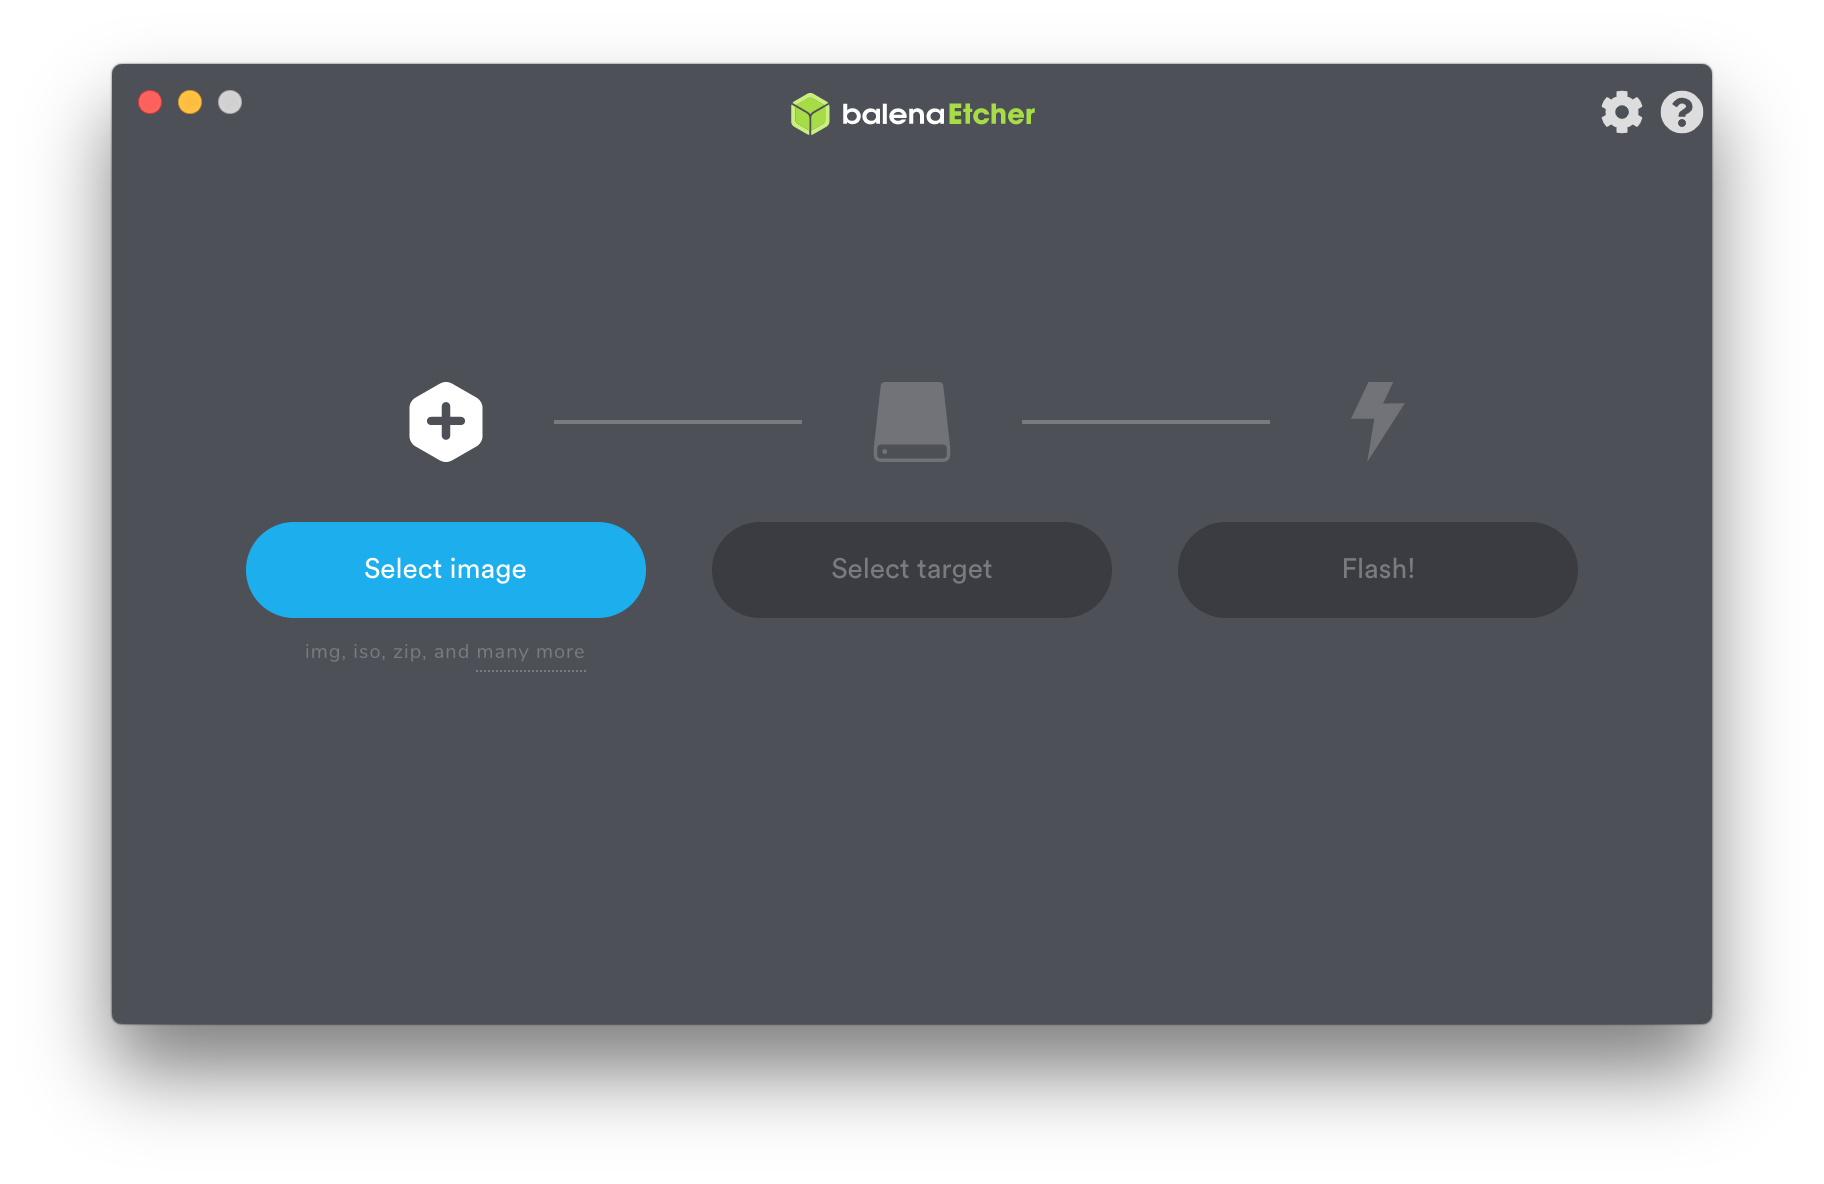
Make sure you choose the SD card in Balena Etcher! This process will overwrite the selected device, so double check the device selected.
Next, click Select Image, and select the Bela software .img.xz file you downloaded in the previous step (you don’t need to uncompress it):
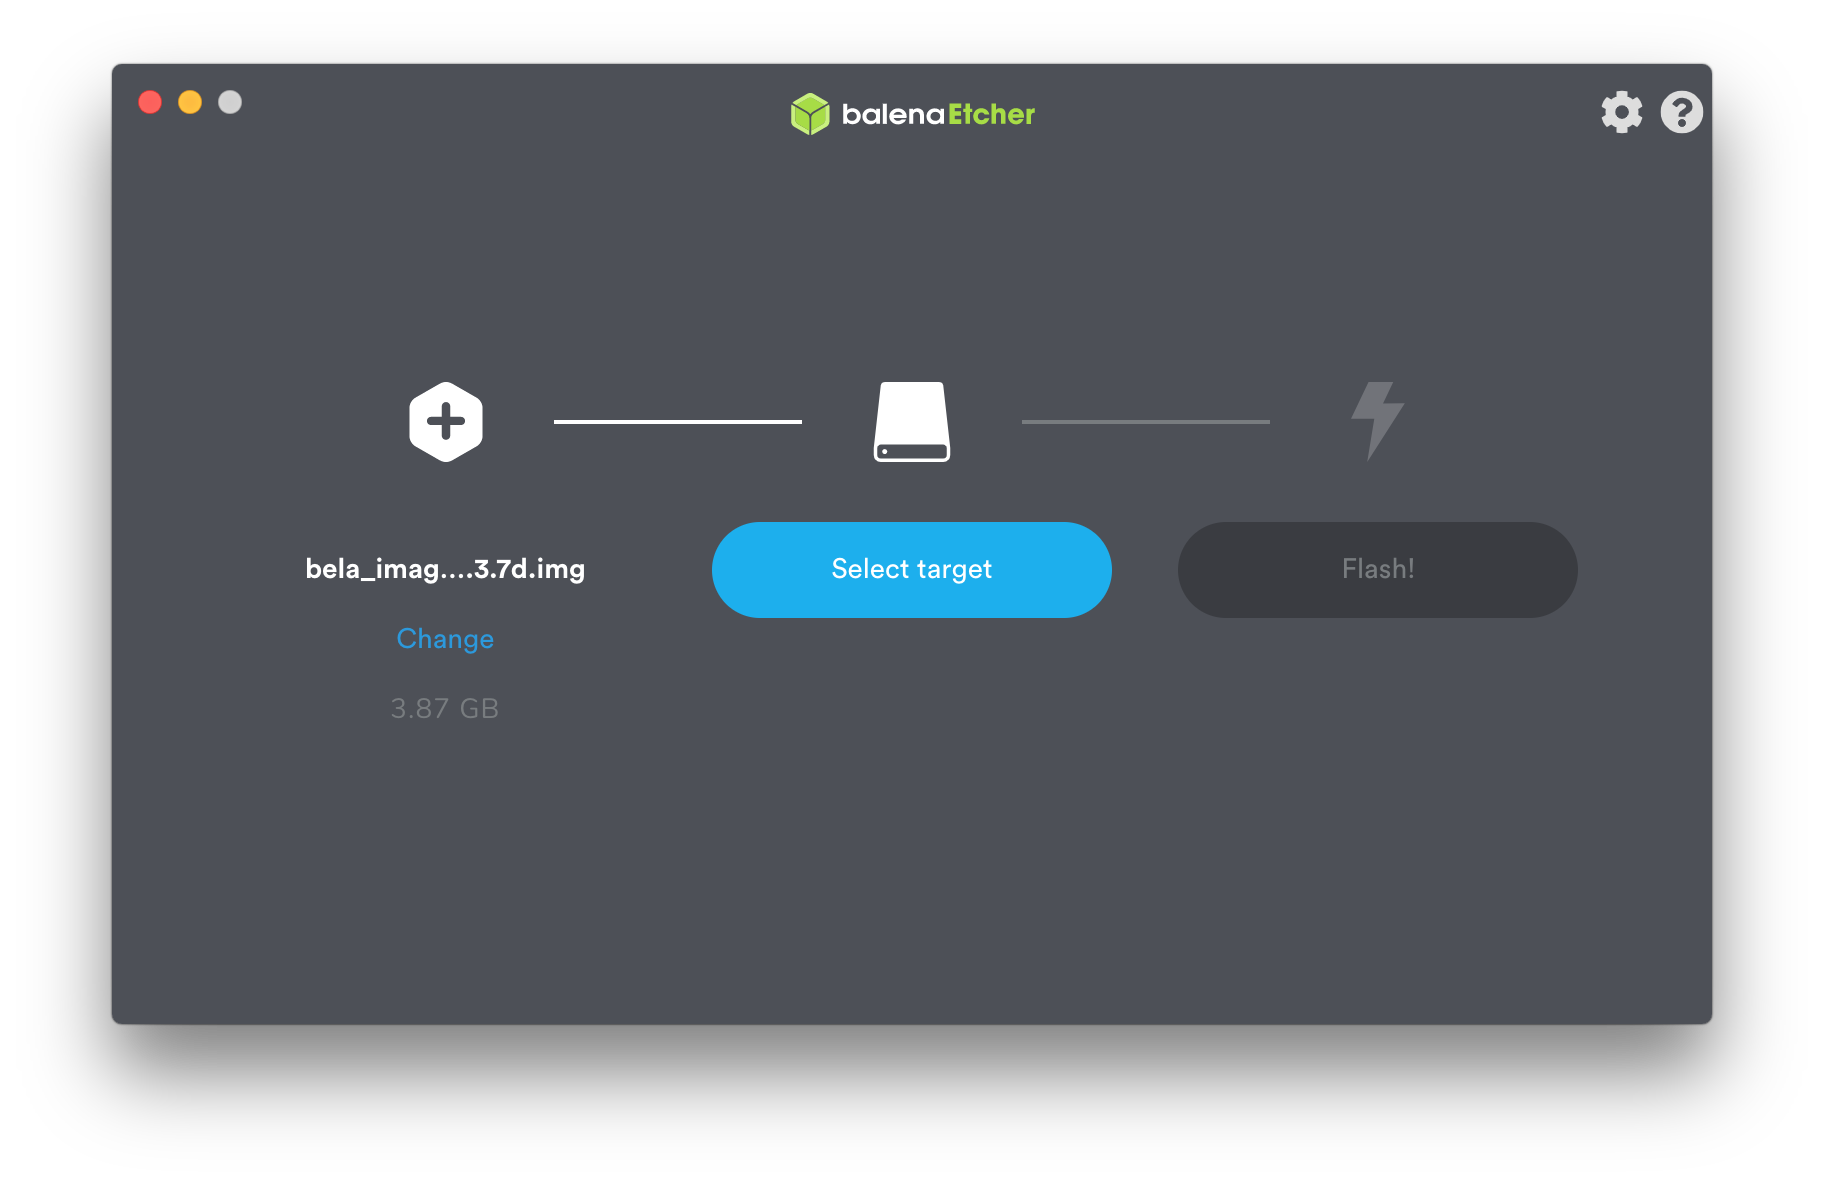
Then, click Select Target, and select SD card you inserted into your computer:

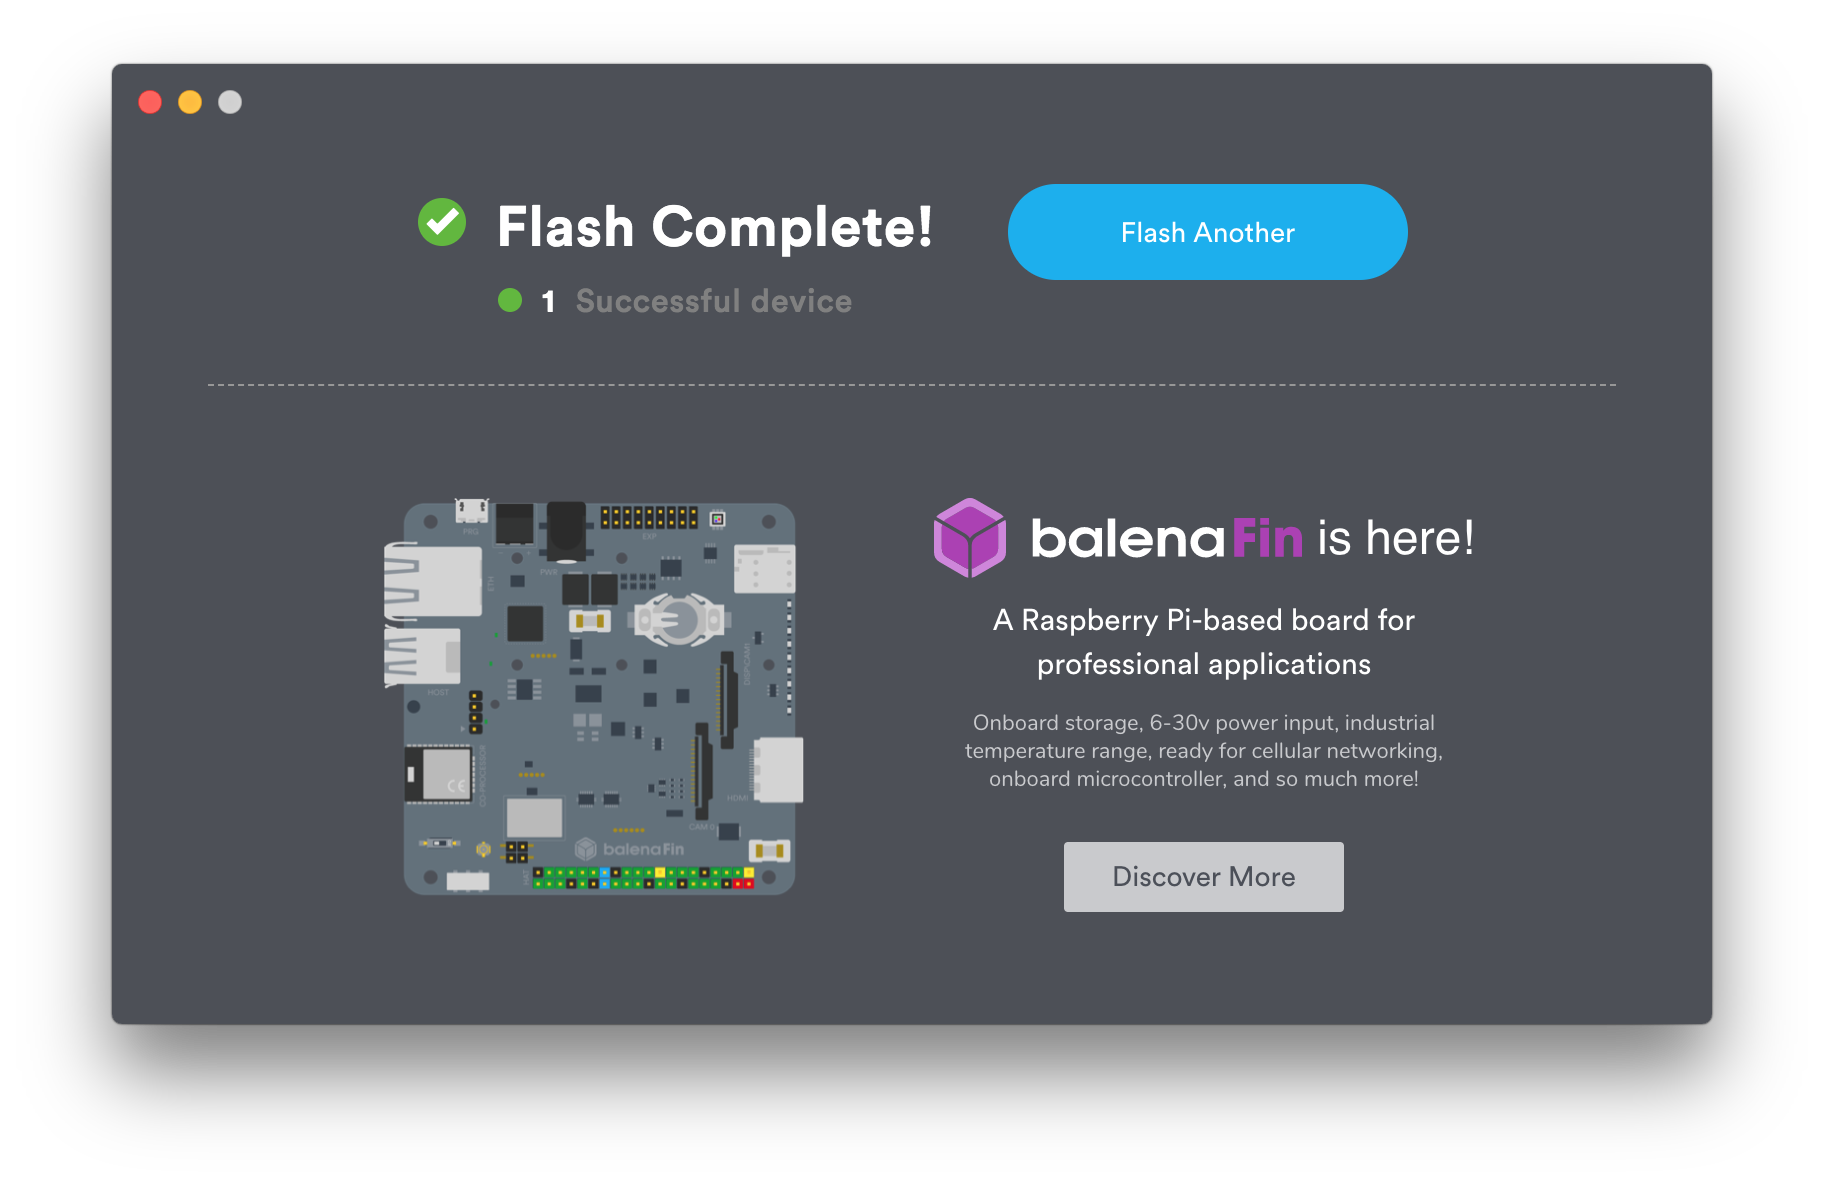
Finally, click Flash to start the process. A progress bar will appear:
5. Insert the SD card into your Bela system
When your SD card is finished, insert it into your Bela system. Plug your system in to your computer by USB and load up the IDE.
Flash an SD card using the command line
If you’re comfortable using the command line and you are on macOS or Linux, you can use this method. No extra software required!
1. Download the latest Bela software image
Download the latest Bela image release from our Github page. The downloaded file will be about 550MB.
Though updating your Bela system requires a ZIP file, you need to download the Bela software image to flash to an SD card.
2. Uncompress the Bela software image
When your download is complete, uncompress it. The uncompressed file will be about 4GB. Various GUI tools for uncompressing xz files are available for Linux, Mac and Windows, but you can also use the command line from a bash shell:
$ unxz -k bela_version_date.img.xz
3. Insert your SD card into your computer
You can use the SD card slot on your computer with an SD card adapter, or an external USB SD card reader.
4. Find the name of your SD card by listing your volumes
This step is crucial! The flashing process re-writes the device you choose, so make sure you double check the name and that you're sure you've specified your SD card.
On Linux, run the following command:
$ sudo fdisk -l
On Mac OS X, run:
$ diskutil list
This will list your volumes. At least one will be your computer’s hard drive, and one will be your SD card. If you’re not sure which is your SD card, eject it and list your volumes again - the volume that’s now not listed will be your SD card.
on MacOS, if your SD card is, e.g.: in /dev/disk3, you will be able to write to and read from the corresponding "raw" disk /dev/rdisk3 (note the additional r). This will make the copy faster.
5. Unmount your SD card partition
We assume for the rest of this document that your SD card is /dev/mydisk.
On Linux:
$ sudo umount /dev/mydisk
On Mac:
$ sudo diskutil unmountDisk /dev/mydisk
6. Write the image to the SD card.
Run the following command. (On a Mac, add an r to your disk name to increase writing speed, ie /dev/rmydisk):
$ sudo dd if=/path/to/inputFile.img of=/dev/mydisk bs=1024k
There is usually no command line output during this process, and it may take several minutes. To display the process, enter CTRL + T.
7. Verify the image
Once the dd command is finished, eject and re-insert the SD card into your computer. List your volumes as you did in Step 4.
If your SD card has flashed correctly, it will be listed as an external driver called BELABOOT.
8. Insert your SD card into your Bela system
Your SD card is ready! Insert it into your Bela or Bela Mini system, and you’re ready to go.
Booting Bela from the SD card
If you are using Bela Mini, a correctly flashed SD card should boot properly straight away. So if you are having issues with a Bela Mini it may be necessary to Reflash your SD card.
If you are using the original Bela this will normally come with the Bela image flashed onto the onboard memory (eMMC) of the board so there is no need to use an SD card. If you want to boot from an SD card instead of the onboard memory then your ability to do so will depend on the content of the in-built memory, or eMMC. The following conditions will mean that Bela will not boot correctly from the SD card and may not boot at all:
- Your BeagleBone Black has the factory-set BeagleBone image on the eMMC which will load instead
- You have Bela v0.3.4 or newer on your SD card, and Bela v0.3.3 or earlier image on the eMMC
In order to be able to boot from the SD card, use one of the following options:
Option A: use jumper wires
Use this if you have 3 jumper wires available.
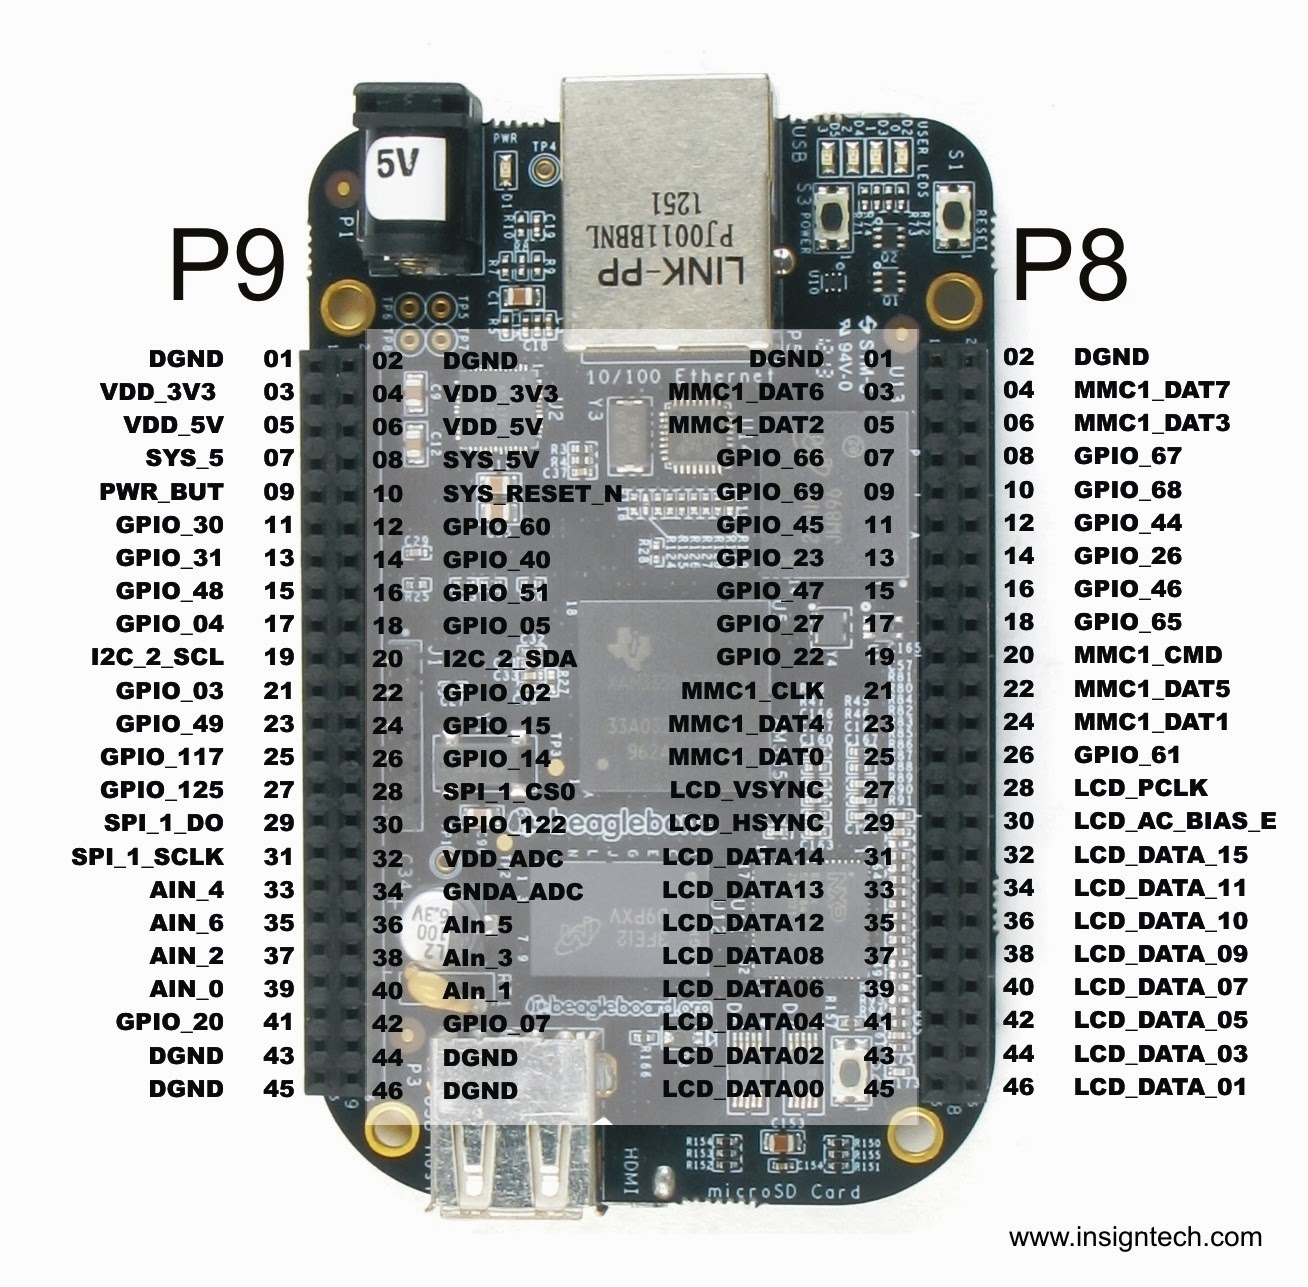
- connect P8_45 and P8_46 to 3.3V (P9_03 and P9_04) and connect P8_44 to GND (P9_01). Check out the pin diagram here.
- insert the SD card
- power on the board
- it will boot from the SD card
- jump to Common steps below to force the board to always boot from the SD card without the need for the jumpers
Option B: hold Boot button
Use this option if you do not have 3 jumper wires available.
- disconnect power from the board
- remove the Bela cape (see here)
- insert the SD card in the slot
- press the Boot button (labelled “S2”) on the BeagleBone (at the back just above the SD card slot) and hold it while powering up the Beaglebone.
- jump to Common steps below and come back here for the final two steps once you are done
- power off the board and put the Bela cape back on
- power on the board. It should now successfully boot from the SD card without need to press the USER button.
Common steps
- Once the board boots successfully, check that you can load the Bela IDE: open a web browser and go to the address bela.local/ (see here for more details). You should then run one of the following commands on the board (either in the console at the bottom of the Bela IDE, or after
sshing into the board):- if you have a Bela image on the eMMC and you want to keep using it in its current state:
/opt/Bela/bela_bootloader.sh. This should restore functionality of the image on the eMMC, but if there is an SD card inserted, it will boot from the SD card. - if you have a beagleboard.org image on the eMMC, or if you want to update the Bela image on the eMMC with the one that is on the SD card, then see the guide below to Flashing the eMMC.
- if you have a Bela image on the eMMC and you want to keep using it in its current state:
If you don't perform at least one of these actions, upon reboot the board will still attempt to boot from the eMMC unless you go through Option A or Option B again.
Flashing the eMMC
This section applies only to Bela, and not to Bela Mini. Bela Mini requires an SD card and does not have internal memory.
Bela uses a BeagleBone Black, which has a built-in eMMC. This means you can copy the Bela software to this eMMC using a flashed SD card. You then won’t need the SD card to boot up.
To flash the Bela eMMC, follow these steps:
1. Flash the Bela software to an SD card
This requires an SD card flashed with the Bela software. Flash an SD card of at least 8GB using the methods on this page: using Balena Etcher, or using your computer’s command line.
2. Insert the flashed SD card into your Bela and boot from it
Insert the flashed SD card, and boot up the Bela system. It will automatically boot from the SD card if there is already a Bela image on the eMMC. If you have a new Beaglebone Black or you are seeing a Beagleboard.org page when you load the IDE then please see the guide to booting from the SD card above.
3. Access the browser-based IDE
In a web browser (we recommend Chrome) access the Bela IDE (you can use bela.local, or use the IP for your OS).
4. Copy the image from the SD card to the eMMC
Run this line in the console at the bottom of the IDE:
/opt/Bela/bela_flash_emmc.sh
To run this command, paste it into the console window at the bottom of the IDE which can be seen here and hit enter. Note: this will delete the content of the eMMC, so back up if you have anything on there.
The LEDs on the board will turn solid blue and the process of flashing the embedded memory (eMMC) will start. It may take up to 10 minutes for the process to complete.
6. Verify it all works
This tests if your image has been properly copied to the eMMC.
Once the LEDs go off and the console shows a success message, you can gracefully shutdown the board, remove the SD card and reboot it (now from the embedded memory). If everything goes fine, you no longer need the SD card for Bela and you can reuse it for whatever you need.
Backing up your SD card
If you simply want to download all projects and assets from your Bela system, go to
Settings , scroll down to Other System Functions, and click Download all projects. Your entire project directory will automatically download in a single ZIP file.
However, you might want to back up your entire Bela system as well as your project files (to use the SD card in another Bela system, for example, or as an emergency backup for a performance). This process creates a Bela software image of what’s on your Bela system, which can then be flashed to an SD card. The instructions below should work for macos and Linux. Windows users could use Balena Etcher instead.
1. Insert your SD card into your computer
You can use the SD card slot on your computer with an SD card adapter, or an external USB SD card reader.
2. Find the name of your SD card by listing your volumes
This step is crucial! Make sure you double check the name and that you're sure you've specified your SD card.
On Linux, run the following command:
$ sudo fdisk -l
On Mac OS X, run:
$ diskutil list
This will list your volumes. At least one will be your computer’s hard drive, and one will be your SD card. If you’re not sure which is your SD card, eject it and list your volumes again - the volume that’s now not listed will be your SD card.
on MacOS, if your SD card is, e.g.: in /dev/disk3, you will be able to write to and read from the corresponding "raw" disk /dev/rdisk3 (note the additional r). This will make the copy faster.
3. Unmount your SD card partition
We assume for the rest of this document that your SD card is /dev/mydisk.
On Linux:
$ sudo umount /dev/mydisk
On Mac:
$ sudo diskutil unmountDisk /dev/mydisk
4. Make an image copy of the SD card
The following line will make an image copy of the disk SD card to the file mybackup.img. Remember to modify the paths /dev/mydisk and mybackup.img below as appropriate
$ sudo dd if=/dev/mydisk of=mybackup.img bs=1024k
This may take a few minutes to complete. No progress indication is displayed on screen, you will just have to wait for the process to end.
Now that you have a .img file that contains your entire Bela system and projects, you can flash it to an SD card using the instructions on this page, either by continuing with the command line approach or using Balena etcher as described above. Note that Balena etcher does not currently allow you to copy from an SD card so it is necessary to use the command line for this part of the work.
The following are optional steps which would reduce the size of the .img file:
a. (optional) Fill the empty space with zeroes
Before backing up the data, if you are planning to compress your image file (e.g.: for sharing over the network, or for archiving), you may want to run the following commands, which fills the unused space with zeroes, so that the compressed file will have a smaller size.
# create a file and fill it with zeroes
$ sudo dd if=/dev/zero of=/path/to/the/mounted/sdcard/bigfile bs=1024k
# delete the file you just created
$ sudo rm /path/to/the/mounted/sdcard/bigfile
To run the commands above you need to be able to mount the ext4 partition on the SD card. Note that it is not advised to run these commands on the drive where your running operating system resides, as it could become unresponsive. If you have to do so, then make sure you set a count= parameter to dd with the number of block of size bs that need to be written. Set this value so that you fill, e.g.: 99% of the space, but not all of it.
b. (optional) Determine the amount of data you need to copy
In case your partition is smaller than the size of the SD card, you do not need to backup the whole card, so if this is the case, you can follow the steps below. You wouldrun these commands while being logged onto the Bela system, before any of the other steps:
$ fdisk -u -l /dev/mmcblk0
You will get something along the lines of
            Device Boot      Start         End      Blocks   Id  System
    /dev/mydisk1     *          63      144584       72261    c  W95 FAT32 (LBA)
    /dev/mydisk2            144585     3743144     1799280   83  Linux
You are interested in the highest value in the “End” column. This number is the number of 512-bytes blocks used on your SD card. Pass that value to dd as the count parameter, and set the bs= parameter to 512:
$ sudo dd count=3743144 if=/dev/mydisk of=outputFile.img bs=512
the above is going to be slow because of the small block size. To speed up the copy process, you can increase bs and decrease count correspondingly, ensuring that their product stays the same.
Resizing filesystems on an existing SD card
The images that we provide use smaller filesystem sizes, so that they can be flashed on a small SD cards and also on the BeagleBone’s internal eMMC which is just under 4GB. On the other hand, this means you will not be able to use all of the space available on your SD card if it is larger than the size of the image. In order to use all of the space available on your SD card you will need to resize your partition or create a new one.
In this section we are going to show you how to resize the filesystem on your SD card from the command line, from within the BeagleBone itself. If you prefer to use a GUI tool, you can consider GParted, if you are on Linux, or GParted live on a USB stick otherwise.
So, let’s get started:
for the rest of this guide, we assume that your BeagleBone’s network address is 192.168.7.2 and the username is root. You may have to change these values according to your configuration.
NOTE: Needless to say, by following the instructions below YOU MAY LOSE ALL YOUR DATA, so make a backup of your SD card first. Also, note that you cannot use the procedure below to shrink a live filesystem, only to expand it. Shrinking an existing filesystem would cause data loss even if the amount of space in use on the disk is smaller than the new size.
- Make sure the SD card is properly inserted, connect your BeagleBone to your computer and wait about 30 seconds
- Open up a terminal window and make sure you can connect to the BeagleBone by typing
$ ssh root@192.168.7.2 - You should now be displayed the prompt
root@bela - Run
$ fdisk /dev/mmcblk0where
/dev/mmcblk0is the device file corresponding to your SD card. You are promptedCommand (m for help):You can now have a look at the help pressing m, if you want.
- Press p to check the current state of the disk. You will see something like this (note: the actual values displayed depend on the size and content of your SD card).
Disk /dev/mmcblk0: 7969 MB, 7969177600 bytes
4 heads, 16 sectors/track, 243200 cylinders, total 15564800 sectors
Units = sectors of 1 * 512 = 512 bytes
Sector size (logical/physical): 512 bytes / 512 bytes
I/O size (minimum/optimal): 512 bytes / 512 bytes
Disk identifier: 0x000a671b

      Device Boot      Start         End      Blocks   Id  System
/dev/mmcblk0p1   *          63      144584       72261    c  W95 FAT32 (LBA)
/dev/mmcblk0p2          144585     6289407     3072411+  83  Linux
The value in MB at the top is the size of your SD card, while the Start and End columns are the boundaries of the partitions, expressed in the Units displayed on the third line (512bytes in this case), while Blocks is the number of blocks in the partition (the unit for Blocks is, confusingly, 1024bytes).
The two partitions /dev/mmcblk0p1 and /dev/mmcblk0p2 are the small FAT32 boot partition (a few MB) and your root filesystem, respectively.
In this example you can see that /dev/mmcblk0p2 ends at 6289407*512=3220176384 bytes, that is about 3GB. So there are about 5GB unused in this SD card.
- We now need to delete the large Linux partition and recreate it. The first sector of the new partition will need to match the one of the old partition, so make a note of the values in the Start column above. Also, the End value of the new partition will have to be greater or equal than the value in the End column.
NOTE: changes made within fdisk are not applied to disk until they are written in the final step, so it is safe to exit (using ctrl-C) at any time.
So let us press d to delete a partition. The successive prompt:
Partition number (1-4):
asks which partition to delete. We want to delete the large Linux partition, which is partition 2 from the list above.
- Now we create a new primary partition by pressing n.
Command (m for help): n
Partition type:
 p   primary (1 primary, 0 extended, 3 free)
 e   extended
Select (default p):
we want to create a primary partition so we can just press enter. The next prompt is for the partition number:
Partition number (1-4, default 2):again, we are happy with the default value of 2, as it matches the value of the old partition, so we can just press enter.
Now we need to set the First sector of the partition. This HAS TO match the value of the old partition, which you read earlier. Make sure that either the default value is ok or you enter the correct Start value of the old partition before pressing enter.
First sector (144585-15564799, default 144585):
Last, we are asked for the Last sector. This is the one value that ultimately sets the size of the partition. Again, the value entered here should be greater than End value of the old partition (and NOT the blocks columns), otherwise data loss will occur.
Last sector, +sectors or +size{K,M,G} (144585-15564799, default 15564799):
Again, this value is in 512bytes sectors and the size of the partition will be ( Last sector - First sector )*512bytes. The default value will resize your partition to occupy all the space available on disk. Enter your value of choice, or accept the default, and press enter.
On recent versions of fdisk you may see the following:
Created a new partition 2 of type 'Linux' and of size 14.4 GiB.
Partition #2 contains a ext4 signature.

Do you want to remove the signature? [Y]es/[N]o:
Type N and hit enter.
- Almost done!
If you now use the p command again, you will see your partition with its the new size
Disk /dev/mmcblk0: 7969 MB, 7969177600 bytes 4 heads, 16 sectors/track, 243200 cylinders, total 15564800 sectors Units = sectors of 1 * 512 = 512 bytes Sector size (logical/physical): 512 bytes / 512 bytes I/O size (minimum/optimal): 512 bytes / 512 bytes Disk identifier: 0x000a671b Device Boot Start End Blocks Id System /dev/mmcblk0p1 * 63 144584 72261 c W95 FAT32 (LBA) /dev/mmcblk0p2 144585 7553023 3704219+ 83 Linux - Spend one second to check again that Start matches the one of the old partition and End is greater or equal than the old value. Once you are sure everything is alright, press w and enter to write your changes to disk.
You will then see something like this
Command (m for help): w
The partition table has been altered!

Calling ioctl() to re-read partition table.
Re-reading the partition table failed.: Device or resource busy

The kernel still uses the old table. The new table will be used at the next reboot or after you run partprobe(8) or kpartx(8).
Nothing to be worried about.
- We now need to reboot:
$ reboot - After reboot, you can ssh back into the board with
$ ssh root@192.168.7.2 - Now the partition size has changed, but the filesystem hasn’t yet. You can run
$ resize2fs /dev/mmcblk0p2to extend the filesystem to use the whole partition.
The output of the program will look like this
resize2fs 1.42.5 (29-Jul-2012)
Filesystem at /dev/mmcblk0p2 is mounted on /; on-line resizing required
old_desc_blocks = 1, new_desc_blocks = 1
The filesystem on /dev/mmcblk0p2 is now 926054 blocks long.
- Done! You can test the size of your filesystem with
$ df -h /which will return something like:
Filesystem      Size  Used Avail Use% Mounted on
/dev/mmcblk0p2  3.5G  1.9G  1.5G  57% /
The Size column tells you the size of the filesystem you extended. The G unit stands for “gigabyte”.
Accessing the other card
Whether you are running the operating system, the IDE and the Bela program out of the SD card or the eMMC (the embedded storage), you can still access the one storage device from the other.
They will both show up in your /dev/ folder:
$ ls /dev/mmcbl*
/dev/mmcblk0  /dev/mmcblk0p1  /dev/mmcblk0p2  /dev/mmcblk1  /dev/mmcblk1boot0  /dev/mmcblk1boot1  /dev/mmcblk1p1
The device you booted from will be /dev/mmcblk0 and the other will be /dev/mmcblk1. The file systems are denoted by the sub p1, p2, boot0, boot1 etc.
The p0 partitions are the ones that contain configuration files useful for boot and the Linux kernel. /dev/mmcblk0p1 is the device that would show up on your host computer as BELABOOT when you connect Bela to it.
The p1 partitions are about 3.5G large by default and will contain most files for the operating system, programs, your home folder and - in the case of a Bela image - the Bela files.
Typically you may want to access the “big” partition on the other device, that is /dev/mmcblk1p1.
In order to access those files you need to mount it somewhere in your filesystem. For instance, let’s mount it in /root/other/:
(run these commands after you ssh into the BBB from a terminal, or directly in the console at the bottom of the IDE)
- create the destination folder if it does not exist:
mkdir -p /root/other - mount the partition:
mount /dev/mmcblk1p2 /root/other - you can now access the files stored on the mounted partition, e.g.:
$ ls /root/other/
bin  boot  dev  etc  home  lib  lost+found  media  mnt  opt  proc  root  run  sbin  selinux  srv  sys  tmp  usr  var
Use case
At this point, say that you are running out of space in the device you booted from and you want to write a big file in the home folder of the mounted partition, you would write to file /root/other/root/mynewbigfile.
NOTE: you will need to re-mount the partition after every reboot, or set a rule in fstab to automatically do that.
Having trouble?
Check out our Troubleshooting Guide for info on common SD problems, or check the Bela Forum.