Delays
Repeating sound in time
In the next tutorials we are going to explore ways of manipulating sound, whether through applying effects that change the quality of a sound or through sampling audio and manipulating the playback. This first example focuses on delay effects.
Table of contents
Delaying signals
Delays, echos and reverb effects all have a shared principle: Sound is repeated after a certain period of time has elapsed. A common example of delay is an echo, which you might have experienced when shouting at a mountainside and hearing your voice being repeated back some seconds later. In this example your voice might only repeat once or twice.
When we hear a loud sound in a cathedral or other large interior space we hear a more complex delay effect, such as a long reverb tail that follows the sound event for a second or two. In this case we can’t pick out individual repetitions of the sound because there are so many of the them happening at once, as the sound is reflected from many different surfaces in the space made of many different materials and repeated back to our ears. Because these reflections all arrive at our ears at slightly different times - in other words, each reflection has some different amount of delay - it produces the effect of reverberation.
In this example we will look at a delay effect that is somewhere between these two extremes: A classical delay effect with feedback that can produce many familiar sound effects, from warm dub delays to sci-fi weirdness.
Hardware setup
The hardware required for this example is straightforward: Two analog sensors connected to the first two analog inputs of Bela and an electret mic capsule connected to the left audio input channel. We’re using an FSR and a potentiometer, but you can use any analog components you have:
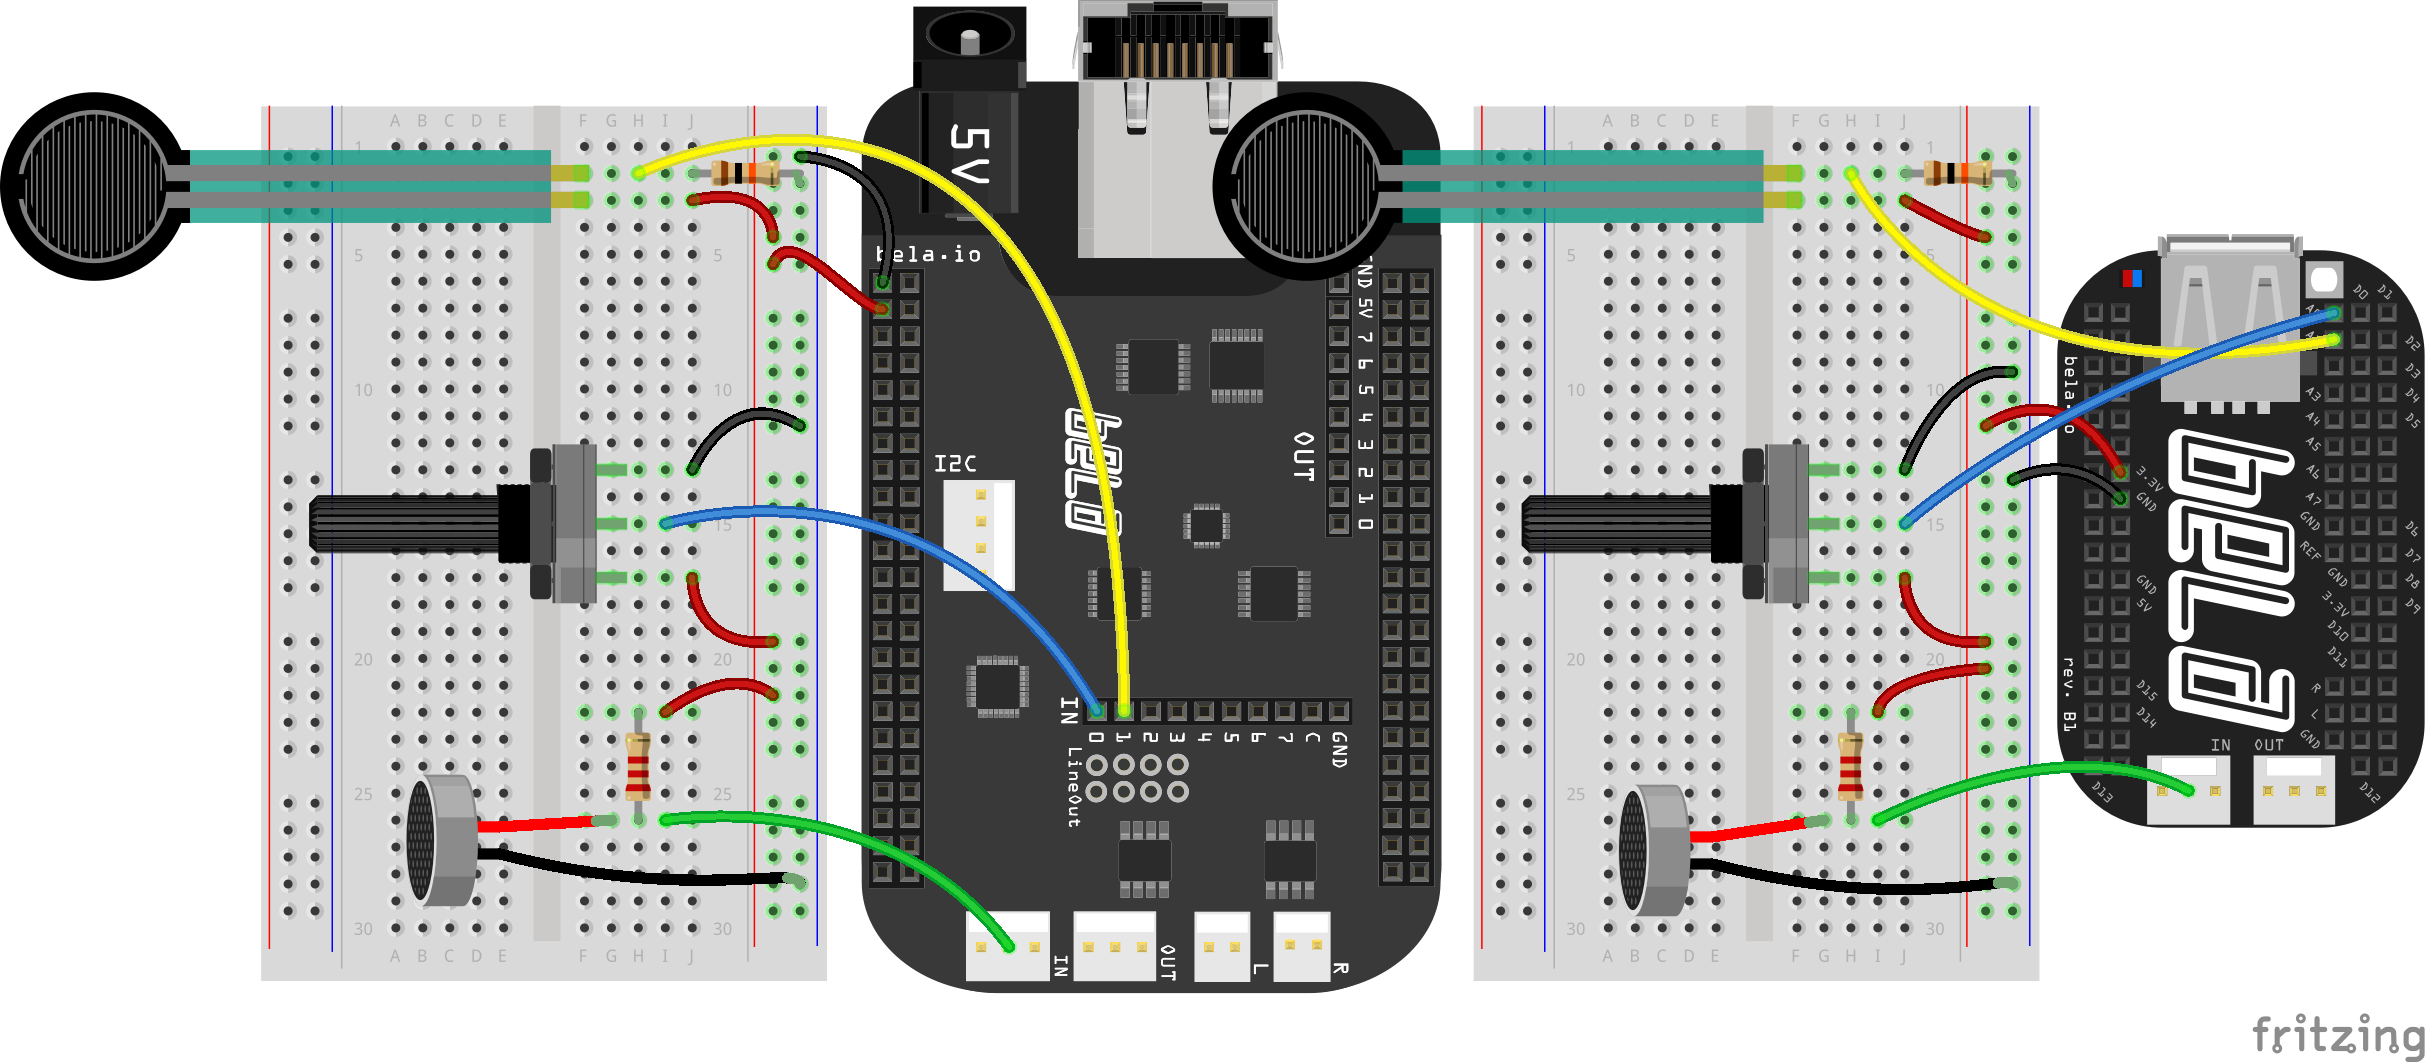
The electret microphone capsule is a new component. This tiny microphone capsule consists of a small membrane inside the metal casing. This membrane is similar to a drum skin, or our ear drums. As sound waves hit the top of the capsule the membrane vibrates, moving back and forth at the same speed as the fluctuations of the air caused by the sound energy. As the membrane moves back and forth it generates a fluctuating voltage which we can capture on Bela – this is our audio signal!
Note that the electret microphone capsule is polarised, meaning that it must be oriented correctly on the breadboard. If you look at the bottom of the microphone where the pins are you will see that one of the pins is connected to the outer casing of the capsule - this is your ground pin. We’ll connect the other pin to to 3.3V through a 2.2K resistor to give the mic power. This pin is also where we take our reading.
Note that in this example we are connecting the mic to the audio input. To do so you’ll need a jumper that has a pin on one side and a socket on the other.
The code
Find the delay-effect sketch in the Pure Data section of the Examples tab of the Bela IDE.
1. Storing audio in memory
We can produce delay by playing back sound after a set period of time has passed. When echos occur naturally the sound waves are travelling great distances before bouncing off something and travelling back to our ears. In the digital world, we don’t have the great physical expanses for our sound waves to travel across; instead, we want to store the audio in memory so we can replay it at a later point.
We can save audio for later playback in a buffer. A buffer is an array of numbers that represent the values of the audio over time.
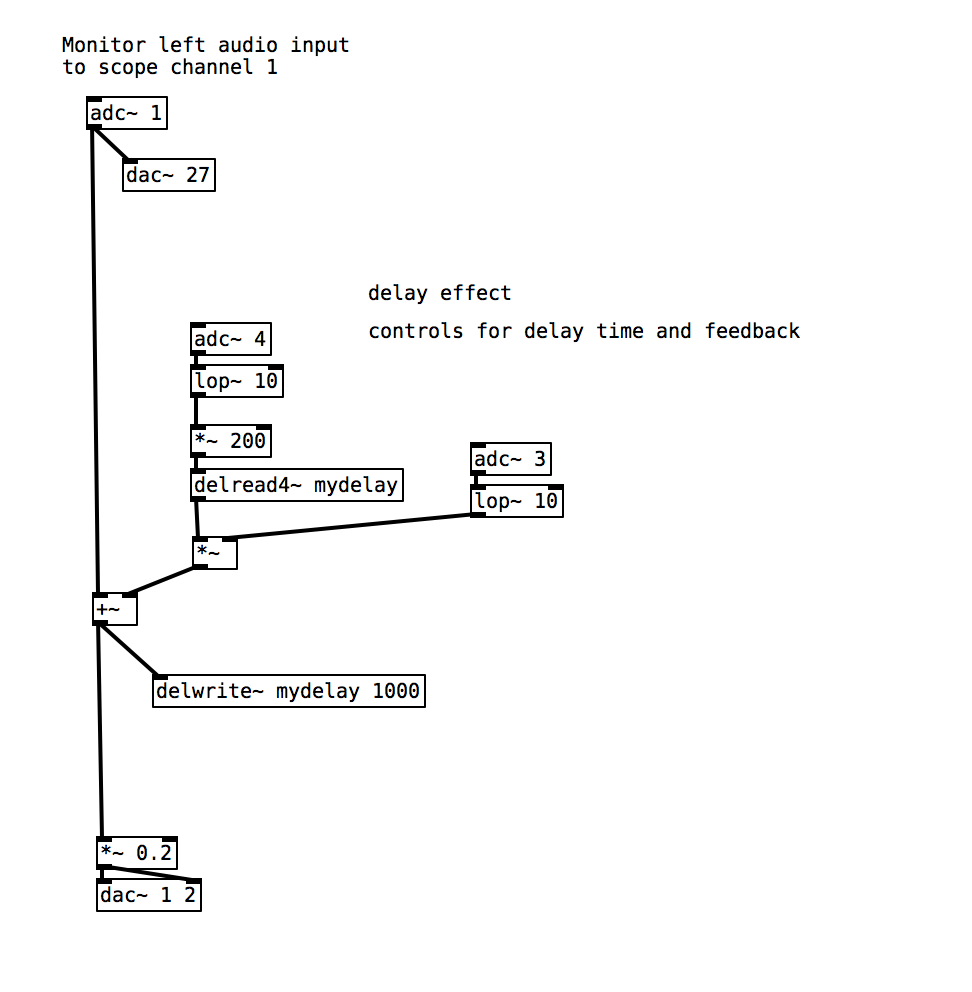
In this patch we use the [delwrite~] object to store audio in memory. This object is towards the bottom of this patch, and it has two arguments: First, the name of buffer where we’ll store the audio (mydelay), and second, the amount of audio we want to store (this amount is in milliseconds, so our argument of 1000 represents 1000ms, or 1 second). This object will continually remember the last one second of audio that it receives through its top inlet.
2. Recalling audio from memory
We use the [delread4~] object to read back the audio we’ve stored, and we need to tell it the name of our buffer so it knows what to read (mydelay). The top inlet of this object controls the delay time, which is the number of milliseconds after the initial sound that we should wait before reading from the buffer (the maximum value here is 1000, as that is the size of our buffer). In this case we’re controlling it with the analog sensor connected to [adc~ 4].
3. Feeding the signal back on itself
We can create more interesting delay effects than just a single repeated echo by feeding the delayed signal back into the buffer. In this patch we are using [adc~ 3] to control the amount of feedback we have in the system.
Practice tasks
Task 1: Check the microphone is working
Run the sketch, plug your headphones into the audio adapter cable into the audio output port, and check for sound. If you can't hear anything the audio input is connected to the scope in the browser, so you can open the scope and see if you can see the signal there (launch the scope using the button in the toolbar). If you're not seeing anything on the scope, check the orientation of your mic capsule. You can also increase the gain on the audio input in the browser by increasing PGA Gain Level in the Settings menu of the Bela IDE (note that this is in decibels).
Task 2: Create infinite feedback feedback
Open the feedback path fully with [adc~ 3] and change the length of the delay line with [adc~ 4]. What do you hear?
Task 3: Try out very short delay times
Try playing recognisable pitch with the delay line. In one of the next examples we will look at a technique for recreating the sound of a plucked string which uses very short delay times with feedback.